
NHSmail Portal Administration: Common Data Service (Dataverse) and Common Data Service for Teams (Dataverse for Teams) Toggles
The O365 Common Data Service, and Common Data Service for Teams are also known as Dataverse, and Dataverse for Teams. Both names are used throughout this guidance. However in the Portal the toggles are: Common Data Service and Common Data Service for Teams.
Common Data Service (Dataverse) is a secure, cloud-based storage space that organisations can use to store and manage business application data. It uses Azure Active Directory identity and access management mechanisms to help ensure that only authorised users can access the environment, data, and reports. Common Data Service (Dataverse) can be utilised through other Microsoft services, such as the Power Platform i.e. Power Apps, Power Automate and Business Process Flows.
Common Data Service for Teams (Dataverse for Teams) is a built-in, low-code data platform for Microsoft Teams that empowers users to build custom apps, bots, and flows in Teams by using Power Apps, Copilot Studio, and Power Automate. The Common Data Service for Teams (Dataverse for Teams) environment is therefore used to store, manage, and share team-specific data, apps, and flows.
Please refer here for more information Dataverse and Dataverse for Teams – NHSmail Support
The toggles for Common Data Service (Dataverse) and Common Data Service for Teams (Dataverse for Teams) are visible to all Local Administrators. They are shown to highlight that Common Data Service (Dataverse) and Common Data Service for Teams (Dataverse for Teams) is available to use, store and manage data for applications. The functionality can be disabled (toggled off) alongside other services such as OneDrive should the organisation wish to restrict functionality.
We do not recommend that Common Data Service (Dataverse) or Common Data Service for Teams (Dataverse for Teams) is toggled off as it may adversely affect Power Platform services and other Microsoft services, such as Power Apps, and Power Automate. When this capability is turned off, any application reading data from Common Data Service (Dataverse) or Common Data Service for Teams (Dataverse for Teams) will fail to load for the user(s).
Security groups
Security groups allow an organisation’s Primary Local Administrator (PLA) Local Administrator (LA) to control which licenced users can be a member of a particular environment.
When a security group is associated with an environment, users in the platform that are not members of the group will not have access to the environment or shared applications and flows.
Once a security group has been setup, it is easy to manage users in the environment. Adding and removing users from a security group enables or disables those users to the database environment respectively.
The table below outlines some examples:
| Environment | Security Group Name | Description |
| NHSmail Finance | Finance_SG | Created to provide access to the environment that processes internal financial information and payroll. |
| NHSmail Nursing | Nursing_SG | Created to provide access to the environment that stores health data (for example: blood test results, etc.) |
| NHSmail Dev | Developer_SG | Created to provide access to the Sandbox environment used for development and testing. |
The environments in these examples have a specific purpose and should not be accessed by general users of the tenant. Rather, only specific users relevant to the use case should be assigned and managed by the security group.
Note, all licenced users must be assigned security roles to access environments. Users cannot access environments until they are assigned at least one security role for that environment. Apps and flows can be shared with the security group assigned to the environment.
For more information, please see further guidance outlined in the section on Role Based Access Control (RBAC).
NHSmail policy
Organisations will have their own dedicated environment to host applications and flows. To manage access to the Power Platform, all NHSmail dedicated environments must be associated with a security group.
To find out if a dedicated environment and security group has been set up for your organisation, please contact your organisation’s Primary Local Administrator (PLA) or Local Administrator (LA).
It is the PLAs or LAs responsibility to manage and maintain their organisation’s security group.
Creating a new security group
Security groups will follow the “ODS CODE_PowerPlatform_SecurityGroup” naming convention.
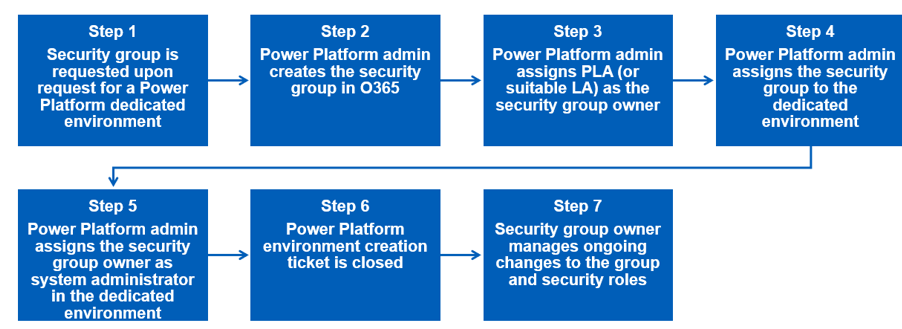
See below for an overview of the process:
Managing a security group
Please refer to the Managing NHSmail Security Groups article .
Adding users to the security group
 Select add members and type the name or the email address of the users that you want to add to the security group in the search bar.
You may add multiple users to a security group at once if they are part of a static distribution list by searching for the distribution list in the search bar.
Granting a security group member access to a Power Platform environment
Once users have become part of the security group assigned to the organisation’s dedicated environment, they will need to be granted access to the Power Platform environment.
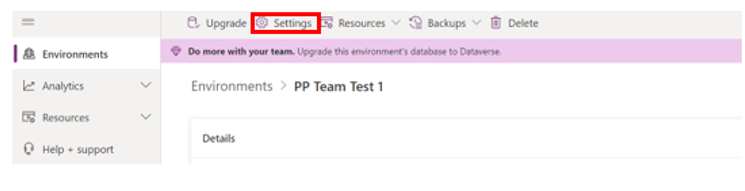 Navigate to the Power Platform admin centre – Environments page and click on the environment that the user needs to be granted access. Next, click on the settings icon.
 Select Users + permission to open the options. Next, click on Users and finally select + Add user. Type in the user’s name or email address to add the user to the environment.
Please note that for users to be successfully added to the environment they will have to comply with the user access requirements outlined in the red box above. Once added to the environment, users will need to be assigned a security role.
Role Based Access Assignment in a Power Platform Environment using Security Groups and Teams
Security Groups
Security groups play a crucial role in ensuring secure access to Power Platform environments. These groups serve the primary function of managing and regulating user access, particularly concerning user-specific environment permissions.
Please refer the Microsoft documentation: Control user access to environments: security groups and licenses – Power Platform | Microsoft Learn
Power Platform Teams
In situations where we have a sizeable team with, for example, 30 members, and we need to assign a specific security role to a subset of 10 users, creating a Team becomes a strategic approach. By creating a Power Platform Team and assigning those 10 users to it, we can efficiently manage their access permissions. Subsequently, we can assign the desired security role to the entire Team, streamlining access control based on the security role we have established.
Please refer the Microsoft documentation: Teams in Dataverse – Power Platform | Microsoft Learn.
1.Sign in to the Power Platform admin center.
2. Select an environment, and then select Settings > Users + permissions > Teams.
3. Select + Create team.
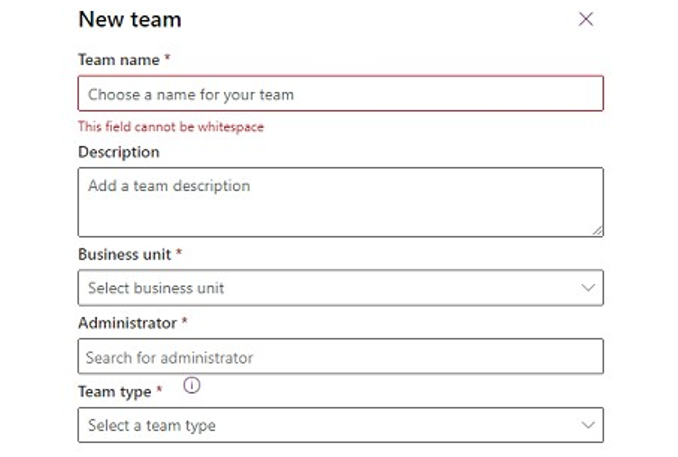
4. Specify the following fields:
-
- Team name: Be sure this name is unique within a business unit.
- Description: Enter a description of the team.
- Business unit: Select the business unit from the dropdown list.
- Administrator: Search for users in the organization. Start entering characters.
 Team type: Select the team type from the dropdown list
5. If the team type is Azure AD Security group or Azure AD Office group (M365 Group) , you must also enter these fields:
- Group name: Start entering text to select an existing Azure AD group name. These groups are precreated in Azure AD or Portal.
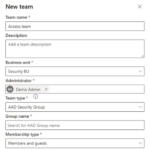 Membership type: Select the membership type from the dropdown list. See How Azure AD security group members match to Dataverse group team members.
After you create the Power Platform Team, you can add team members in Teams group or Security group and select corresponding security roles.
Manage the security roles of a team
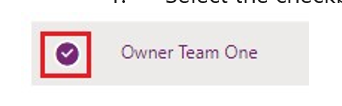 1. Select the checkbox for a team name.
2. Select Manage security roles.
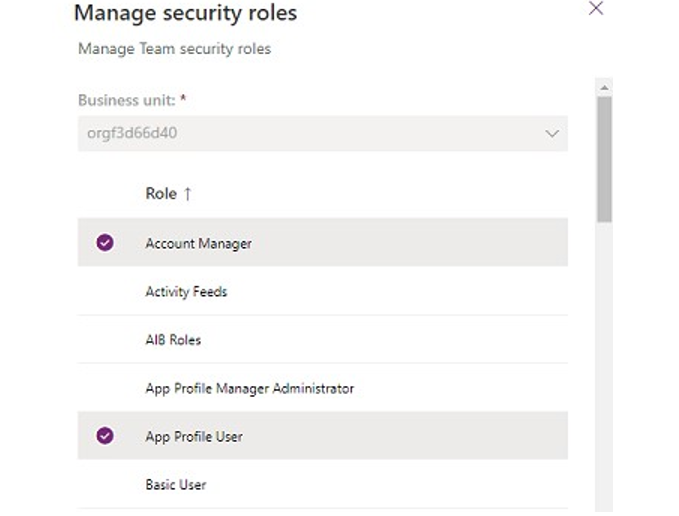
3. Select the role or roles you want, and then select Save.
Edit a Power Platform group team
1. Make sure that you have the System Administrator security role or equivalent permissions.
2. Sign in to the Power Platform admin center.
3. Select an environment, and then select Settings > Users + permissions > Teams.
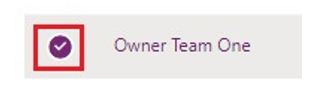
4. Select the checkbox for a team name.
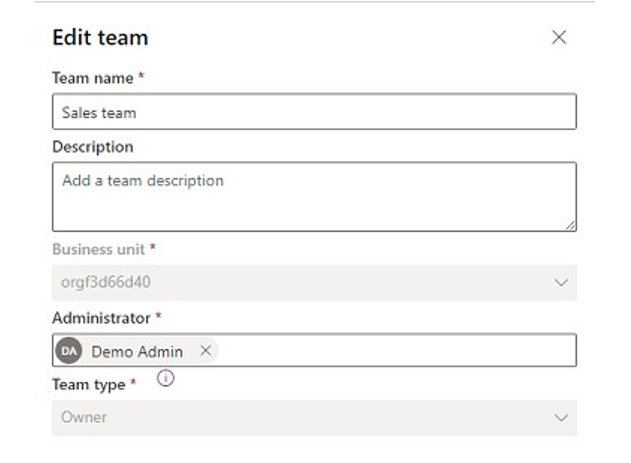 5. Select Edit team. Only the Team name, Description, and Administrator are available for editing
6. Update the fields as required, and then select Update.
Delete a team
1. Sign in to the Power Platform admin center.
2. Select an environment, and then select Settings > Users + permissions > Teams.
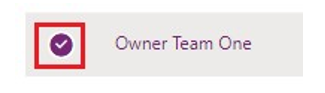
3. Select the checkbox for a team name.
4. Select Delete twice to confirm. Note that this action can’t be undone.
Removing users
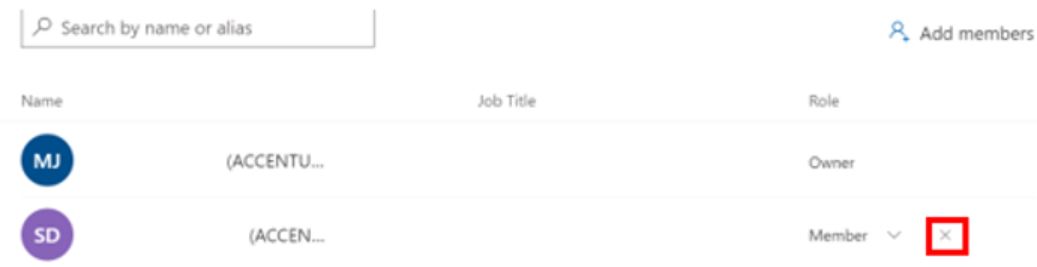 Members of a security group will appear under the “members” tab. To remove users from the group, select the “x” icon as shown below. Note, it is only possible to remove users individually.
Changing user rights from group “member” to “owner”
Members of a security group can be promoted to group “owner”. By granting this role, the user will have the ability to add, remove and update user rights of other members.
It is recommended that only Primary Local Administrators (PLAs) have the group “owner” role. If the organisation does not have a PLA, then a suitable Local Administrator (LA) should assume the “owner” role.
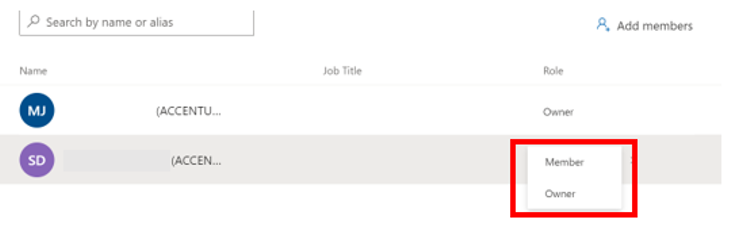 To change the user role from “member” to “owner”, locate the user in the list of group members, click on the user role and select from the drop-down the new role.
Creating a static distribution list
To bulk upload a large group of users into a security, you must create a static distribution list.
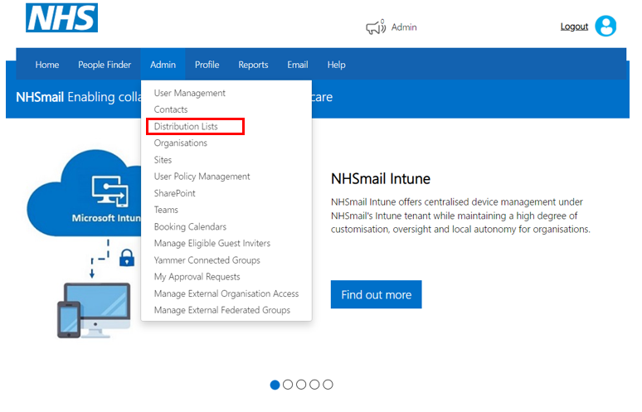 1. Login to NHSmail Portal and navigate to Admin. Select Distribution List from the dropdown and then select Static Distribution List.
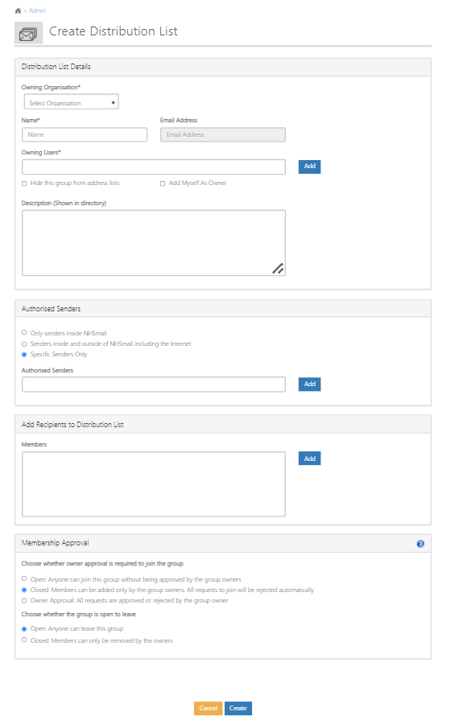 2. Create a new distribution list by filling in the mandatory information including, Name, Organisation and Organisational unit. Then click Create.
Note: bulk upload is only possible after the distribution list is created.
 3. Once created, select edit distribution list and then Add Recipients.
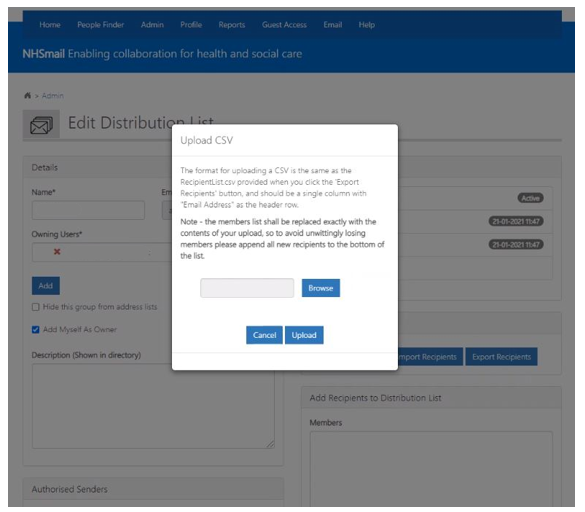 4. The message below will appear. At this point you can bulk upload users using a .csv file of email addresses
5. Once the file has uploaded, click Upload.
Service principles
Please note, service principles are currently not available in the NHSmail central tenant.
Please see the NHSmail Roadmap or email Customer Service Portal – Customer Support (digitalservices.nhs.uk) for further information.
Role Based Access Control
Overview
Microsoft Dataverse uses a role-based security model to help secure access. Security roles control a user’s access to an environment’s resources through a set of access levels and permissions. A security role must be assigned to any licenced user within the security group to access environments.
Security roles
The view of applications and data inside a dedicated organisation environment will be limited depending on the specific security role each user is assigned.
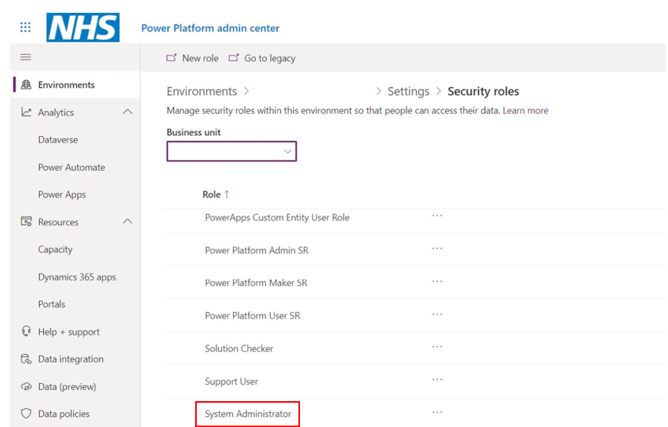
An organisation’s Primary Local Administrator (PLA) or Local Administrator (LA) is responsible for managing licences, environments and Data Loss Prevention (DLP) Policy for their dedicated environment. All other users will be either assigned a Basic User or Environment Maker role.
The three types of security roles are outlined in the table below.
| Security Role | Applicable to | Scope and Responsibilities |
| Basic User | All other users | For users who can access Power Platform but cannot create/share/edit resources in the environment.
Access to the environment only, cannot view applications & flows unless explicitly shared. |
| Environment Maker | All other users | For users who can access Power Platform but can create/share/edit resources in the environment.
Can create new resources associated with an environment, including applications, connections, custom APIs, gateways, and flows. |
| System Administrator | LAs | Management of licencing, environment and the resources located in the environment.
Has full permission to customise or administer the environment and can view all data in environment |
The level of access and permissions for each role are highlighted below:
Can create new resources associated with an environment, including applications, connections, custom APIs, gateways, and flows.
| Role | Environment name visible | Play Apps | Edit Apps | Apps visible in admin centre | View shared app |
| Basic User | X | X | X | X | ✓ |
| Environment Maker | ✓ | ✓ | ✓ | ✓ | ✓ |
| System Administrator | ✓ | ✓ | ✓ | ✓ | ✓ |
How to assign a security role
As a Primary Local Administrator (PLA) or Local Administrator (LA) with System Administrator rights, you can assign security roles via the Power Platform admin centre.
A PLA or LA should only assign the roles supported for users in the organisation such as Basic User or Environment Maker. To request System Administrator rights, please see the section Request System Administrator access.
 1. Sign in to the Power Platform admin centre.
2. Select Environments.
3. In the Access tile, select See all under Security roles.
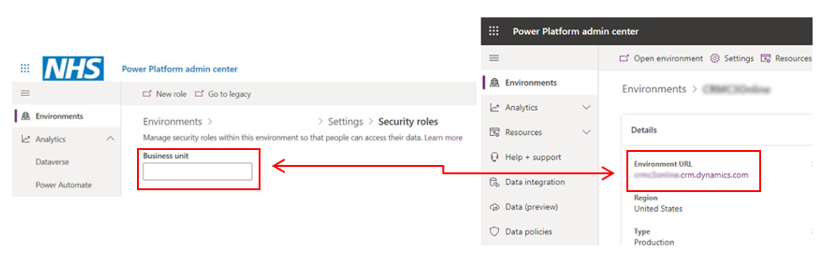 4. If you own multiple environments, make sure that the right Business unit is selected. The Business unit is the unique identifier for the environment (also known as Environment URL).
 5. If you own multiple environments,
 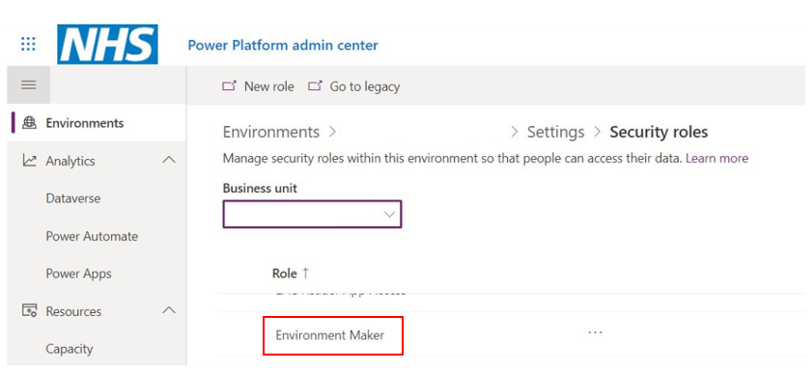 make sure that the right Business unit is selected. The Business unit is the unique identifier for the environment (also known as Environment URL).
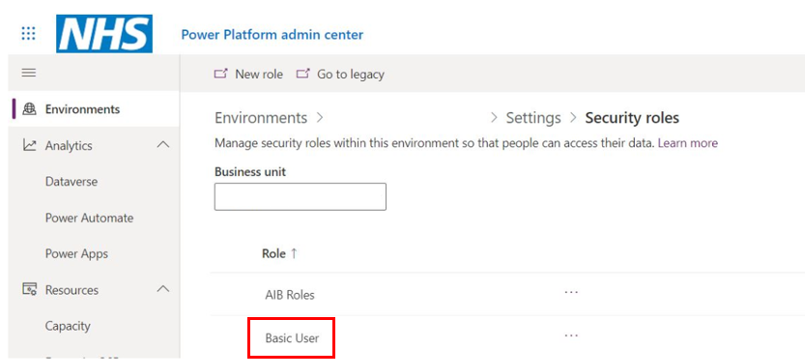
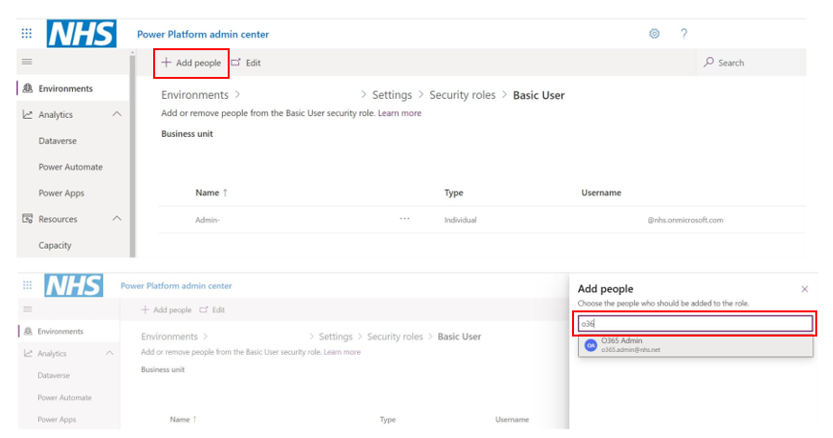 6. In example shown, we will add a person from the security group assigned to this environment to the role of Basic User by clicking on Add people.
Request system administrator access
Upon requesting a dedicated environment, the system administrator role will be assigned to the designated Primary Local Administrator (PLA) or Local Administrator (LA) who is the security group owner.
The PLA or LA assigned the System Administrator role can then add any additional System Administrators. To request system administrator access, contact your PLA or LA in the first instance.
If you have an issue with your System Administrator access, please email the NHSmail Helpdesk (with ‘Power Platform System Administrator Access’ in the subject line).
Please note, System Administrators roles are limited to PLAs or LAs and requests will be reviewed on a case by case basis. All other users should have one of the Security Roles outlined above assigned to them.
Data residency
The table below outlines the current residency of each of the components of the Power Platform.
| Environment | Data Residency |
| Default Environment | United Kingdom |
| Dataverse for Teams | United Kingdom |
| Dedicated environments for your organisation | United Kingdom |
Copilot Studio
Copilot Studio in Teams is available to users who have an Office365 Teams license. Everyone in a Team has access to the agents created using Copilot Studio in Teams and can be shared with other users by adding them to the Team.
Permissions are determined by your Microsoft Teams roles in the team where a bot is created:
1. Team Owners can create, view, edit, and configure all agents in the team where they are Team Owners.
2. Team Members can create, edit, and configure agents they have created. They can view other member’s agents in the team.
| Last Reviewed Date | 22/07/2025 |