Below you can find instructions on how to migrate your Apps and Flows from the NHSmail Default environment into your organisation’s dedicated environment.
Please note that instructions are different depending on the type of app or flow you wish to migrate. Use the navigation menu on the right-hand side of this page to view the relevant instructions for your app or flow.
Determine the type of app(s) or flow(s)
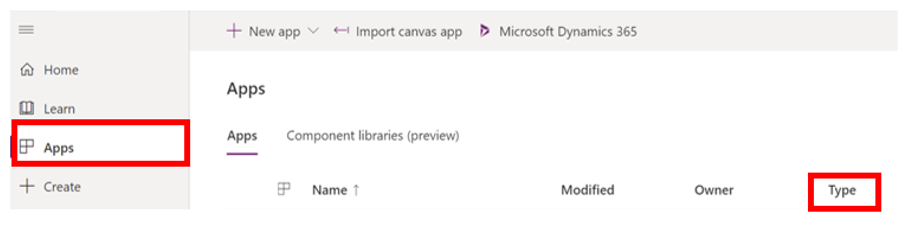 To determine your app type, go to Power Apps and look in the column Type in Apps
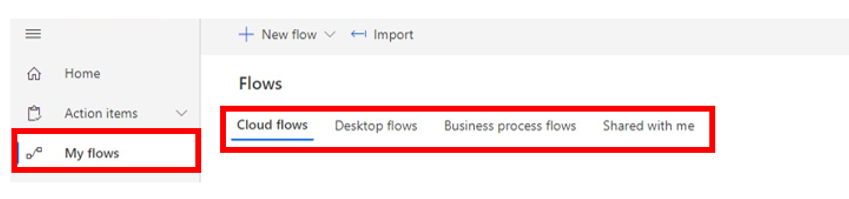 To determine your flow type, go to Power Automate and look in the different tabs in My flows
What happens when you export your apps and flows?
An app or flow might consume different resources to function. Please note that your export will include your app/flow infrastructure but may not include:
- Canvas apps and Cloud flows: custom connectors, connections, Dataverse customisations and gateways. These resources will need to be recreated in your organisation’s dedicated environment before the import process.
- Model-driven apps: as model-driven apps are packaged in a Solution, the apps data and connectors might be migrated with the apps. Please take steps to test and ensure that your apps have all the necessary resources to function in the new environment. This may include recreating resources in your organisation’s dedicated environment before the import process.
Migration considerations
Approvals
Approvals must be set up by the System Administrator in the organisation’s dedicated environment before users can use the Approvals connectors in their flows.
If you need to migrate a flow that uses the Approval connector, please contact your Primary Local Administrator/System Administrator and ask them to create a flow containing the Approvals connector so it is enabled in your organisation’s dedicated environment.
Visit Managing a security group to learn how to view the details of your System Administrator (security group owner).
Please note that you will not be able to connect your flow to an Approval connector from a different environment.
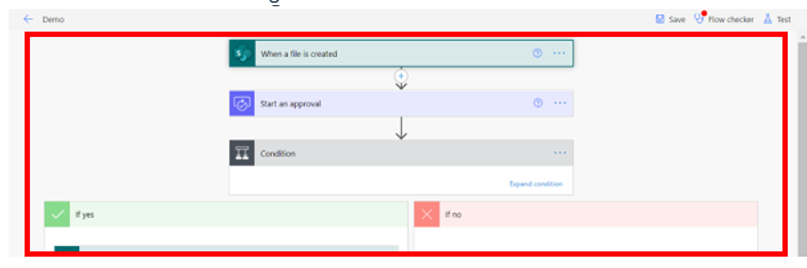
“Running” Flows
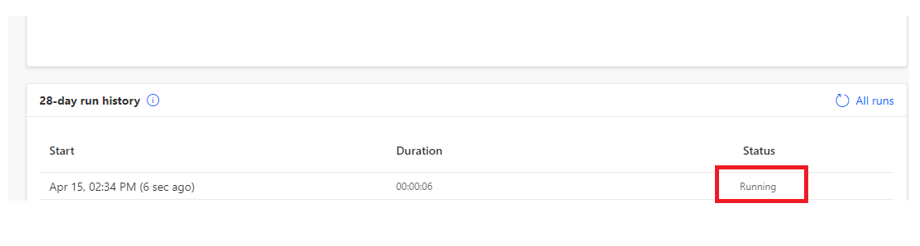 Please check your flow running history before starting the migration process. We recommend that you do not delete your flows from the NHSmail default environment while their status is “Running”.
Dataverse Tables
This guidance contains important information if your applications or flows integrate with Dataverse tables in one of the ways below:
- Your app or flow connects to a Dataverse custom table (i.e. a table you have created yourself), please note you must migrate your tables and data into your organisation’s dedicated environment along with your apps or flows.
- If your application or flow uses a Dataverse table in the default environment (e.g. Project entities), you will need to take the necessary steps to reconnect your app or flow to right data source.
SharePoint Approval Flows
It is a known Microsoft Product limitation that SharePoint Approval flows cannot be manually triggered in dedicated environments. Therefore, this type of Power Automate flows do not need to be migrated off the NHSmail Default environment and can remain there as an exception.
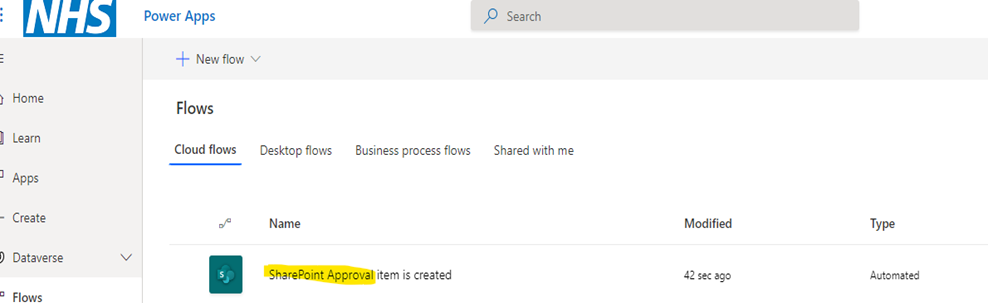 To continue to use SharePoint Approval flows on the Default environment please ensure the flow name will contain the phrase “SharePoint Approval” (case sensitive) as shown.
SharePoint Request sign-off Flows
It is a known Microsoft Product limitation that SharePoint Request sign-off flows cannot be manually triggered in dedicated environments. Therefore, this type of Power Automate flows do not need to be migrated off the NHSmail Default environment and can remain there as an exception.
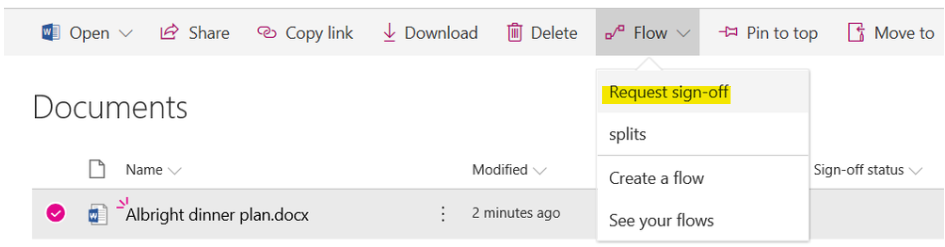 To continue to use SharePoint Request sign-off flows on the Default environment please ensure the flow name will contain the phrase “Request sign-off” (case sensitive) as shown.
Excel Flows
It is a known Microsoft Product limitation that Excel flows cannot be manually triggered in dedicated environments. Therefore, this type of Power Automate flows do not need to be migrated off the NHSmail Default environment and can remain there as an exception.
To continue to use Excel flows on the Default environment please ensure the flow name will contain the phrase “Excel” (case sensitive) as shown.
Planner Premium Portfolio Flows
It is a known Microsoft Product limitation that Planner Premium Portfolio flows cannot be manually triggered in dedicated environments. Therefore, this type of Power Automate flows do not need to be migrated off the NHSmail Default environment and can remain there as an exception.
To continue to use Planner flows on the Default environment please ensure the flow name will contain the phrase “Planner” (case sensitive) as shown.
Power Automate Flows created from Power BI
Similar to SharePoint Approval flows, Power Automate flows created within Power BI cannot be manually triggered in dedicated environments. Therefore, this type of Power Automate flows also do not need to be migrated off the NHSmail Default environment and can remain there as an exception.
 To continue to create and use Power Automate flows created within Power BI on the Default environment please ensure the flow name will contain the phrase “Power BI flow” (case sensitive) as shown.
Editing a flow name
 1. To edit your flow name, click on the title of your SharePoint Approval flow which should open the flow structure.
2. Click on the flow name in the top left corner
3. Edit the flow name accordingly to include the phrase “SharePoint Approval”
4. Save the flow
Please visit the Microsoft documentation on SharePoint Connectors for further information on the current Microsoft Product limitation on SharePoint Approval flows.
Migrating Power Apps
Canvas apps export
Follow the steps outlined below to download a .zip export of your canvas app. Please note the steps below will need to be repeated for each canvas app export:
 1. Go to Power Apps. If you are not automatically signed in, make sure you sign in with your nhs.net account
 2. Ensure that you are in the right environment by selecting the NHSmail Default environment as the environment in top right corner of the page
 3. Select Apps from the left panel
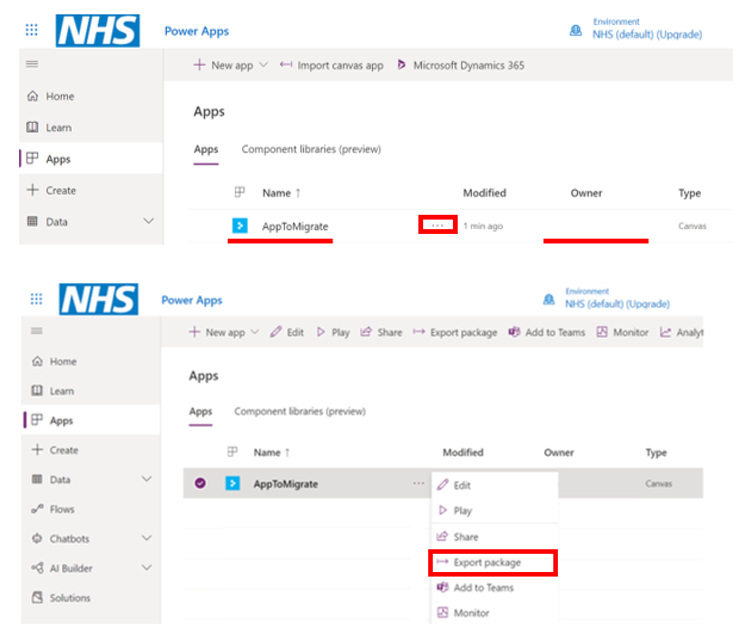 4. Locate the app you want to migrate in which your name appears as Owner, click on the three dots next to the app name (more command) and select Export package. You will be redirected to the Export package page.
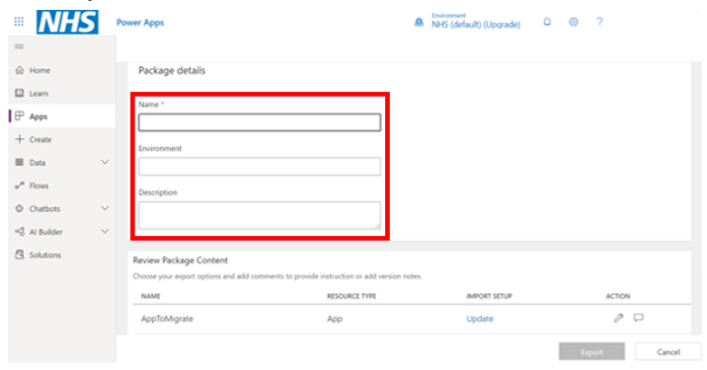 5. Fill in the package (export) details. Note that Name is the only mandatory field
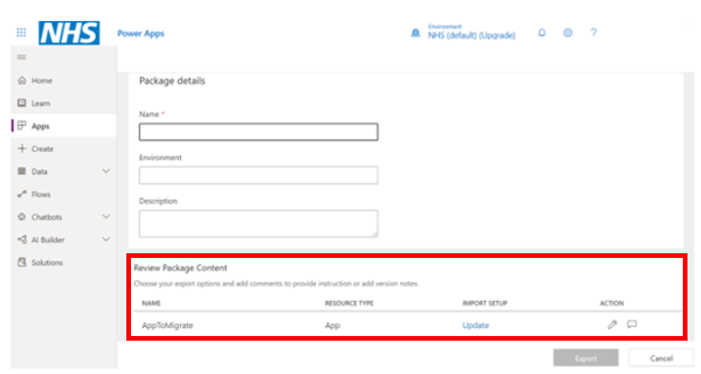 6. OPTIONAL: In Review Package Content section you can add comments and change the setting of your export that will be applied once you import the app into the dedicated environment
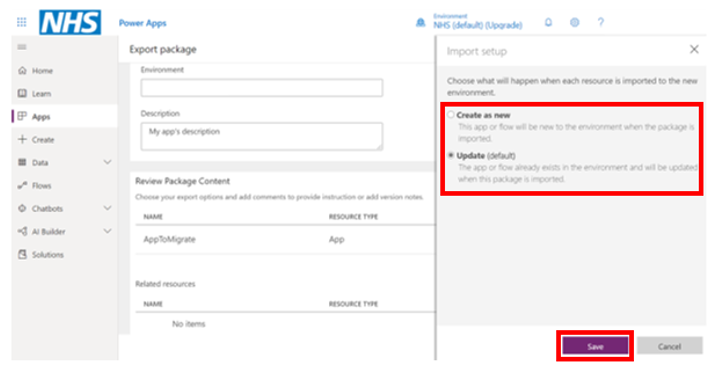 7. Click on Update (or on the wrench icon) if you would like to change the default import setup to Create as new. Click Save
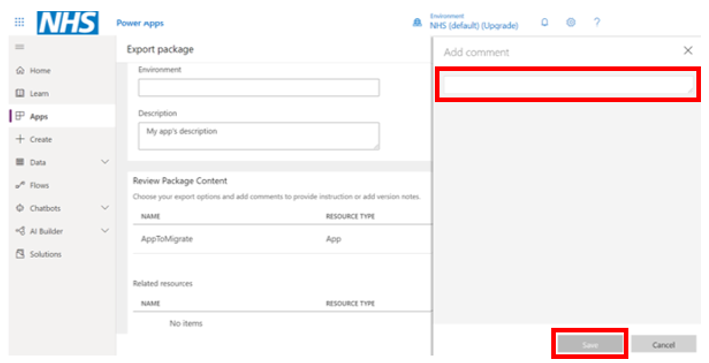 8. Select the comment icon to add a note or comment to be made available during the package import. Click Save
 9. Click on Export at the bottom of the page
10. Repeat the steps above for each canvas app you wish to export
Canvas apps import
Follow the steps outlined below to import the .zip export of your canvas app into your organisation’s dedicated environment.
Please note the steps below will need to be repeated for each canvas app import:
 1. Go to Power Apps and ensure that you are in your organisation’s dedicated environment by selecting the environment name in top right corner of the page
 2. Click on Import canvas app. You will be redirected to the Import package page to do the import
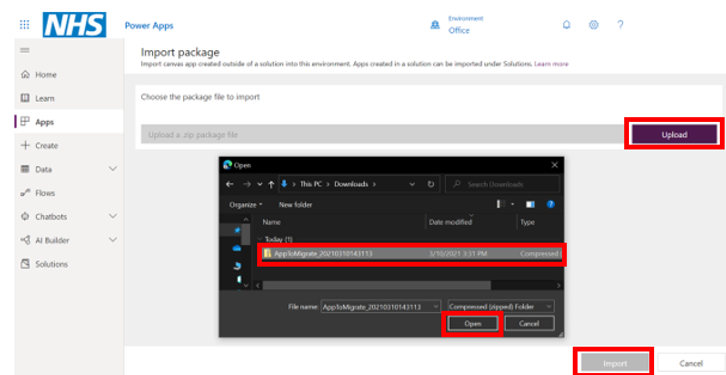 3. On the Import package page, click on Upload. A dialog box will open for you to locate your app export (.zip folder) on your computer. Once you have located and select it, click on Open then Import
 4. The package will upload
 5. Once the package has been uploaded you will need to review the package contents and provide additional input for any item marked with a red icon
 6. If any supporting comments were provided with the export you can view them by clicking in the comment icon
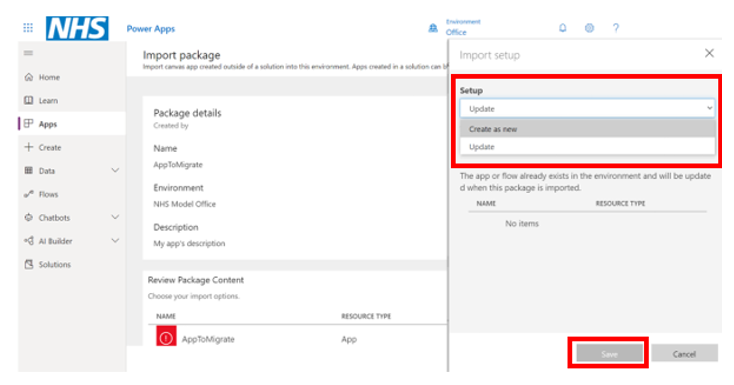 7. Click on the wrench icon for each item marked in red and enter the required information in the Import setup.
If you choose to Update an existing app, the new changes will be saved as a draft and after the import is successful you will need to publish those changes for them to be available to all other app users.
 8. If your setup is Update, once you have provided the necessary information, the red icon will turn black. If your set up is Create as new, the red icon will turn green
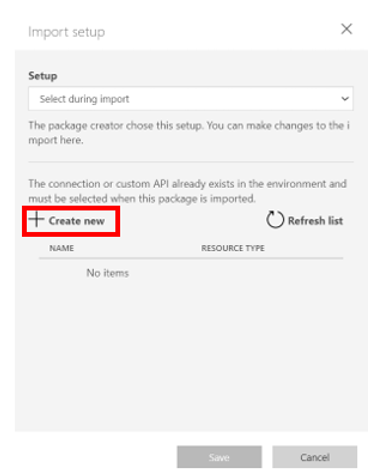 9. You will need to specify the required
 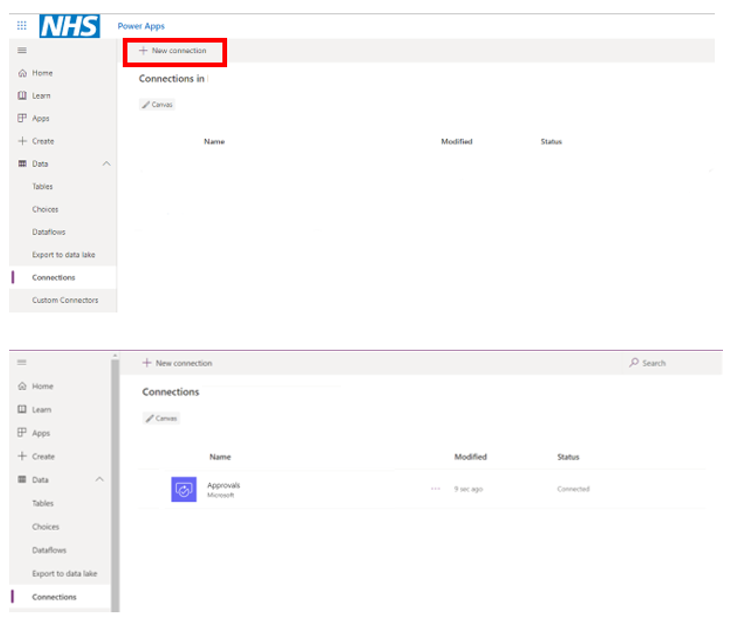 connections for the app to function. If no connections are shown or the connection you need is not listed, select + Create new to create a new connection in a new browser tab
NOTE: This will only be possible if your app already had previous connections
 10. After creating the connection, return to the import app page, select Refresh list and choose the newly created connection. Then click Save

11. Once all items have been reviewed, 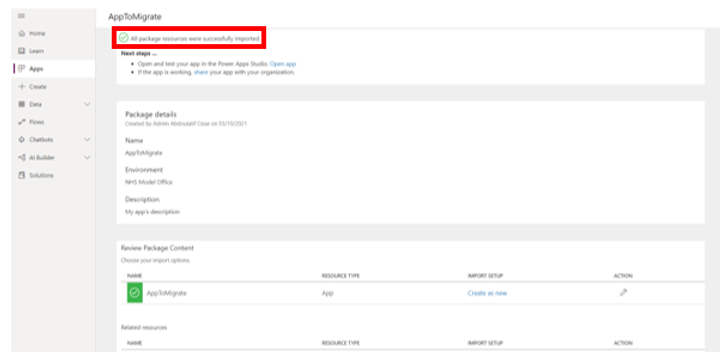 click on Import
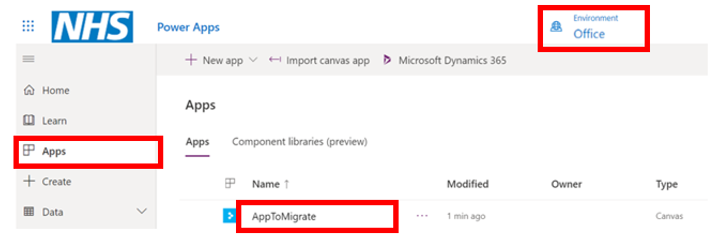 12. Go to Apps in your organisation’s dedicated environment and ensure that you can see the app listed there
 13. Click on the three dots next to the app name (more command) and select Edit
 14. Select the App checker icon on the right side of the screen to review any errors in the app. The list will show the number of errors per category
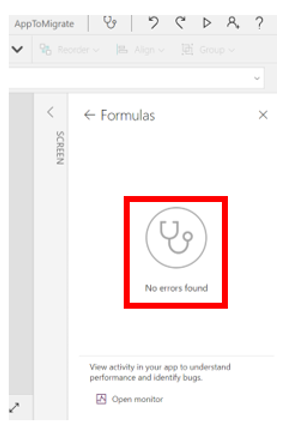 15. Once all errors have been resolved, a No errors found message will be displayed for each category
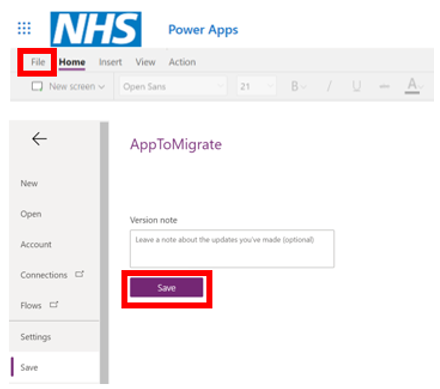 16. Save the app by selecting File then Save
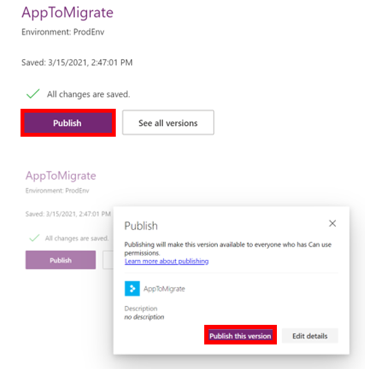 17. Publish the new version of the app by selecting Publish
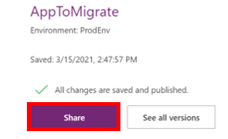 18. Click on Share to share the updated app link with the relevant users. Make sure to inform the users that the old version of the app (in the NHSmail Default environment) will be deleted
19. Repeat the steps above for each canvas app you wish to import
20. Once you have successfully imported all relevant apps, return to the NHSmail Default environment to delete the apps from the environment. Visit the Deleting Applications and Flows hosted in the Default Environment for instructions
Model-driven apps export
Follow the steps outlined below to create a Solution to download a .zip export of your model-driven app. Please note that multiple model-driven apps are allowed in the same exported Solution:
 1. Go to Power Apps. If you are not automatically signed in, make sure you sign in with your nhs.net account
 2. Ensure that you are in the right environment by selecting the NHSmail Default environment as an environment in top right corner of the page
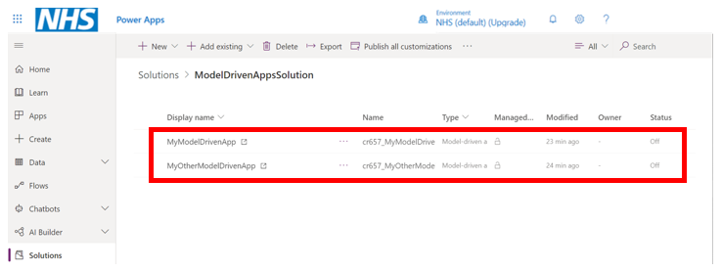
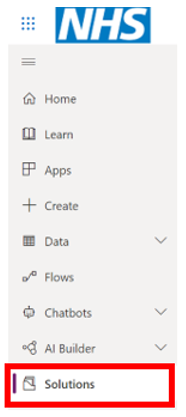
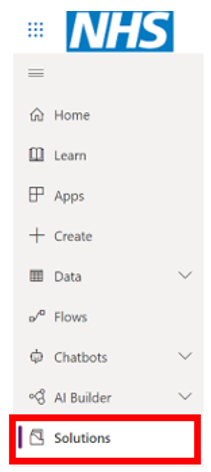
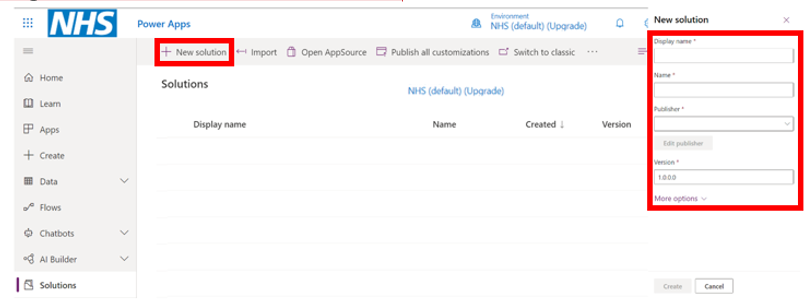
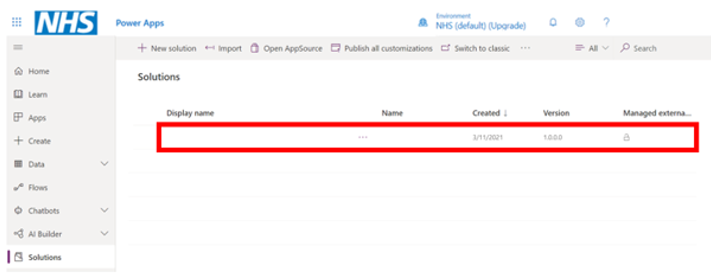
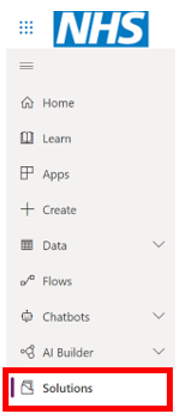 3. Select Solutions from the left panel. You will need to create a Solution to export the model-driven apps
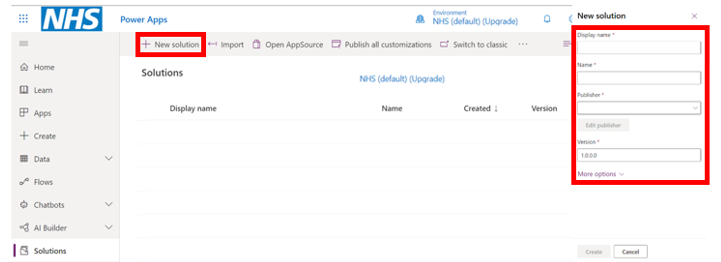 4. Click on + New solution, fill in the
 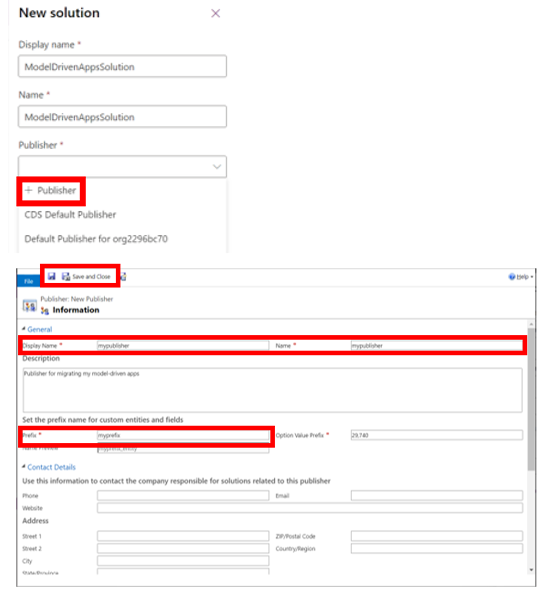 Solutions In Publisher, create your own publisher
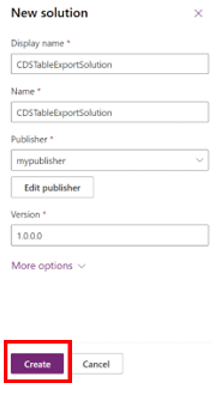
 5. Once all fields are completed, click on Create
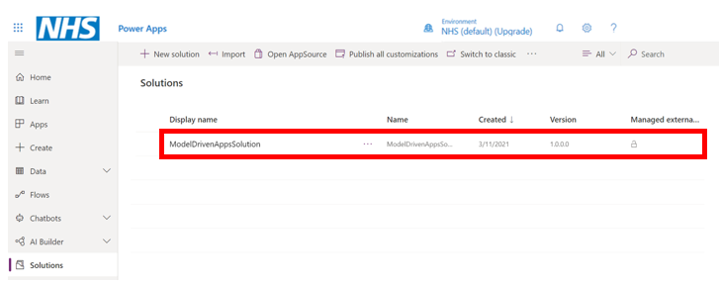 6. Your newly created solution should be listed in Solutions
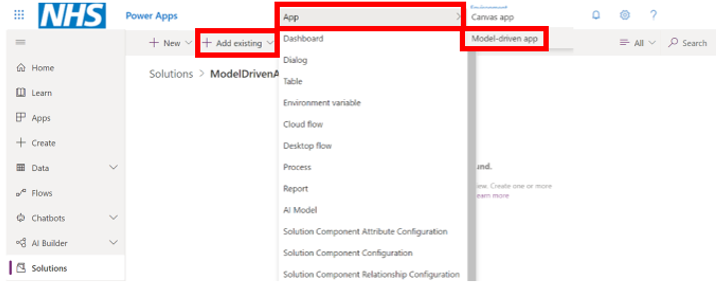 7. Click on your solution to open it. Click on + Add existing, then on App, finally on Model-driven app
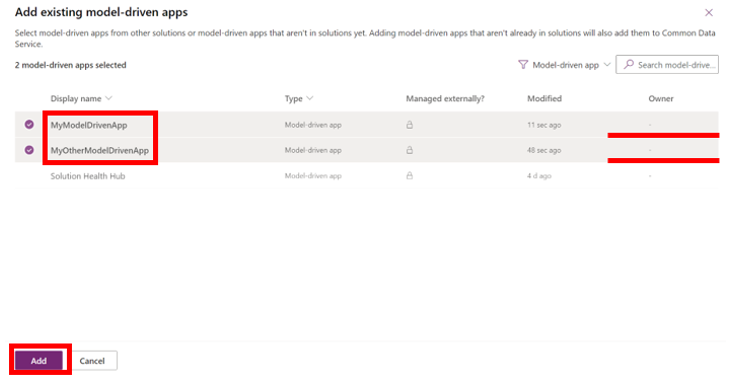 8. All the model-driven apps in the environment will be displayed. Select the model-driven apps you own, then click on Add. You may select multiple apps at once for the Solutions
 9. The apps you have selected in the step above will now appear in your Solutions
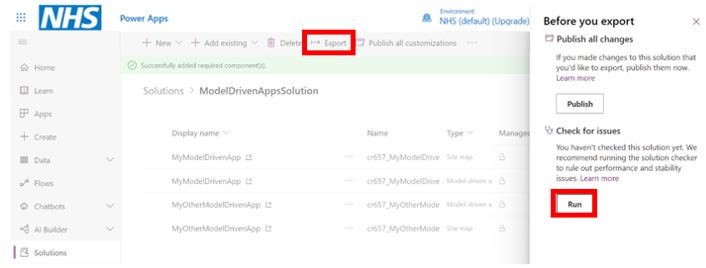
 10. For each app in your solution, select the app, click on the three dots next to the app name (more command) and select Add required components
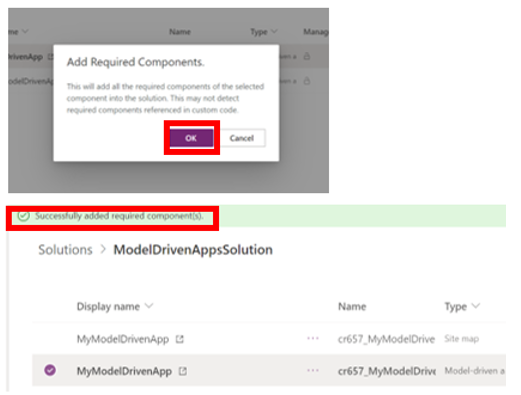 11. The Add required components will automatically add to the solution all the components your model-driven app needs
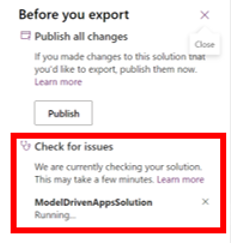
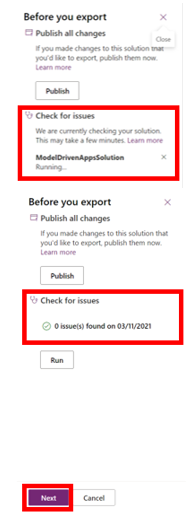
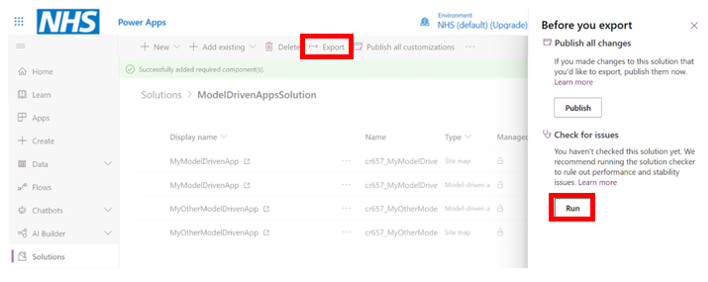 12. Click on Export. You will be prompted to publish all changes and check for issues before finishing the export. Click on Run and if any errors are detected, including design-related errors, you may correct them and re-publish the app
NOTE: Components referenced in custom code may not be detected during step 11. If you have any missing custom code in your exported solution, this will be highlighted when checking for errors. This can be fixed by clicking on + Add existing, then selecting the relevant component as prompted by Power Apps
 13. Once the assessment is complete,
 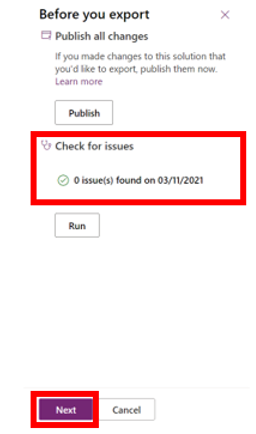 click on Next
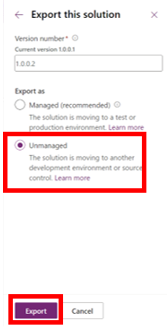
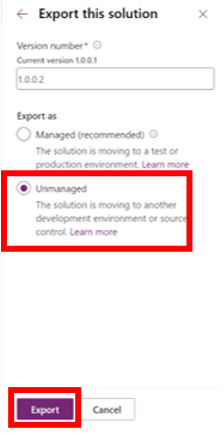 14. Select export as Unmanaged to retain editing capabilities of the apps in the organisation’s dedicated environment where the model-driven apps will be imported. Now click on Export
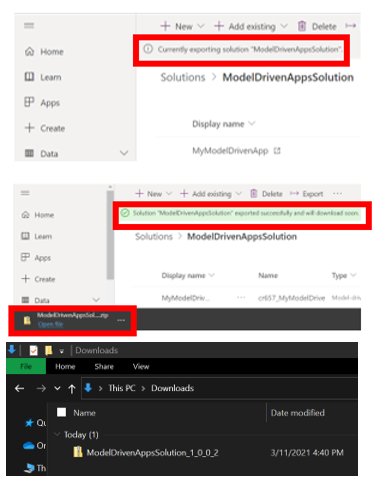 15. The export panel will close, and you will be redirected to your Solution Once the export is ready, it will automatically download on your computer
Model-driven apps import
Follow the steps outlined below to import the .zip export (Solution) of your model-driven apps into your organisation’s dedicated environment.
Please note that multiple model-driven apps are allowed in the same imported Solution:
1. Go to Power Apps and ensure that you are in your organisation’s dedicated environment by selecting the environment name in the top right corner of the page
 2. Select Solutions from the left panel
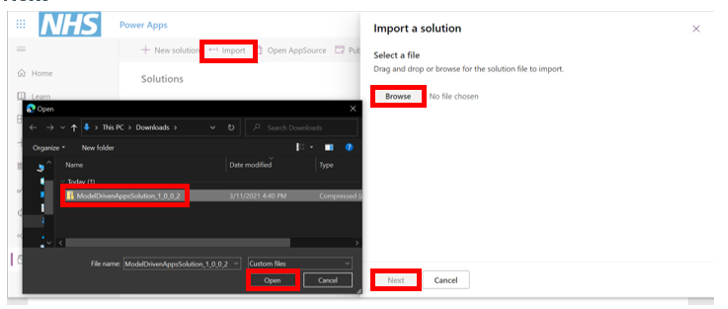 3. Click on The Import a solution panel will appear on the right, click on Browse. Locate your solution export (.zip folder) on your computer. Once you have located and select it, click on Open then Next
 4. Click on The import process will initiate and once complete, you will be redirected to the Solutions page
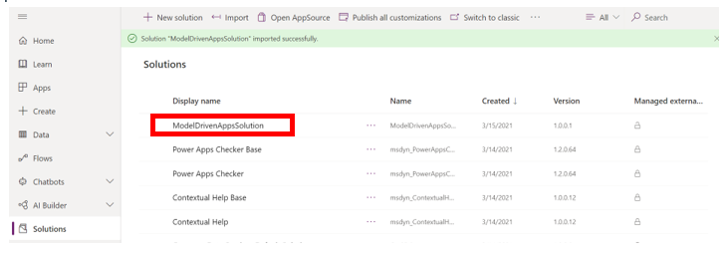 5. The imported solution is now listed in
 your environment Solutions and you should be able to see the imported model-driven apps in the Apps panel
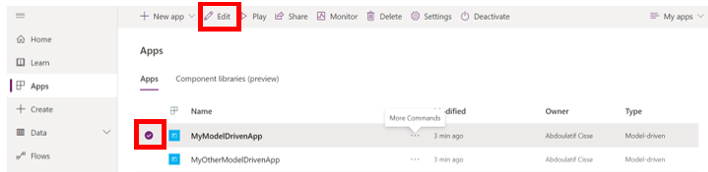 6. Review and test all imported apps to make sure that there are no errors by selecting the desired app and clicking on Edit
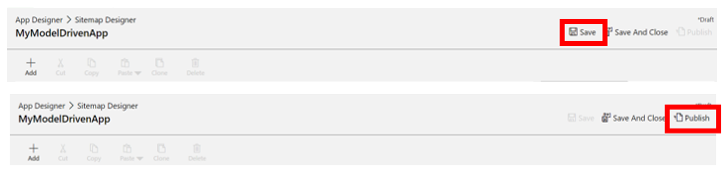 7. Once all errors (if any) have been corrected, select Save then Publish
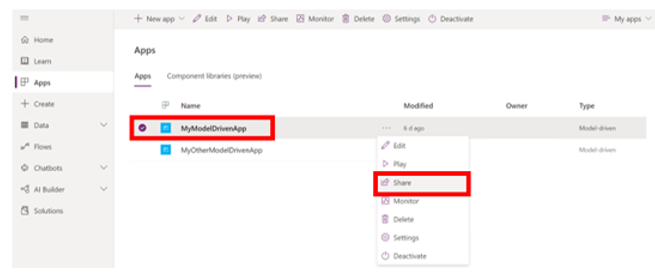 8. Return to the Apps pane and select the model-driven app you need to share. Click on the three dots
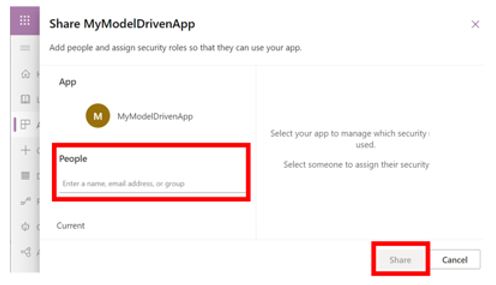 (more command) and select Share. Type in the information of the relevant users and click on Share Make sure to inform the users that the old version of the app (in the NHSmail Default environment) will be deleted
 9. Once you have successfully imported all relevant apps, return to the NHSmail Default environment to delete the solution used to export the model-driven apps by selecting the NHSmail Default environment as the environment in top right corner of the page
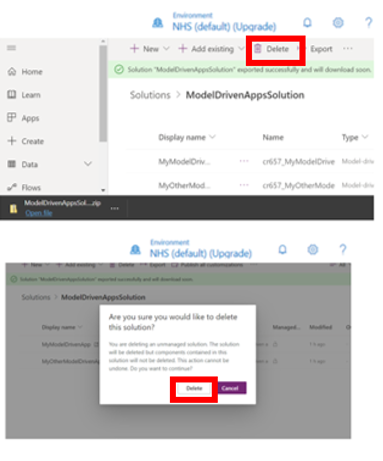 10. Go to the Solutions panel, select the relevant solution, and click on Delete. When prompted to confirm, click on Delete in the confirmation box
11. Still in the NHSmail Default environment, delete your apps from the environment by following the instructions in the Deleting Applications and Flows hosted in the Default Environment page
Migrating Power Automate
Cloud flow export
Follow the steps outlined below to download a .zip export of your cloud flow. Please note the steps below will need to be repeated for each cloud flow export:
 1. Go to Power Automate. If you are not automatically signed in, make sure you sign in with your nhs.net account
 2. Ensure that you are in the right environment by selecting the NHSmail Default environment in top right corner of the page
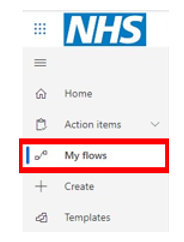 3. Select My flows from the left panel
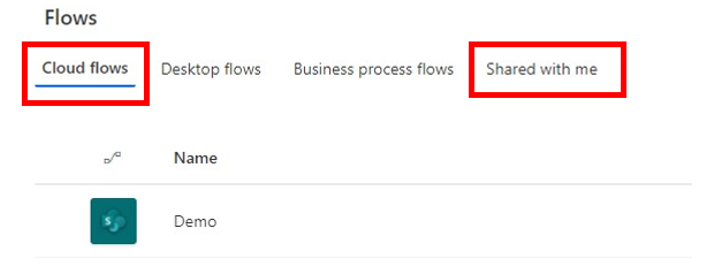 4. Select Cloud flows or Shared with me to view your flows
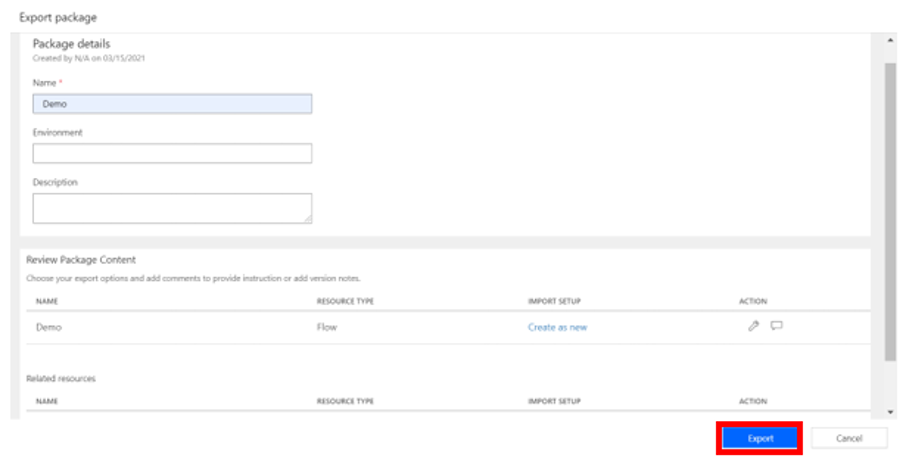
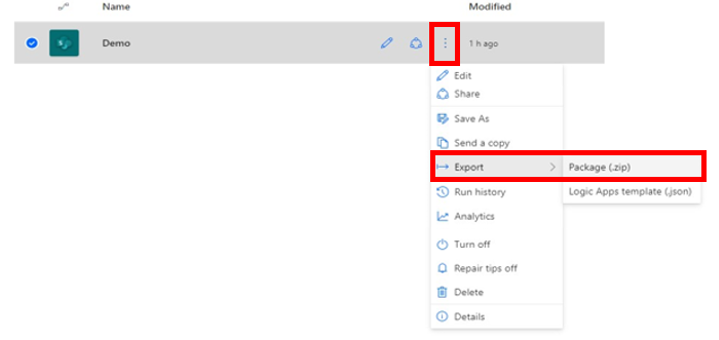 5. Locate the flow you want to migrate, click on the three dots (more command), select Export then Package (.zip). You will be redirected to the Export package page
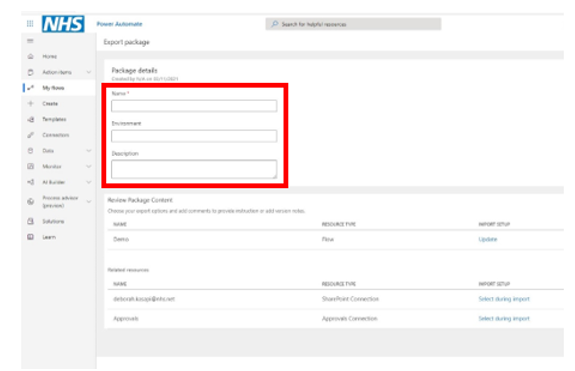 6. Fill in the package (export) details
 7. Click on Update and change the
 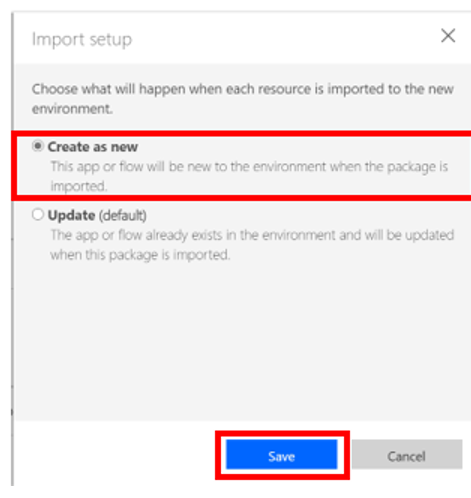 default import setup to Create as new. Click Save
 8. Click on Export at the bottom of the page
Cloud flow import
Follow the steps outlined below to import the .zip export of your cloud flow into your organisation’s dedicated environment.
Please note the steps below will need to be repeated for each cloud flow import:
1. Go to Power Automate and ensure that you are in your organisation’s dedicated environment by selecting the environment name in top right corner of the page.
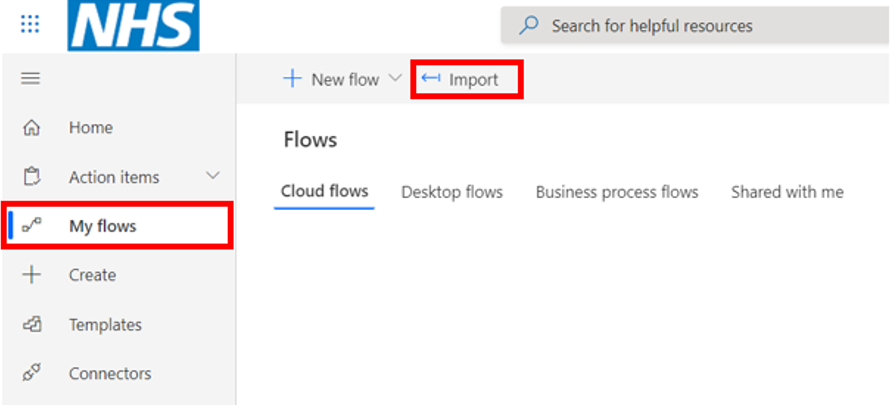 2. Select My flows from the left panel and then Import
 3. On the Import package page, click on Upload. A dialog box will open for you to locate your app export (.zip folder) on your computer. Once you have located and select it, click on Open then Import
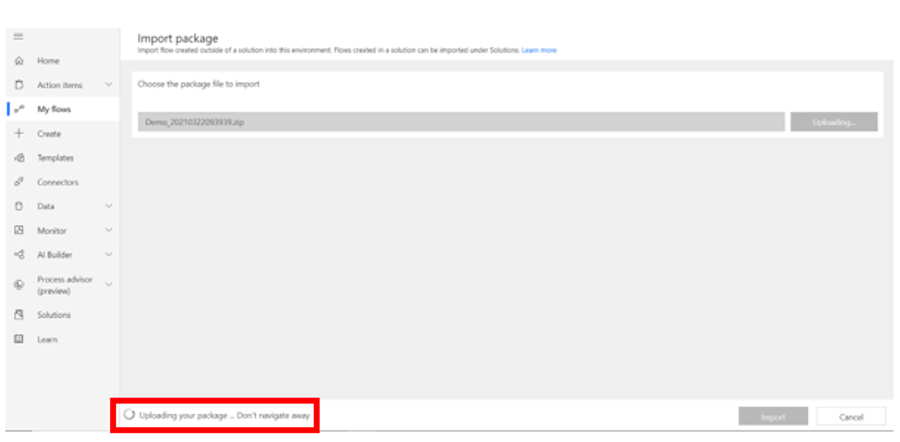 4. The package will upload
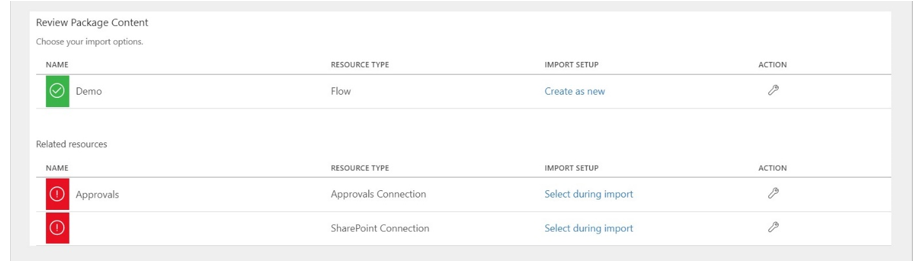 5. Once the package has been uploaded you will need to review the package contents and provide additional input for any item marked with a red icon
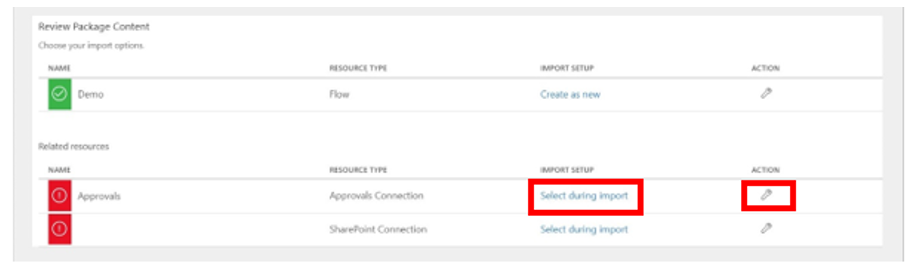 6. Under Related resources, for each resource with a red icon you will need to click on Select during import (or on the wrench icon) to create the connection
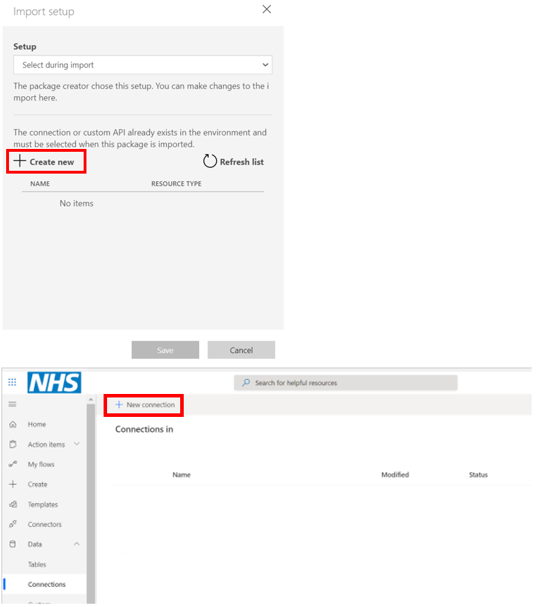 7. You will need to specify the required connections for the flow to function. If no connections are shown or the connection you need isn’t listed, select + Create new to create a new connection in a new browser tab
 8. Scroll to find the resource connection you need and click on the add To create the resource, you might be prompted to sign into that connector for verification
 9. After creating the connection, return to the import flow page, select Refresh list, and choose the newly created connection. Then click on Save
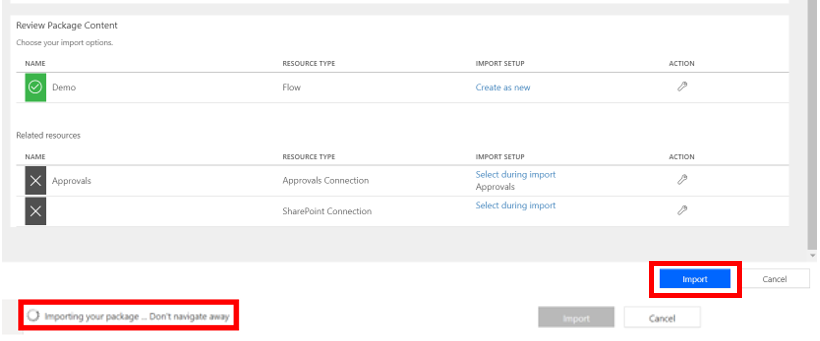 10. Repeat the steps 7-9 for all the connections until the red icons turn grey. Once all items have been reviewed, click on Import

 11. Once your flow is open, please review and test your flow actions to ensure that it is functioning as intended
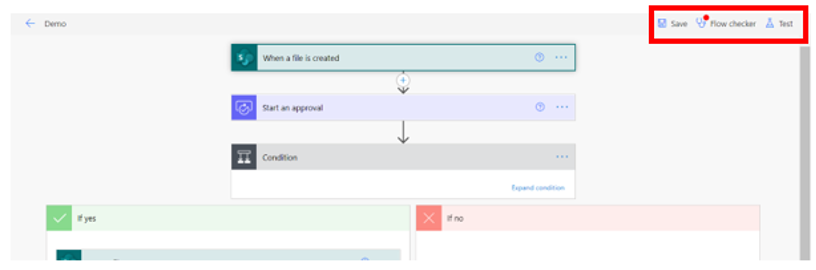 12. Flow checker will provide error messages and warnings about flow issues. Once you have cleared any messages in the Flow checker, click on Test at least once. Once you are done, click on Save
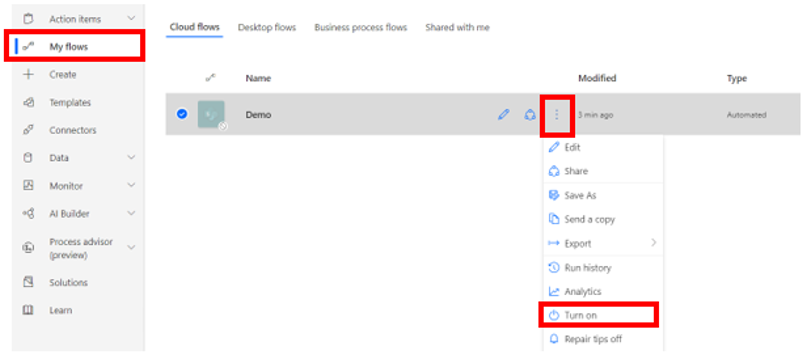 13. Finally, go back to My flows, find your flow, click on the three dots (more command) and select Turn on
14. Repeat the steps above for each cloud flow you wish to import
15. Once you have successfully imported all relevant cloud flows, return to the NHSmail Default environment to delete your flows from the environment by following the instructions in the Deleting Applications and Flows hosted in the Default Environment page
Migrating Dataverse Custom tables
Dataverse custom tables export
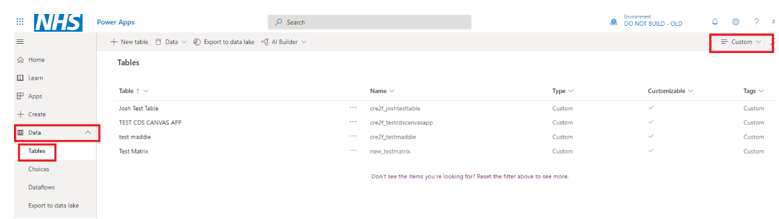 You can check for custom tables by going to Power Apps in the NHSmail Default environment, navigating to Data > Tables and setting the filter to Custom.
If you have created any Dataverse tables, or if your apps or flows are connected to any of the tables listed, your System Administrator will need to recreate the tables in your organisation’s dedicated environment before you migrate your apps and flows.
Follow the steps outlined below to download a .zip export of your Dataverse custom table. Please note that multiple custom tables are allowed in the same exported Solution:

1. Go to Power Apps. If you are not automatically signed in, make sure you sign in with your nhs.net account
 2. Ensure that you are in the right environment by selecting the NHSmail Default environment as an environment in top right corner of the page
 3. Select Solutions from the left pane. You will need to create a Solution to export the CDS custom table
 4. Click on + New solution, fill in the
 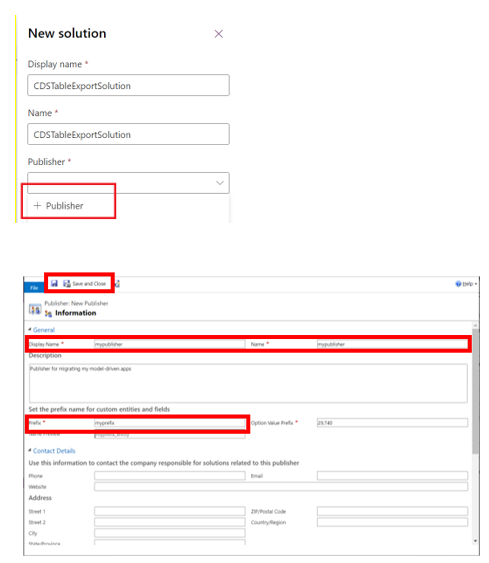 Solutions details. In Publisher, create your own publisher
 5. Once all fields are completed, click on Create
 6. Your newly created solution should be listed in Solutions
 7. Click on your solution to open it. Click on + Add existing, then on Table, and find your custom CDS table. Select the required tables and click Next
 8. Select Include all components and then on Add
 9. Click on Export. You will be prompted to publish all changes and check for issues before finishing the export. Click on Run and if any errors are detected, including design-related errors, you may correct them and re-publish the app
NOTE: Components referenced in custom code may not be detected during step 11. If you have any missing custom code in your export Solution, this will be highlighted when checking for errors. This can be fixed by clicking on + Add existing, then selecting the relevant component as prompted by Power Apps
 10. Once the assessment is complete, click on Next
 11. Select export as Unmanaged to retain editing capabilities of the table in the organisation’s dedicated environment where the custom table will be imported. Now click on Export
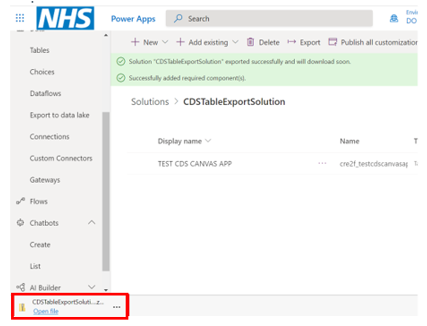 12. The export panel will close, and you will be redirected to your Solution Once the export is ready, it will automatically download on your computer
 13. When the data is ready to be downloaded, click on Download exported data.
Dataverse custom tables import
Follow the steps outlined below to import the .zip export (Solution) of your custom tables into your organisation’s dedicated environment.
Please note that multiple custom tables are allowed in the same imported Solution:
1. Go to Power Apps and ensure that you are in your organisation’s dedicated environment by selecting the environment name in top right corner of the page
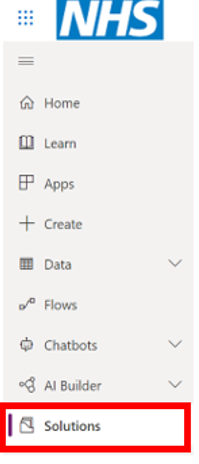 2. Select Solutions from the left pane
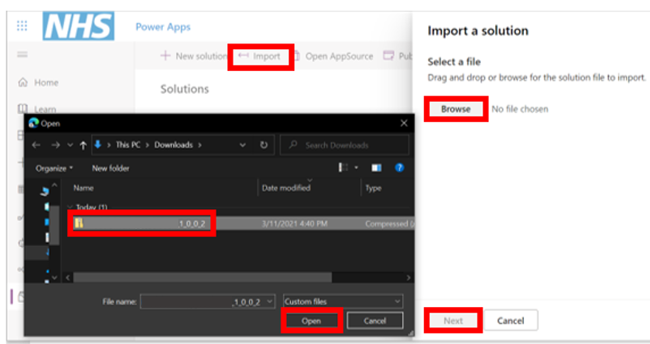 3. Click on Import. The Import a solution panel will appear on the right, click on Browse. Locate your solution export (.zip folder) on your computer. Once you have located and select it, click on Open then Next
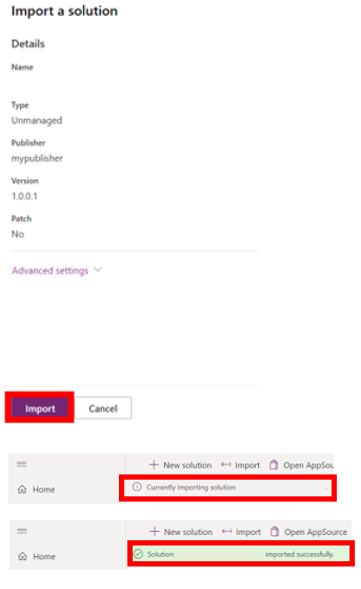 4. Click on Import. The import process will initiate and once complete, you will be redirected to the Solutions page
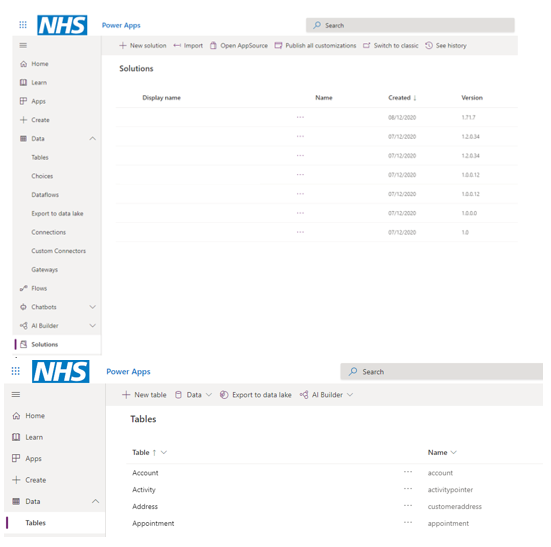 5. The imported solution is now listed in your environment Solutions and you should be able to see the custom tables in the Data > Tables section
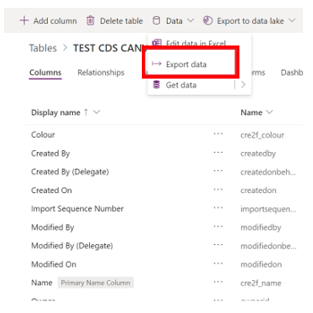
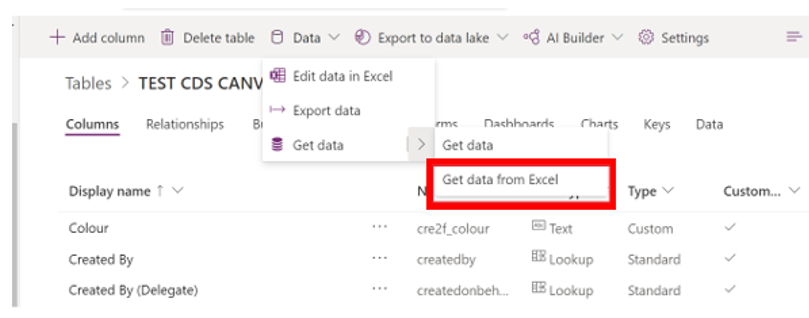 6. Once the table has been imported, the data can also be imported into the table. First extract the .zip file, then navigate to Data > Table, click on Data > Get data > Get data from Excel
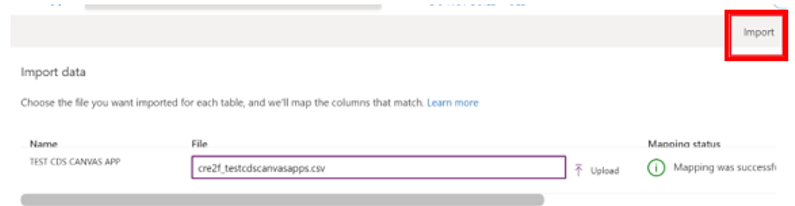 7. Upload the Excel file from the extracted .zip folder and click Import
Reconnecting to Dataverse tables in the NHSmail Default environment
Applications
If your application is currently hosted in the NHSmail default environment, then by default it will connect to Dataverse data in the default environment. When you migrate your application to your organisation’s dedicated environment, you will need to instruct your application to reconnect to the default environment for data source.
Please follow the steps below to connect your application to the default environment data source:
1. Follow the migration steps for exporting and importing canvas apps
2. Ensure that you are in the right environment by selecting your organisation’s dedicated environment as an environment in top right corner of the page
3. Open your migrated canvas app in the Power Apps Studio
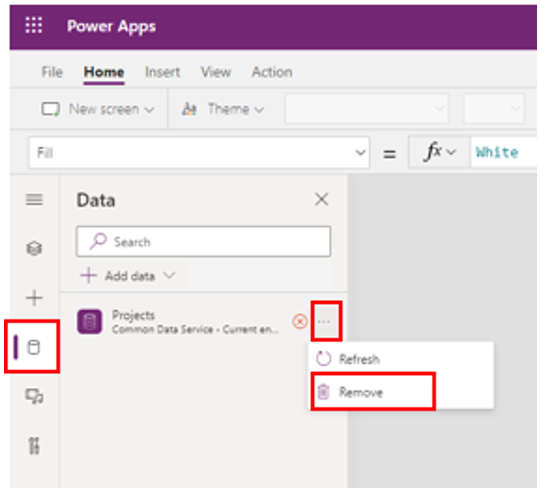
4. Remove the CDS connection (or Microsoft Dataverse) by clicking on the three dots and then Remove
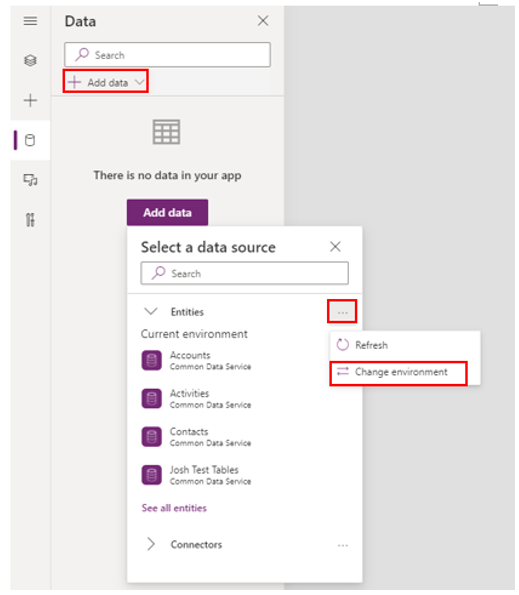 5. Click on Add data and then on the three dots. Next, click on Change environment
 6. Search for the NHSmail Default environment and select it
 7. You should be able to see the entities in the NHSmail Default environment listed
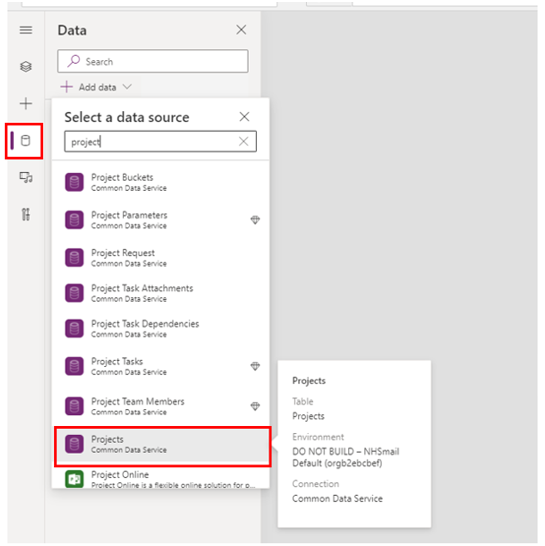 8. Search for the CDS table (or Microsoft Dataverse) you require and add the data source
 9. Refresh the data source by clicking on the three dots and selecting Refresh
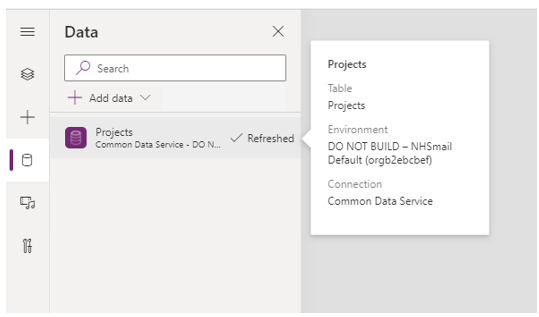 10. After the refresh, your application should be populated with data
Flows
If your flow is currently hosted in the NHSmail default environment and uses Microsoft Dataverse connectors (formerly Common Data Service), then by default it will connect to CDS data in the default environment. When you migrate your application to your organisation’s dedicated environment, you will need to instruct your application to reconnect to the default environment for data source.
Please follow the steps below to connect your flow actions to the default environment data source:
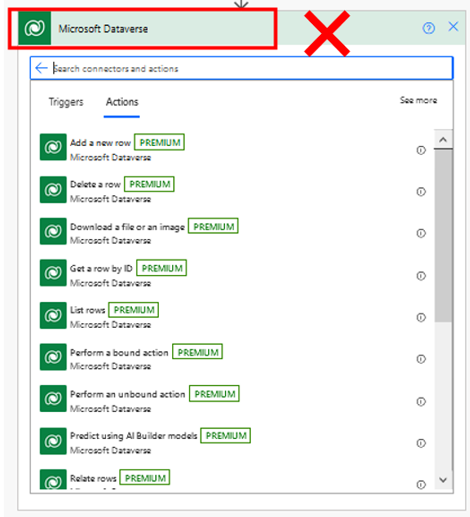 1. Before you complete the migration steps,
 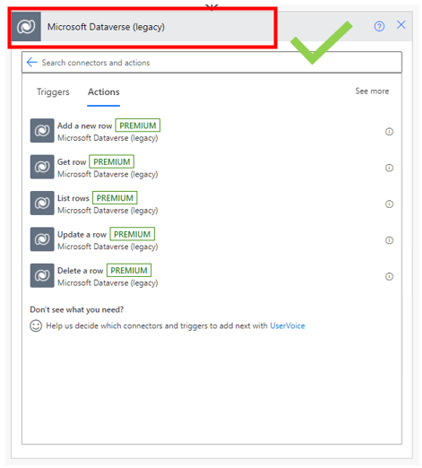 if your flow contains Microsoft Dataverse connectors then you must replace them accordingly with equivalent actions that are Microsoft Dataverse (legacy)
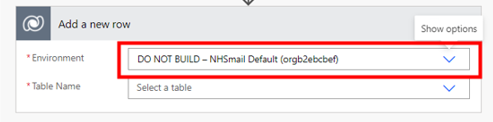 2. Ensure that your Microsoft Dataverse (legacy) actions use the NHSmail Default environment as an environment
3. Continue to follow the migration steps for Power Automate.
| Last Reviewed Date | 16/01/2026 |