
You can update information associated with a static distribution list (e.g. name, owning users, recipients) registered to your organisation. Once a static distribution list is updated, the changes will apply to all future emails sent to this list. You must have the correct permissions to be able to perform this action
To edit a static distribution list
 1. Click Admin in the navigation bar at the top of the screen and select Distribution Lists from the drop down menu
2. Use the search box to find the distribution list you wish to edit
Refer to the Searching for an Entry section for more information
3. Click on the Display Name of the static distribution list to open the Edit Static Distribution List Page
Although the Edit Distribution List page looks slightly different to the Create Static Distribution List page, the steps to edit a static distribution list are the same as when you create one (with the exception of Directory Properties). Refer to Creating a static distribution list for more information on editing each part of a distribution list
The Edit Distribution List page includes a Status box which indicates if the list is active/inactive, the dates it was created and last updated and who was the last administrator to edit it
Editing the Organisational Unit of a static distribution list
To move a static distribution list to a different department within the current owning organisation (e.g. switch from Leeds Teaching Hospital IT department to Leeds Teaching hospital maintenance department) you must edit the Directory properties of the distribution list. These edits will have immediate effect and will update the static distribution list entry in the NHS Directory
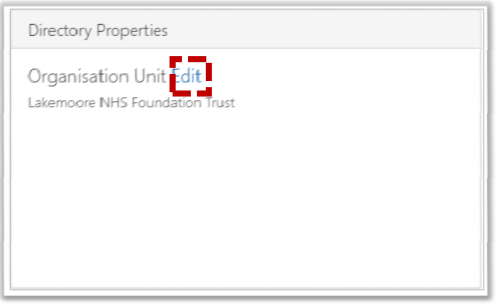 1. Click on Edit next to Organisational Unit under Directory Properties
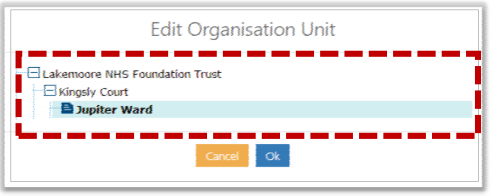 2. If appropriate, click the + box to expand the Organisational Unit list and select a new Organisational Unit and click Ok
Note: To change the owning organisation, rather than switch the list between different departments within the same organisation, you will need to use Transfer in the Actions box. Refer to the Transfer static distribution list for more information
When all editing is complete:
3. Click Update at the bottom of the Edit Distribution List page
The following message will be displayed:

If you receive any type of failure notification, refer to the Notifications for more information on how to address the issue
Bulk import of users to a static distribution List
Local Administrators can do bulk import of recipients into a static distribution list. The list imported will replace the current list of members.
Note: When a distribution list is imported, the recipient list of the distribution list is replaced exactly with the contents of the upload. So, to avoid losing the existing recipients of the distribution list, first export the recipient list and then add all the new recipients to the bottom of the exported list. This process can also be followed to remove existing recipients of the static distribution list.
1. Click Admin in the navigation bar at the top of the screen and select Distribution Lists from the drop down menu
2. Use the search box to find the distribution list you wish to edit
Refer to the Searching for an Entry section for more information
To export the recipients list
 3. Click on Export Recipients under Actions box
Once you have exported the recipients list add all the new recipients to the bottom of the exported list
To import the recipients list
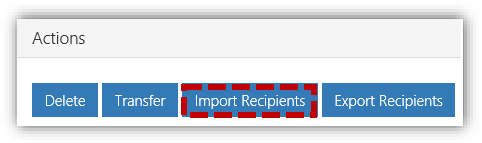 4. Click on Import Recipients under Actions box
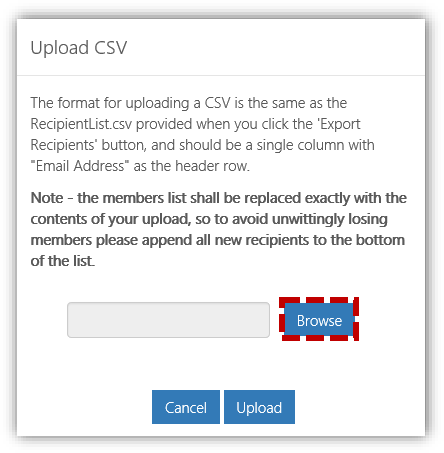 5. After either importing or exporting, click on Browse
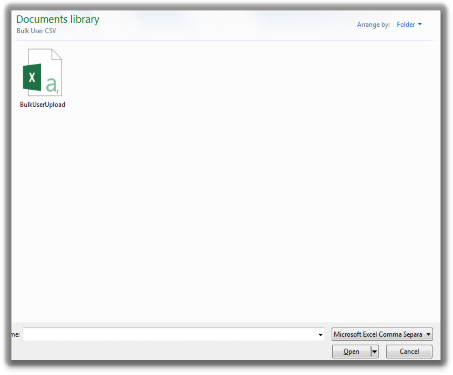 6. When you have found the CSV file, click on it and click Open
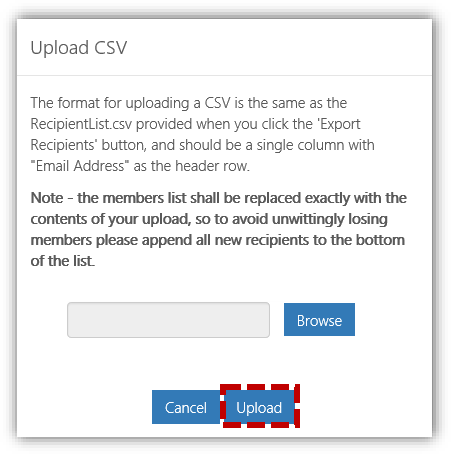 7. Click on Upload
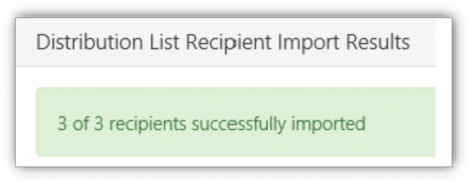
The following message will be displayed if the upload is successful :
Setting security group policy of a static distribution list
Local Administrators can edit the Security Group Policy of a Static Distribution List.
Note: When the Security Group Policy of a Distribution List is edited, the selected policy is applied to the members of the Distribution List. The policy is only applied to the users of the organisation the Local Administrator has admin rights over.
Refer to the NHSmail mobile device configuration guide and this Microsoft guidance site for further information on what policies are available
1. Click Admin in the navigation bar at the top of the screen and select Distribution Lists from the drop down menu
2. Use the search box to find the distribution list you wish to edit
Refer to the Searching for an Entry section for more information
3. Click on the Display Name of the static distribution list to open the Edit Static Distribution List Page
Although the Edit Distribution List page looks slightly different to the Create Static Distribution List page, the steps to edit a static distribution list are the same as when you create one (with the exception of Directory Properties). Refer to the Creating a static distribution list for more information on editing each part of a distribution list. The Edit Distribution List page includes a Status box which indicates if the list is active/inactive, the dates it was created and last updated and who was the last administrator to edit it.
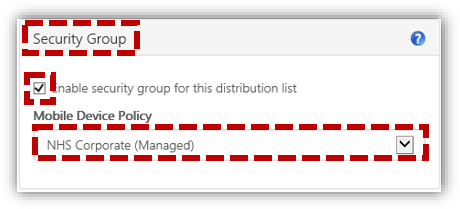 4. Select the tick box under Security Group to enable security group and select the policy from the drop down
5. Click Update at the bottom of the Edit Distribution List page
The following message will be displayed:

| Last Reviewed Date | 16/07/2019 |