This article provides information to Local Administrators of organisations with in-house software or third-party backend applications that are integrated to Exchange Online using Basic Authentication with the below protocols:
- Post Office Protocol (POP)
- Internet Messaging Access Protocol (IMAP)
- Remote Power Shell (RPS)
- Simple Mail Transfer Protocol (SMTP)
Microsoft is deprecating SMTP Basic Authentication protocols for Exchange Online, From September 2025, with modern connectivity that enables additional layers of security.
The below table provides an overview of this schedule:
| Protocol | Retirement date |
| POP, IMAP, RPS | 25th May 2023 – Completed |
| SMTP | March 2026 |
Overview
Microsoft has replaced Basic Authentication protocols for Exchange Online with modern connectivity that enables additional layers of security. The NHSmail team has put in place a strategy to separate out the retirement of these protocols into a new schedule before June 2023 to reduce any potential impact or disruption to organisations and their users.
All applications required to integrate with Exchange Online must use OAuth 2.0 authentication, a service provided by Azure Active Directory (Azure AD) to enable applications to connect with IMAP, POP or SMTP protocols to access Exchange Online in Office 365.
The OAuth 2.0 protocol involves several actors: the user who owns the resource, the third-party application that wants to access the resource, and the authorisation server that grants permission to the third-party application to access the resource on behalf of the user. The authorisation server issues an access token to the third-party application, which it can use to access the user’s resource.
The process to request the registration of an application is as follows:
Step 1: Review all pre-requisites and application requirements.
Step 2: Access the web-based form and submit a request.
Step 3: Retrieve the Application ID, Secret and Tenant ID.
Once the above process is completed, Local Administrators can proceed to configure the application to use OAuth 2.0.
Pre-requisites
1. Confirm the application supports OAuth 2.0.
To determine if the application can use OAuth 2.0 to connect to Exchange Online, Local Administrators should check the documentation and specifications for the app.
Exchange Online supports several authentication methods, including OAuth 2.0, which allows users to authorise third-party applications to access their Exchange Online data. However, some applications may not support OAuth 2.0, or may require additional configuration or permissions to use OAuth 2.0 with Exchange Online.
If the organisation has developed in-house applications to connect to Exchange Online, Local Administrators should review the Microsoft documentation on OAuth 2.0 and Exchange Online REST APIs to ensure that the application meets the requirements and follows best practices for secure authentication.
If the organisation is using a third-party application to connect to Exchange Online, Local Administrators should check with the vendor or provider of the application to determine if it supports OAuth 2.0 and if any additional configuration is required.
2. Identify the type of permissions required
Local Administrators will be required to specify the type of permissions required for the application to connect to Exchange Online. There are four supported permissions:
- IMAP/POP/SMTP Application:
- Office 365 Exchange Online
- IMAP.AccessAsApp
- POP.AccessAsApp
- SMTP.AccessAsApp
- IMAP/POP/SMTP Delegated:
- Office 365 Exchange Online
- IMAP.AccessAsUser.All
- POP.AccessAsUser.All
- SMTP.Send
- Graph Mail Delegated:
- Mail.ReadWrite
- Mail.ReadWrite.Shared
- Mail.Send
- User.Read
- Graph Mail Application:
- Mail.ReadWrite
- Mail.Send
3. Confirm mailbox addresses
Application permissions require at least one mailbox address (application account) that will be used to connect to Exchange Online. As part of this confirmation, Local Administrators are required to check:
- Mailboxes are set as application accounts in NHSmail Portal.
- Mailboxes are assigned to their organization (belongs to the same ODS code).
4. Confirm if the application requires a Digital Certificate
Whether the app requires a digital certificate to connect using OAuth 2.0 depends on several factors, including the authentication method used, the API used to connect to, and the security requirements of the system.
For Exchange Online, Microsoft recommends using certificate-based authentication for certain scenarios, such as when the application requires a high degree of trust, or when using OAuth 2.0 with Exchange Online PowerShell. In these cases, Local Administrators would need to obtain a digital certificate and submit it as part of the request.
If Local Administrators are unsure whether in-house apps require a digital certificate or not, consult the documentation for the application or service, as well as the documentation for the OAuth 2.0 library or framework used to build this functionality. For third-party backend applications, Local Administrators can contact the provider of the service for more information about their authentication requirements.
5. List any URIs
URIs (Uniform Resource Identifiers) are used in OAuth 2.0 as identifiers for various components of the authorization process. Here are some of the common URIs used in OAuth 2.0:
- Authorization Endpoint URI: This URI specifies the location of the authorization server’s endpoint where the resource owner can grant authorization to the client.
- Token Endpoint URI: This URI specifies the location of the authorization server’s endpoint where the client can exchange the authorization grant for an access token.
- Redirect URI: This URI is used by the client to specify where the authorization server should redirect the resource owner after authorization is granted or denied.
- Client ID URI: This URI is used to uniquely identify the client application to the authorization server.
- Scope URI: This URI specifies the set of permissions that the client application is requesting from the resource owner.
- Resource Server URI: This URI specifies the location of the resource server that hosts the protected resources that the client is trying to access.
These URIs are typically defined as strings and can be specified in various formats, including HTTPS URLs, URN (Uniform Resource Name) format, or other custom formats. The specific format and requirements for each URI will depend on the implementation of the OAuth 2.0 protocol by the authorization server and client application.
If Local Administrators are unsure whether in-house apps are using URIs or not, consult the setup or configuration documentation for the application or service. For third-party backend applications, Local Administrators can contact the provider of the service for more information about their setup/configuration.
6. Confirm the Home Page URL
In OAuth 2.0, a home page URL is a URL that represents the homepage of a registered application. It is typically used as part of the authorization process to provide additional information about the client application to the user.
During the OAuth 2.0 authorization flow, when the user is redirected to the authorization server’s consent page, the server may display the home page URL along with the client name and logo. This helps the user to identify the client application and decide whether to grant access to their resources.
The home page URL is typically specified by the client application during registration with the authorization server, and can be any valid URL that represents the application’s homepage or landing page. This URL can also be used by the authorization server to provide additional information about the client application to the user, such as its purpose or features.
7. Choose an application name and find out the organization ODS code
Local Administrators are required to use a memorable application name as it will help to identify and troubleshoot any issues using NHSmail support teams services or going through the renewal process next year.
Search for the organization ODS code using the Organisation/Practitioner Search service.
Submit a Request
The NHSmail application registration form is available to Primary Local Administrators (PLAs) or Local Administrators (LA) to submit a request to register an application in Azure AD to connect to Exchange Online using OAuth 2.0.
Step 1: Access the registration form.
Step 2: Fill in the form using the information and data gathered while confirming the pre-requisites.
1. *Type in the organisation ODS code without spaces or special characters.
2. *Select the type of access required.
a. *If the application requires application permissions, please provide a list of mailbox addresses separated by comas:
i.e. email1@nhs.net,email2@nhs.net,email3@nhs.net
3. Confirm if the application requires a digital certificate to connect using OAuth2.0.
a. If the application requires a digital certificate, complete the submission process, and then proceed to follow the guidance to upload it.
4. Provide URIs identifiers separated by comas:
i.e. https://url1.net,https://url2.net,https//:url3.net
5. Provide Home Page URL.
i.e. https//homepage.net
6. *Type in an application name.
7. *Read and confirm the validation questions.
Step 3: Review all information that has been provided in the form and click on Submit button to submit the request.
Information marked with an * is mandatory and local administrators are required to confirm it is correct before submitting a request to us.
Upload a Digital Certificate
In certain cases, in-house or 3rd party applications require a digital certificate instead of a Secret to connect to Exchange Online using OAuth 2.0. Local Administrators would need to obtain a digital certificate and submit it as part of the request.
Step 1: Submit an application registration request.
Step 2: Access NHSmail mailbox and look for an email with subject “app registration has been received”.
Step 3: Click on the NHS Application Registration Portal link provided on the email body and wait for the SharePoint site to load up; if requested, log in using the NHSmail credentials used to submit the application registration request.
 1. Locate the RITM column and look down the list for the request needed to upload a certificate to.
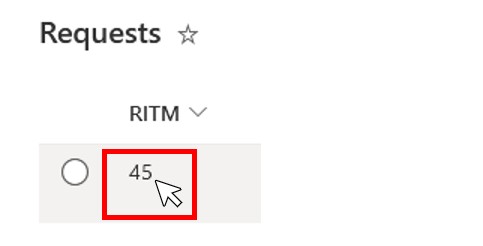 2. Click on the RITM number of the request.
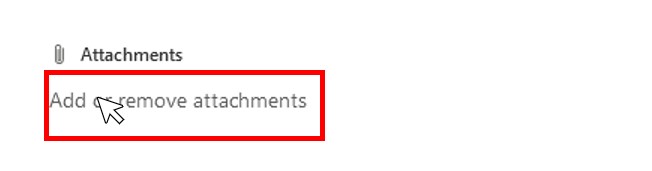 3. Double click on “Add or remove attachments”.
4. Locate and attach the digital certificate and click on Open.
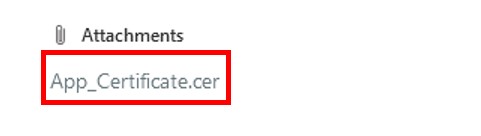 5. Verify the correct file has been attached.
 6. Close the certificate upload Window.
Once the certificate has been added, it can take up to 20 minutes for the request to be processed and completed.
Access the Application ID, Secret and Tenant ID
Once the application request is completed, an automated email will be sent to the Local Administrator who initially submitted the request. To access and retrieve the Application ID and Secret, follow the below steps:
To access the Application ID:
Step 1: Access the NHSmail mailbox and look for an email with subject “app registration has been received”.
Step 2: Click on the NHS Application Registration Portal link provided on the email body and wait for the SharePoint site to load up; if requested, log in using the NHSmail credentials used to submit the application registration request.
 Step 3: Locate the RITM column and look down the list for the request.
 Step 4: Check the Application Name is correct.
 Step 5: Check the Status is set to Complete.
 Step 6: Retrieve the Application ID which will be in the AppID column.
To access the Secret:
Step 1: Access the NHSmail mailbox and look for an email with subject “app registration is now completed”.
Step 2: Click on the NHS Application Portal Documents Library link provided on the email body and wait for the SharePoint site to load up; if requested, log in using the NHSmail credentials used to submit the application registration request.
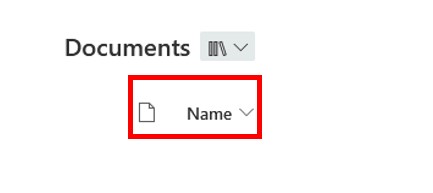 Step 3: Locate the Name column and look down the list for the request.
 Step 4: Click on the RITM number of the request.
 Step 5: Click on the .docx file.
 Step 6: Click on Edit in Desktop App button.
Step 7: Retrieve the Secret which will be in the document.
To access the Tenant ID:
NHS tenant ID is: 37c354b2-85b0-47f5-b222-07b48d774ee3
To Access Authorization URL and Token URL:
Authorization URL is: https://login.microsoftonline.com/37c354b2-85b0-47f5-b222-07b48d774ee3/oauth2/v2.0/authorize
Token URL is: https://login.microsoftonline.com/37c354b2-85b0-47f5-b222-07b48d774ee3/oauth2/v2.0/token
Configure the application to use OAuth 2.0.
Once the application request is completed and the Local Administrator has retrieved the Application ID, Secret and Tenant ID, applications can be configured to use OAuth 2.0.
If the organization has developed in-house applications to connect to Exchange Online, Local Administrators should review the Microsoft documentation on OAuth 2.0 and Exchange Online REST APIs to follow their guidance.
If the organisation is using a third-party applications to connect to Exchange Online, Local Administrators should check with the vendor or provider of the application to confirm and set up the application to use OAuth 2.0.
Application Credential Renewal Notification
Local administrators will receive notifications and reminders when their organisation’s application credential’s that are connected to internal or external backend systems are nearing the expiration date.
To ensure that local organisations can renew their credentials in time and prevent service interruption, the organisation’s administrators will get reminder emails at 60, 45, 30, 14, and the last seven days before the credentials expire. The reminder email will come from no-reply.nhsmail@nhs.net and will have the subject “[Action Required] Renew the Credential for Entra Application – <Application Name>”. The email will contain relevant information about the application, its credential type, and its expiration date.
Credential Renewal Request
One of the local administrators who received the email can ask for a renewal by sending a ticket to the national helpdesk at helpdesk@nhs.net with the following information:
| Details | Description |
| Subject | Renew Entra Application Credential Secret/Certificate |
| Application Name | <Application Name found on the reminder mail> |
| Application ID | <Application ID found on the reminder mail> |
| Credential Type | <Secret* or Certificate**> |
| Email Address | Administrator or Recipient’s email address |
| Availability | <Administrator or Recipient’s availability in the next few days and best time to contact through MS Teams> |
| Secondary Contact | Alternate NHSmail Local Admin user email address for sharing the credentials |
*Please provide the email address of the recipient who will receive the credentials if the application credential type is a Secret.
**Please attach the certificate (public key) if the application credential type is a Certificate. The file type should be one of these: .cer, .pem, .crt. Please also change the extension of the public key to a .txt file to avoid being blocked by the NHSmail attachment policies.
The NHSmail team will renew the application credentials and send them securely to the recipients provided after the ticket was raised.
Application Registration Deletion Process
Automated Deletion
One of the steps to maintain hygiene and order for application registration is an automated task that will remove all applications that have expired credentials over 30 days old. This will happen once a week.
Manual Deletion
If application owners decide that an application is no longer needed, they can ask for it to be removed from the platform.
To ask for application removal, please submit a ticket to national helpdesk and include the Application Name and Application ID.
After the ticket is created, NHSmail team will arrange for it to be removed from the platform.
Application Recovery
If an application is deleted, it can still be recovered within 30 days of deletion. Application owner can contact the national helpdesk and give the information of their application, such as application name and application ID. NHSmail team will recover it and create a new credential.
After 30 days, deleted applications are irrecoverable. Application owners are advised to make a new request with the Modern Authentication process.
Issues and Troubleshooting
How can I submit a request to register an application to use OAuth 2.0?
Follow the guidance provided in the NHS Support Site, check pre-requisites and application requirements before submitting a formal request.
Where is the link to access the web-based form to submit a request?
The registration form can be accessed using any internet web browser.
How can I request access to the web-based form?
Only Local Administrators have access to the form.
I am a Local Administrator but do not have access to the form.
Please raise an incident with the NHSmail helpdesk to confirm and give you access to the form.
The web-based form shows an error when trying to submit a request.
Please raise an incident with the NHSmail helpdesk providing relevant details to troubleshoot and solve this issue.
I submitted a request, but I did not get an email confirmation.
It can take up to 20 minutes for new requests to be processed, if you do not receive an email confirmation in the next 4 hours, please raise an incident with the NHSmail helpdesk.
I submitted a request, but I do not have access to Application Request Portal.
It can take up to 20 minutes for new requests to be processed, if you do not have access in the next 4 hours, please raise an incident with the NHSmail helpdesk.
I have not received a confirmation email my request is completed.
If the application does not require a digital certificate, it can take up to 20 minutes for the request to be processed; if you do not have an email confirmation in the next 4 hours, please raise an incident with the NHSmail helpdesk.
If the application requires a digital certificate, read and follow how to upload a certificate. Once the certificate is uploaded, it can take up to 20 minutes for the request to be processed; if you do not have an email confirmation in the next 4 hours, please raise an incident with the NHSmail helpdesk.
I have received an email saying the registration could not be completed, what do I need to do next?
The reason why the request could not be completed is stated within the body of the email you have received. Please review the pre-requisites and application requirements before submitting a new request.
How can I access the Application ID, Tenant ID and Secret?
Review and follow the guidance to access the Application ID, Secret and Tenant ID.
The secret does not appear to be accessible anymore.
Local Administrators have access to Secrets 72 hours after the request has been completed.
I have missed the 72h deadline or lost the Secret created for my application, what should I do?
Please raise an incident with the NHSmail helpdesk providing the name of the application and type of permissions required. Please note that only the Local Administrator who submitted the request will be able to raise an incident for this purpose.
How can I submit a Digital Certificate with my request?
If the application requires a digital certificate, read and follow how to upload a certificate. Once the certificate is uploaded, it can take up to 20 minutes for the request to be processed.
Why do I keep receiving multiple emails from this service?
If you keep receiving multiple or duplicated emails from this service, please raise an incident with the NHSmail helpdesk.
Can I raise an exception case?
If the application requires a set of permissions that are not available as described in the pre-requisites section, you can request an exception using the ServiceNow request process for O365 stores.
How do I raise a ticket with NHSmail helpdesk?
If you are having issues that can’t be resolved using this guidance, please send an email to the NHSmail helpdesk to raise an incident, attaching the below information:
- Name and email address of the Local Administrator who submitted the request using the web-based form.
- Organization and/or ODS code.
- Application Name.
- RITM (if known).
- Confirm if the application requires a digital certificate.
- Any additional notes.
What is MS Entra Application?
Microsoft Entra Application is an identity solution that is used to create and manage applications that support in-house software and third-party backend applications that are integrated to M365 Services.
Why have I received the Application Credential Renewal email?
You have been contacted along with other administrators to ensure the information about the secret expiry has a wider-reach and is disseminated within your Organisation.
This is to ensure the application renewal is requested before the existing credential expires. Failure to renew and replace the existing credential will result in disruption to service(s) which depends on the application.
What should I do with the new application secret?
If the application is managed internally by someone in your Org/Team/Department, inform them to replace the existing secret with the newly generated one before the expiry date.
It is advisable to do the update as soon as possible. The existing secret will remain active alongside the new secret and will work for the remainder of the days until its expiry date.
If the application is managed by an external service provider, the secret should be shared with them at the earliest time to enable switchover to take place before the existing secret expires.
How soon can I use the new Application Secret?
Once generated, the new secret is active and can be used immediately after you receive it.
Where do I enter the new Application Secret?
The secret is like a password for the application and will need to be entered into the application’s configuration settings.
NHSmail team is unable to confirm exactly where the application information/settings are stored or configured, please contact your service provider or your app developer for assistance.
My application uses a certificate instead of a secret. How are these updated?
Certificates are created at the developer side and installed locally on the machines that use the application. Your developer will need to generate a self-signed certificate and provide that to the NHSmail team for upload to the application in MS Entra.
What is Role Based Access Control for Applications in Exchange Online?
Role Based Access Control for Applications in Exchange Online (EXO RBAC) is Microsoft’s recommended method for scoping application permissions.
It allows organisations to restrict an application’s access so that permissions apply only to the specific mailboxes requested, rather than across the entire tenant.
EXO RBAC replaces the legacy Application Access Policies model and provides a more secure and granular approach to managing application access.
It seems my application does not work with EXO RBAC?
The application registration request has been granted Application permissions and scoped using Role Based Access Control for Applications in Exchange Online (EXO RBAC).
In some cases, the supplier’s solution may not yet support this newer scoping method. Where this occurs, the application may not function as expected.
The local organisation should therefore liaise with their supplier and request that they update their solution to support Microsoft’s current EXO RBAC scoping model.
For further information, suppliers can refer to Microsoft’s guidance on Application RBAC in Exchange Online.
https://learn.microsoft.com/en-us/exchange/permissions-exo/application-rbac
| Last Reviewed Date | 16/07/2026 |