
1. Overview
This Quick Start User Guide is intended to be used by end users who will be using Windows devices enrolled onto Intune.
Please follow the step-by-step instructions to begin using your Intune-enrolled Windows device. If you have any questions or queries about any of the following enrolment steps or other content in this document please contact your Local Administrator (LA).
This Quick Start End User Guide covers the steps which need to be followed to enrol both Single User and Shared User devices. There is no difference between the enrolment process for Windows 10 devices which will be used by a single user or used as shared devices.
2. Getting started on Windows (Single User and Shared Devices)
 Step 1. Unbox your Windows device, plug it in to power and turn it on.
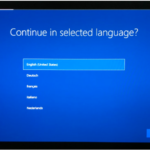
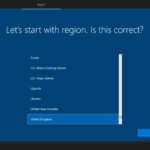 Step 2. Select your language preference and United Kingdom as your region from the list of options displayed to you.
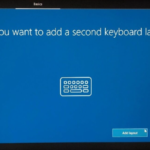 Step 3. You will be given the option of using a second keyboard. Either select the Add Layout, to use a second keyboard or the Skip option.
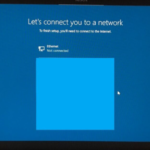 Step 4. You will now need to connect to a Wi-Fi network. Please select the network you would like to connect to from the options listed on your Windows device.
 Step 5. Please wait while your device begins enrolling and applying all relevant settings. This is an automatic process. You are not required to do anything at this step.
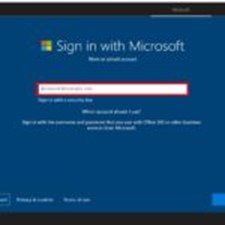 Step 6. You will then need to enter your NHSmail account credentials (username and password) to sign in. You will also be required to complete Multi-Factor Authentication (MFA) at this step. MFA is an additional security step and this may already have been set up by you when you created your nhs.net email address.
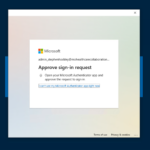 You will be sent a Multi-Factor Authentication (MFA) request to confirm your identity before the signing in process can complete. The MFA prompt shown below will appear on the device on which you set up two-factor authentication for your NHSmail account. This may be another device. You will need to follow the instructions presented to you, and select Approve, Confirm or Allow when asked to do so.
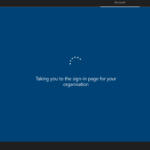 Step 7. Once you have successfully completed the MFA step, you will see a loading screen before you are directed to the NHSmail Portal. This is an automatic process. You are not required to do anything at this step.
 Step 8. When your device shows the NHSmail Portal Login screen, you will need to enter your password. Your email address should auto-fill as you entered this on Step 6 and so you will not have to manually re-enter it at this step. Select Sign In once you have entered your password.
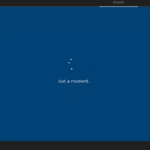 Step 9. Please wait a few moments while your device is getting set up. This is an automatic process. You are not required to do anything at this step. You will see the following loading screen.
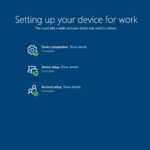 Step 10. Once Setup tasks on your device are completed, your device will begin to download policies, apps and other settings. Please be patient while this completes. If you would like to see further details, you can select Show details for a summary of the specific tasks your device is working on completing or has completed.

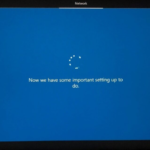
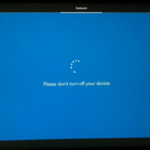
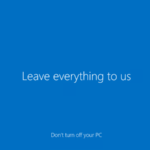 Step 11. Your device will need to complete some final setup tasks. This may take several minutes. This is an automatic process. You are not required to do anything at this step. Please do not turn off your device while this is happening. You may see the following loading screens.


 Step 12. The Setting up your device for work screen will reappear and there may be some final updates to be completed. Please wait for these updates to complete. Once they have completed, you should see that all tasks are marked as complete.
If you would like to see further details, you can select Show details for a summary of the specific tasks your device is working on completing or has completed.
 Step 13. Once the setup is complete, your device will show your home screen and you will see the notification Your device is ready appear in the bottom right-hand corner. Your device is now ready to use.
| Last Reviewed Date | 09/08/2024 |