Shared channels in Microsoft Teams create collaboration spaces for people inside and outside your team or organisation. They offer a seamless and improved version of collaboration with those inside and outside of the NHSmail central tenant, helping to extend teamwork effectively and efficiently across organisational boundaries.
This article is intended to set out how to use the Teams shared channels functionality for NHSmail users and Local Administrators. For more information, please refer to the additional guidance for Users and the guidance for Local Administrators.
How to set up a Teams shared channel?
To set up a Teams shared channel, please follow the steps below.

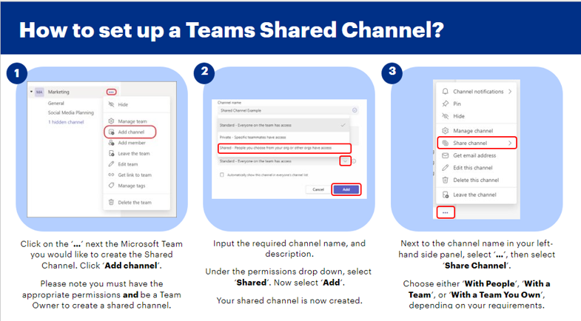
- Click on the ‘…’ next to the Microsoft Team you would like to create the shared channel. Click ‘Add channel’.
- Input the required channel name and description.
- Under the permissions drop down, select ‘Shared’. Now select ‘Add’.
- Your shared channel is now created.
- Next to the channel name in your left-hand side panel, select ‘…’, then select ‘Share Channel’.
- Choose either ‘With People’, ‘With a Team’, or ‘With a Team You Own’ depending on your requirements.
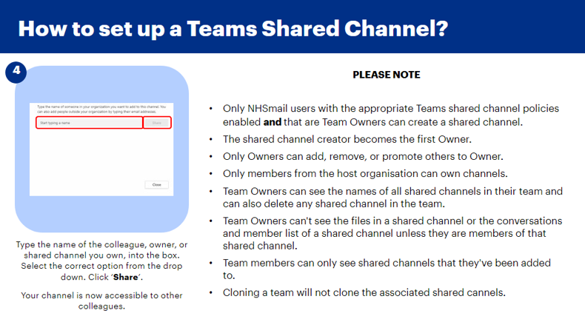
- Type the name of the colleague, owner, or shared channel you own, into the box. Select the option from the drop down. Click ‘Share’.
- Your channel is now accessible to other colleagues.
How to add members to a Teams shared channel?
An Owner of a shared channel has all the normal channel levels controls available for a standard channel within Teams. Channel Owners also have a tab to manage Invites. These are used when a Shared Channel is added to another Team.
When an external user is added to a shared channel, they do not receive an email notification. Instead, the user will receive a notification in Teams in their activity feed. The notification will include the name of the person who shared the channel, the name of the Team the channel is linked to, and the name of the shared channel.
How to access a Teams shared channel?
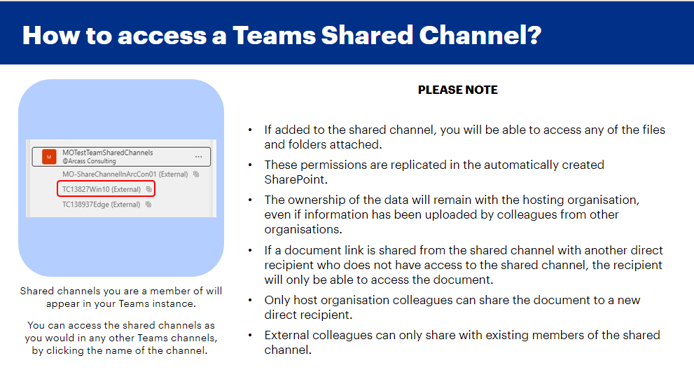
Shared channels you are a member of will appear in your Teams instance. You can access the shared channels as you would in any other Teams channels, by clicking the name of the channel.
How to communicate in a Teams shared channel?
When you go to any channel in Teams, the first tab you’ll see is Posts. Think of Posts as one big group conversation. Everyone who has access to the channel can see all the messages on the Posts tab.
To create a post in a Teams shared channel, please follow the steps below.
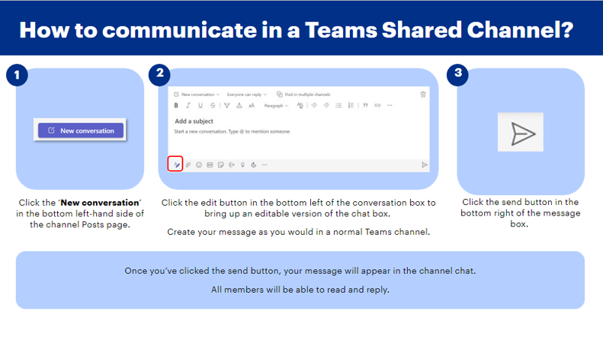
- Click the ‘New conversation’ in the bottom left-hand side of the channel Posts page.
- Click the edit button in the bottom left of the conversation box to bring up an editable version of the chat box.
- Create your message as you would in a normal Teams channel.
- Click the send button in the bottom right of the message box.
- Your message will appear in the channel chat.
- All members will be able to read and reply.
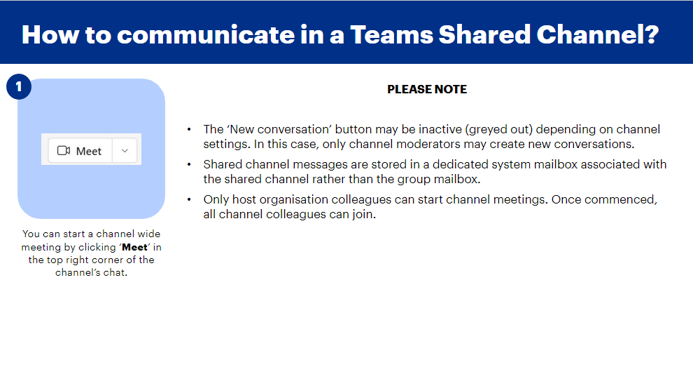
The ‘New Conversation’ button may be inactive (greyed out) depending on the channel settings. In this case, only channel moderators may create new conversations.
Shared channel messages are stored in a dedicated system mailbox associated with the shared channel rather than the group mailbox. For more information about performing an eDiscovery search for shared channel messages, see the Microsoft guidance on conducting an eDiscovery investigation of content in Microsoft Teams.
Shared channels support both ‘Meet Now’ and ‘Scheduled Meetings’.
Only internal host organisation channel members can start or schedule a meeting. Once commenced, all channel members can join.
You can start a channel wide meeting by clicking ‘Meet’ in the top right corner of the channel’s chat.
For scheduled meetings, the person who schedules the meeting is assigned the meeting organiser role. The meeting is still classed as a channel meeting rather than a personal meeting. The channel will include a ‘Join’ button for the meeting as a new chat thread.
How to manage files in a Teams shared channel?
Shared channels facilitate the synchronous storing and editing of documents, avoiding tricky version control across organisations.
Users can create a new file directly in the shared channel and upload an existing file to the shared channel. Users can also view, edit, delete, download, move, copy and rename files. Internal users can share files while external users can only share files with users who already have access to the shared channel.
To manage files in a Teams shared channel, please follow the steps below.
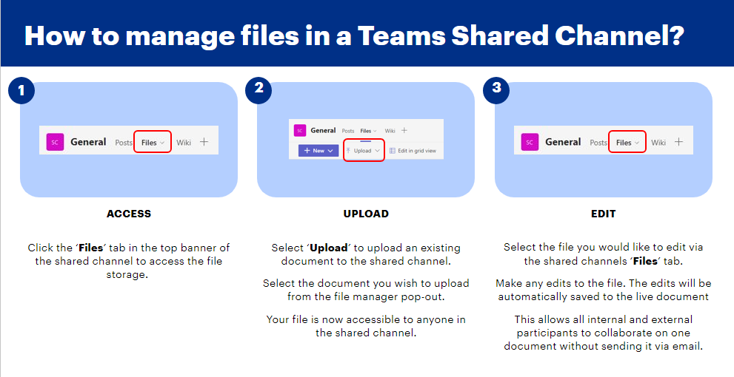
- Click the ‘Files’ tab in the top banner of the shared channel to access the file storage.
- To upload a file, select ‘Upload’ to upload an existing document to the shared channel.
- Select the document you wish to upload from the file manager pop-out.
- Your file is now accessible to anyone in the shared channel.
- To edit a file, select the file you would like to edit via the shared channel ‘Files’
- Make any edits to the file. The edits will be automatically saved to the live document. This allows all internal and external participants to collaborate on one document without sending files via email.
How to manage permissions in a Teams shared channel?
If you are added to the shared channel, depending on your permissions, you will be able to access any of the files and folders attached. These permissions are replicated in the automatically created SharePoint.
The ownership of the data will remain with the hosting organisation, even if information has been uploaded by colleagues from other organisations. Please take appropriate steps to secure / save any necessary documents or files.
If a document link is shared from the shared channel with another direct recipient who does not have access to the shared channel, the recipient will only be able to access the document. This means that:
- Only host organisation colleagues can share the document to a new direct recipient.
- External colleagues can only share with existing members of the shared channel.
Files, folders, and OneNote notebooks in a shared channel can be shared with people outside the channel by using standard SharePoint file sharing. If a user is granted access to a file, folder, or notebook in a shared channel through SharePoint, removing the user from the team or shared channel won’t remove the user’s access to the file, folder, or notebook.
If an existing notebook is added as a tab to a shared channel, access to the Shared Channel isn’t changed and the notebook retains its existing permissions.
How to manage SharePoint sites associated with a Teams shared channel?
Each shared channel has its own SharePoint site. The separate site is to ensure access to shared channel files is restricted to only members of the shared channel.
These sites are created with a document library by default, and can be easily enhanced to a full-featured site through the site management interface.
Each site is created in the same geographic region as the site for the parent team. These lightweight sites have a custom template ID, “TEAMCHANNEL#0”, for easier management through PowerShell and Graph API.
What are the owner and member responsibilities in a Teams Shared Channel?
| Action | Team Owner | Team Member | Team Guest | Shared Channel Owner | Shared Channel Member | Shared Channel External Participant |
|---|---|---|---|---|---|---|
| Create Shared Channel | Yes | No | No | N/A | No | No |
| Delete Shared Channel | Yes | No | No | Yes | No | No |
| Leave Shared Channel | N/A | N/A | N/A | Yes (unless last owner) | Yes | Yes |
| Edit Shared Channel | No | N/A | N/A | Yes | No | No |
| Restore Deleted Shared Channel | Yes | No | No | Yes | No | No |
| Add Members | No | N/A | N/A | Yes | No | No |
| Edit Setting | No | N/A | N/A | Yes | No | No |
| Manage Tabs and Apps | No | N/A | N/A | Yes (apps must be installed) | Channel owner controlled | No |
A shared channel owner can’t be removed through the Teams client if they are the last owner of one or more shared channels.
If the last shared channel owner leaves your organisation or if they are removed from the Microsoft 365 group associated with the team, a member of the shared channel from the organisation is automatically promoted to be the shared channel owner.
Consider adding more than one owner to avoid this situation. An external user can never be the owner of a Shared Channel.
Each shared channel has its own settings that the channel owner can manage, including the ability to add and remove members, add tabs, and @mentioning for the entire channel. These settings are independent of the parent team settings. When a shared channel is created, it inherits settings from the parent team, after which its settings can be changed independently of the parent team settings.
What else do I need to know about managing Teams shared channel?
- Only users that are members of partner tenants, that have been configured for shared channels, can be added.
- The latest list of apps supported by shared channels can be found in this Microsoft guidance. Stream, Planner, and Forms are currently unable to be hosted within a shared channel.
- Bots, connectors, and message extensions are not supported.
- Notifications from shared channels are not included in missed activity emails.
- Only people with owner or member permissions in the channel will have access to content in the shared channel site. People in the parent team and admins won’t have access unless they are also channel members.
- A shared channel site syncs data classification from the site of the parent team.
- Membership to the site owner and member groups are kept in sync with the membership of the shared channel.
- Site permissions for a shared channel site can’t be managed independently through SharePoint.
- Teams manages the lifecycle of the shared channel site. If the site is deleted outside of Teams, it is restored automatically within four hours as long as the shared channel is still active. If the site is permanently deleted, a new site is provisioned for the shared channel.
- If a shared channel or a team containing a shared channel is restored, the sites are restored with it. If a shared channel site is restored and it’s beyond the 30-day soft delete window for the shared channel, the site operates as a standalone site.
- Only high-level presence, such as “Available”, “Busy” and “Do Not Disturb”, is supported. Rich presence such as “Busy – in a call” is not shared. Out-of-Office information is not displayed as part of the external user’s presence information.
Where can I find out more about Teams shared channel?
For more information, please refer to the additional guidance for Users and the guidance for Local Administrators.
You can also refer to the following Microsoft guidance for more information:
- Create a shared channel in Microsoft Teams
- Share a channel with people in Microsoft Teams
- Share a channel with a team in Microsoft Teams
- Why use a shared channel versus other channel types in Teams?
- Guests and shared channels in Microsoft Teams
- Shared channel owner and member roles in Microsoft Teams
- Manage shared channels in Microsoft Teams
| Last Reviewed Date | 16/10/2023 |