What is Multi-Factor Authentication (MFA)?
Normally you use your email address and password to log into your NHSmail account. Multi-factor authentication (MFA) is an additional way of checking that it is really you when you log in to your account.
In addition to your email address and password, you will need to set up a second form of authentication, such as an authentication app on your mobile phone, text message or phone call. This second layer of security is designed to prevent anyone but you from accessing your account, even if they know your password.
Why is MFA important to the NHS?
 Cyberattacks on electronic health records and other systems pose a risk to patient privacy because hackers could access sensitive information, potentially causing harm to patient safety and care delivery. Hackers can use ransomware viruses to hold medical records or devices hostage, risking your access to vital tools and information.
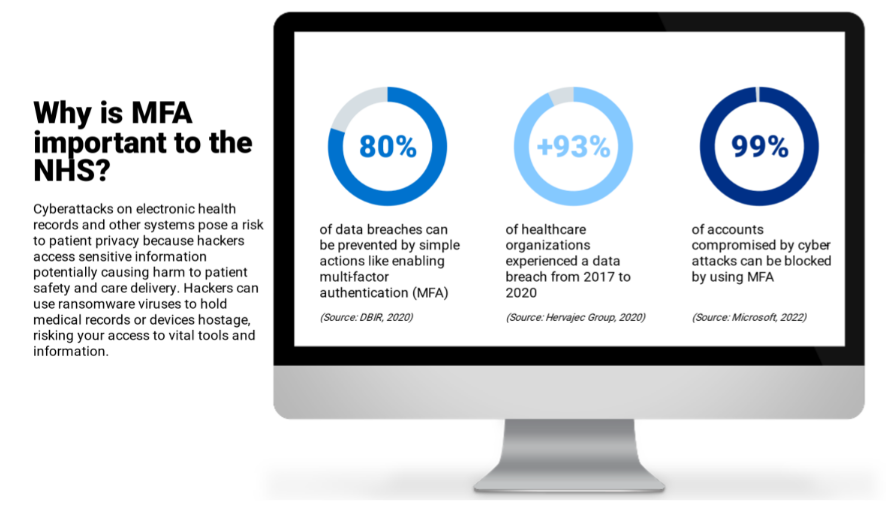
- Up to 80% of data breaches can be prevented by simple actions like enabling MFA – Source: DBIR, 2020
- Over 93% of healthcare organisations experienced a data breach from 2017 to 2020 – Source: Herjavec Group, 2020
- More than 99.9% of accounts compromised by cyber attacks can be blocked by using MFA – Source: Microsoft, 2022
What are the benefits of MFA?
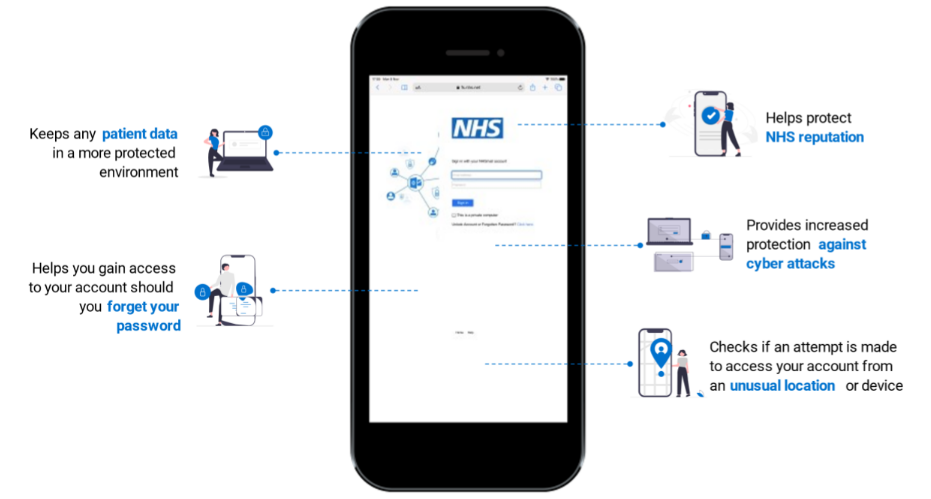
- Keeps any patient data in a more protected environment
- Helps you gain access to your account should you forget your password
- Helps protect NHS reputation
- Provides increased protection against cyber attacks
- Checks if an attempt is made to access your account from an unusual location or device
What are my authentication options for MFA?

There are three options available that you can choose from to authenticate your account: mobile app, text message or phone call . The recommended option by Microsoft is the mobile app given is the more secure one in case your mobile phone is lost or stolen it would be harder to access and generate the approval on the app.
- Authentication App: Download the Microsoft Authenticator app to your smartphone to verify your sign in or to get a verification code.
- Text message: A text message (SMS) is sent to the mobile phone number registered containing a verification code.
- Call: An automated voice call is made to the mobile phone number registered prompting the user to press # on their keypad.
You should enable MFA using mobile app, text message or phone call in addition to using a FIDO2 token or NHS Smartcard for security purposes. If using a FIDO2 token or NHS Smartcard in addition to another MFA option, you won’t be challenged for MFA.
How do I set up MFA?
To set up MFA you can start by self-enrolling [go to 1.1 Self-Enrol Steps] or by being prompted on the NHS Portal login page.
After this, you will need to select your authentication method and follow the steps below and / or watch the videos to learn how to enrol for MFA.
Note: Remember to always register an alternative method of multi-factor authentication (MFA) for emergencies, such as an alternative mobile phone number or set up the Microsoft Authenticator app on another mobile device.
If you are using a mobile browser to enrol in MFA the steps should follow the same as for desktop browser for all methods, except for Microsoft Authenticator app.
1.1 Self-Enrol


Download the full Step by Step Guidance for Self Enrol
Follow the steps below to enrol in MFA:
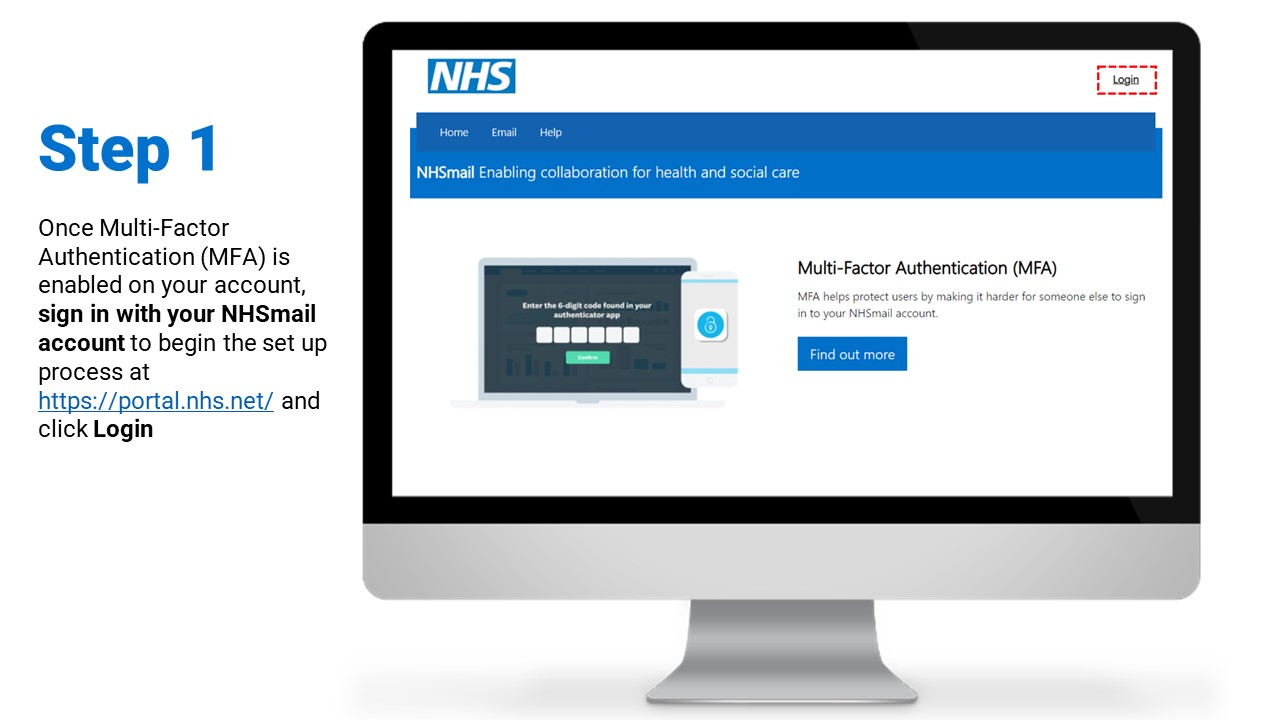
- Step 1: Sign in with your NHSmail account to begin the set up process at https://portal.nhs.net/ and click Login
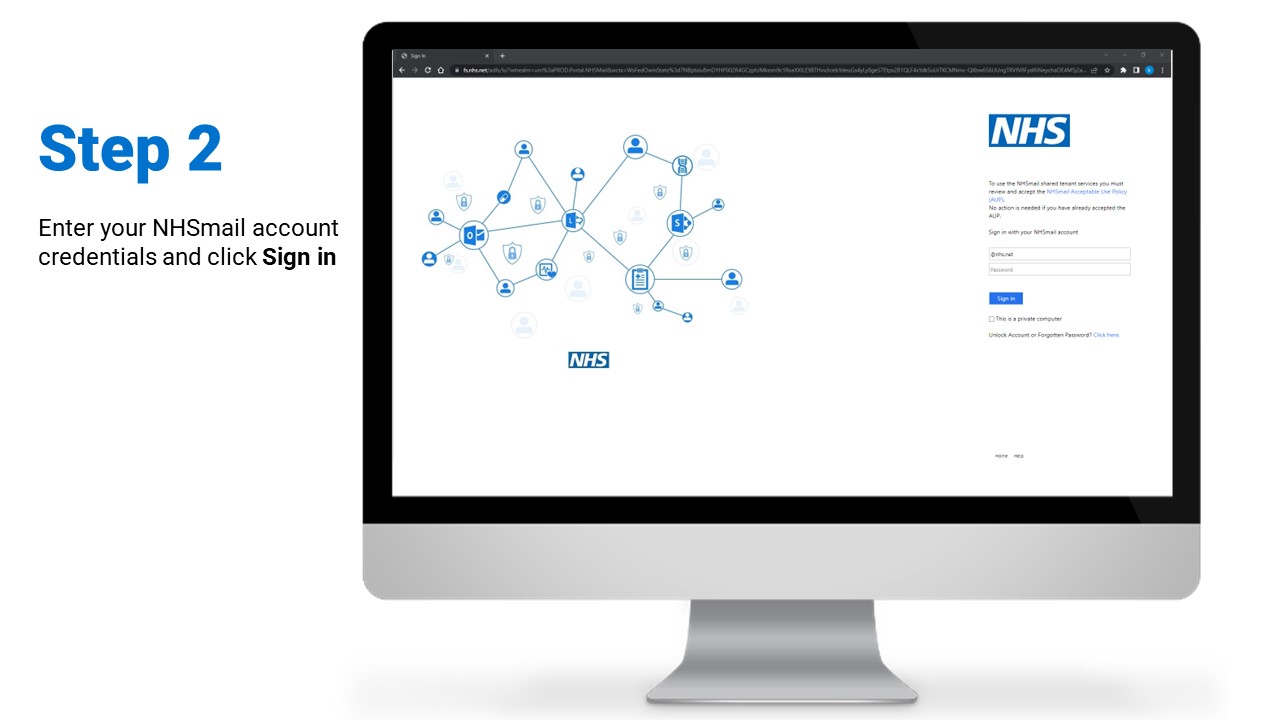
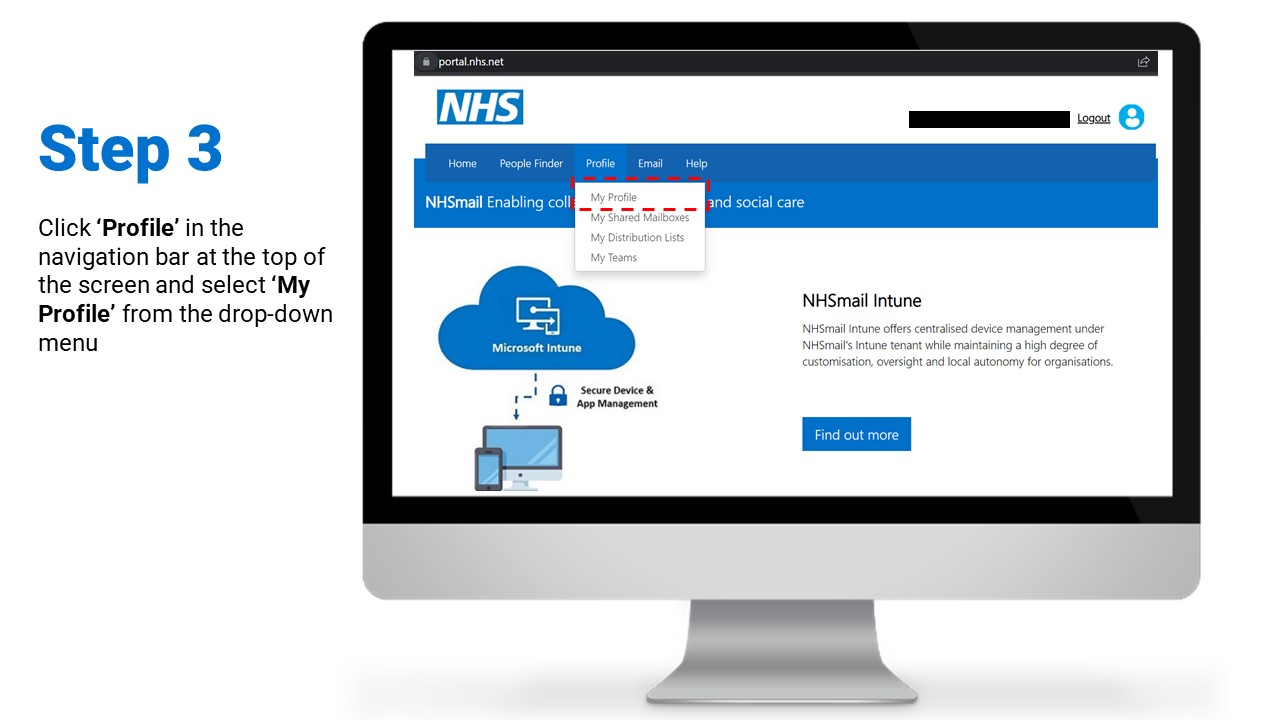
- Step 2: Click ‘Profile’ in the navigation bar at the top of the screen and select ‘My Profile’ from the drop-down menu
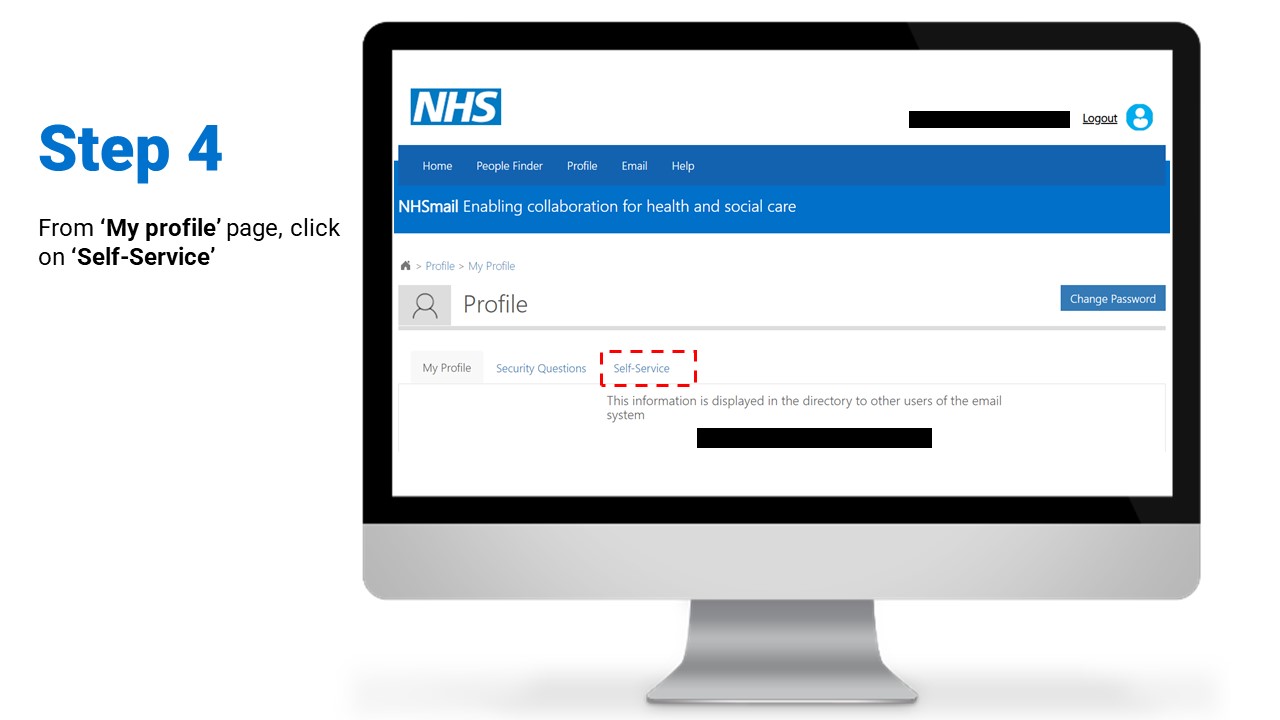
- Step 3: From ‘My profile’ page, click on ‘Self-Service’
- Step 4: Select ‘Self-enrol’ for MFA
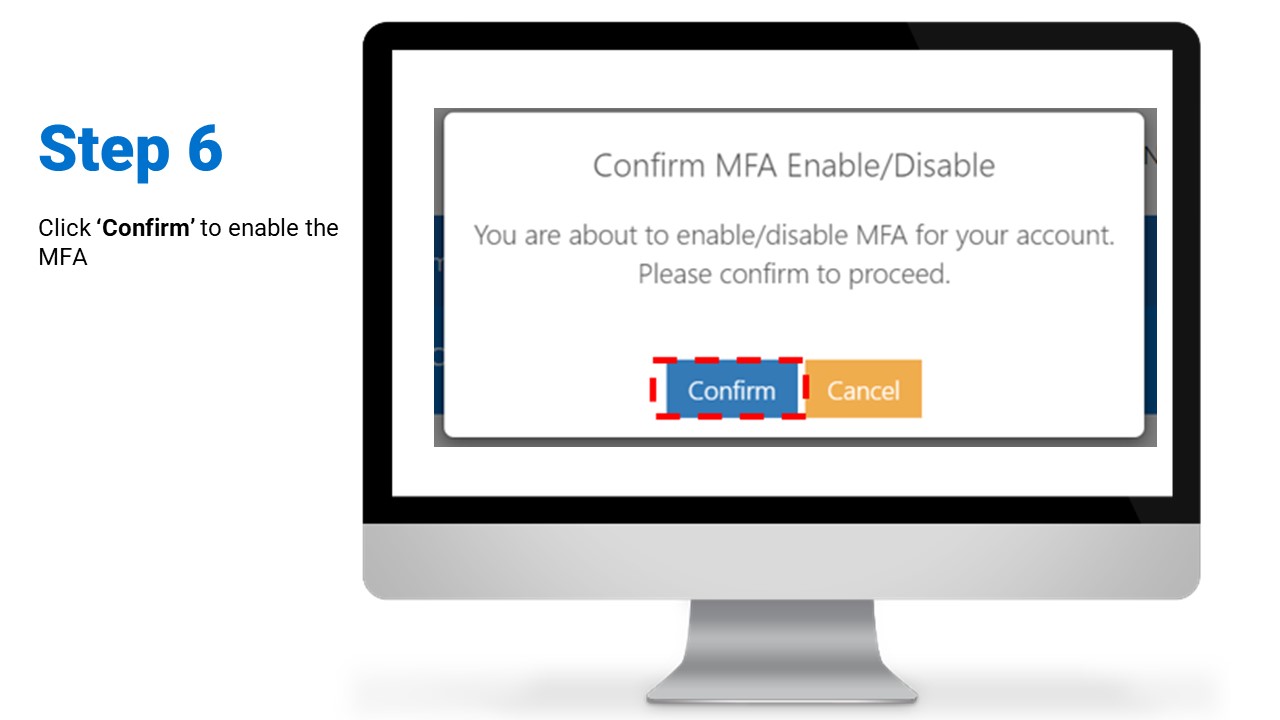
- Step 5: Click ‘Confirm’ to enable the MFA
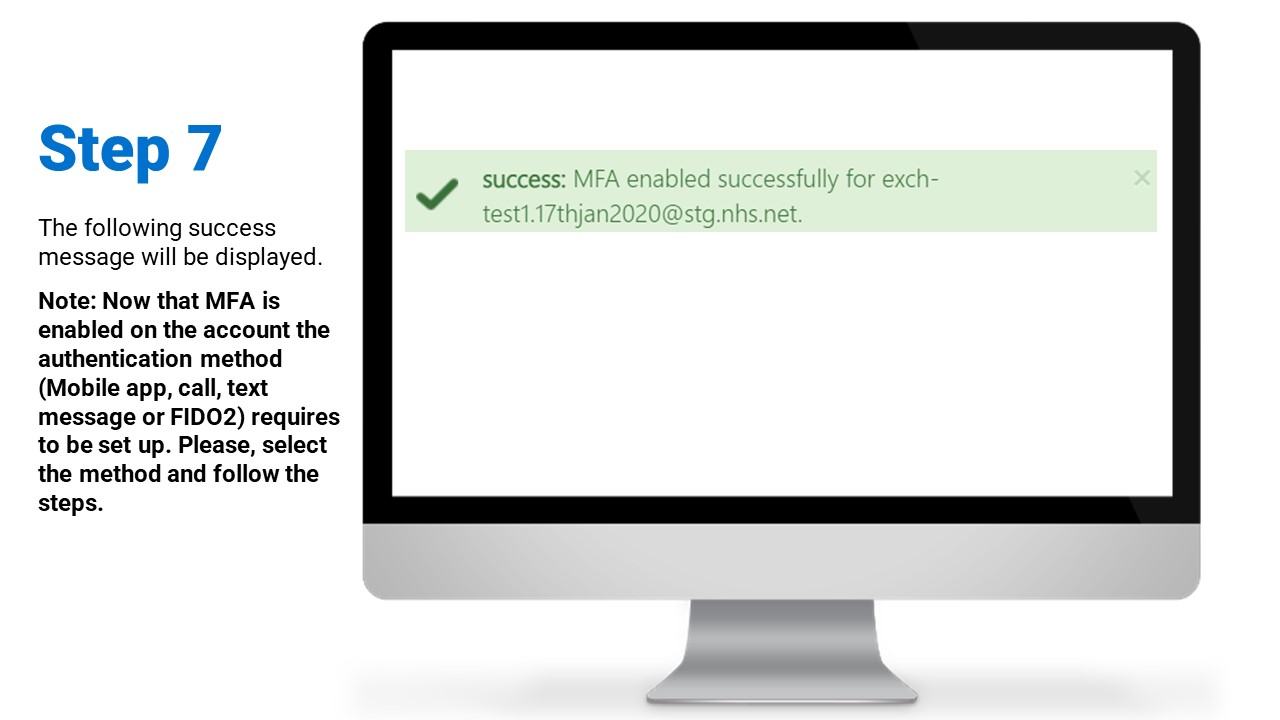
- Step 6: The following success message will be displayed: ‘success: MFA enabled successfully for nhsmailaccount@nhs.net’.
Note: Now that MFA is enabled on the account the authentication method (Mobile app, call or text message) requires to be set up. Please, select the method and follow the steps.
1.2 Microsoft Authenticator App
To register for MFA with the Microsoft Authenticator app, watch the video above or follow the steps below.
Download the full Step by Step Guidance for Microsoft Authenticator app
Follow the steps below to enrol in MFA:
Please start from Step 5, if you already have the Microsoft Authenticator app downloaded and have enabled Multi-Factor Authentication (MFA) on your NHSmail account.
If you do not have the Microsoft Authenticator app downloaded, please follow the instructions for set up by starting from Step 1. Please note that the Microsoft Authenticator app is free and you should not have to make a payment at any point of the process.
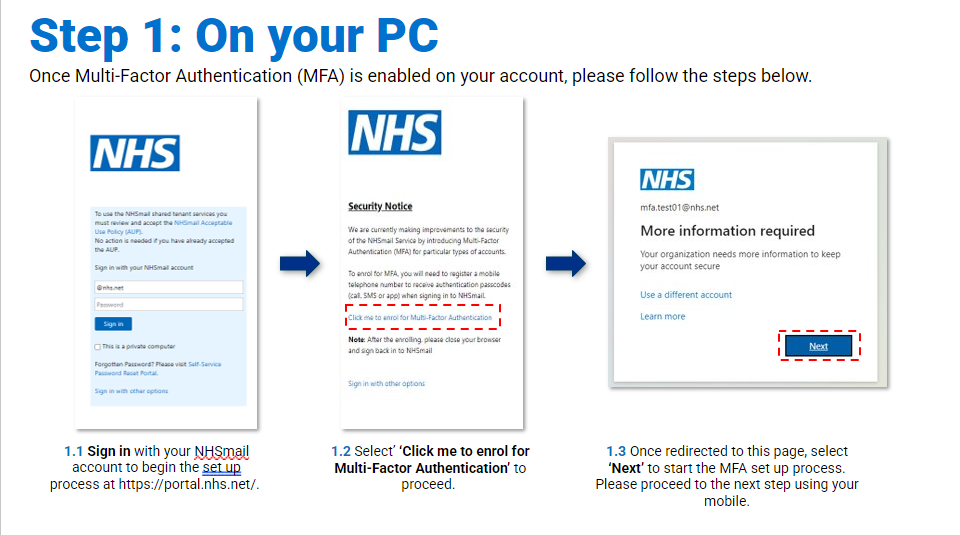
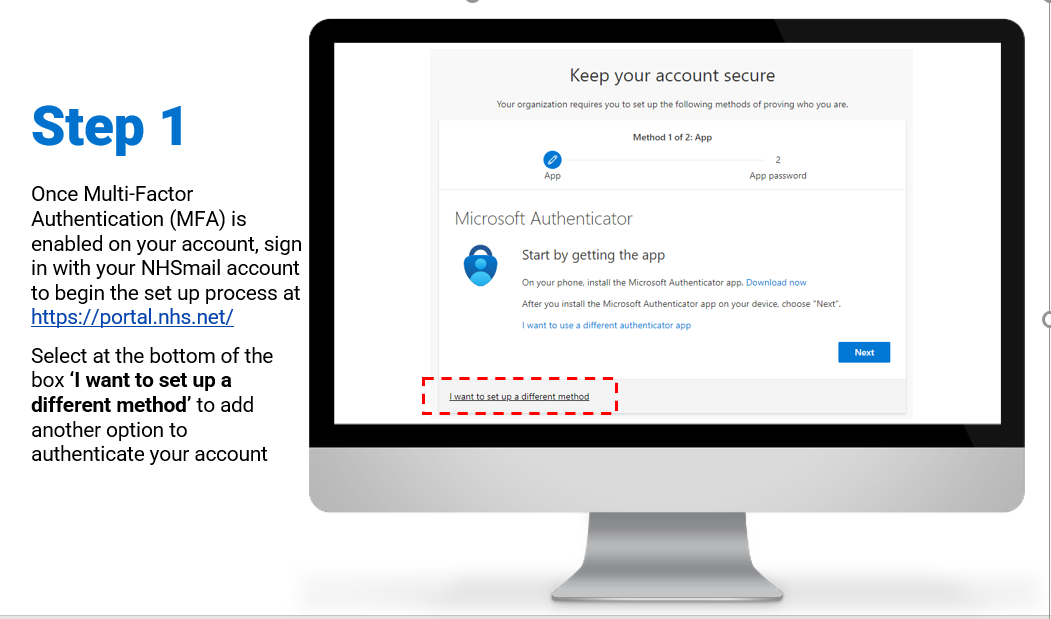
- Step 1: Once Multi-Factor Authentication (MFA) is enabled on your account, sign in with your NHSmail account on your PC to begin the set up process at https://portal.nhs.net/. Select ‘Click me to enrol for Multi-Factor Authentication’ to proceed. Once redirected to this page, select ‘Next’ to start the MFA set up process. Please proceed to the next step using your mobile.
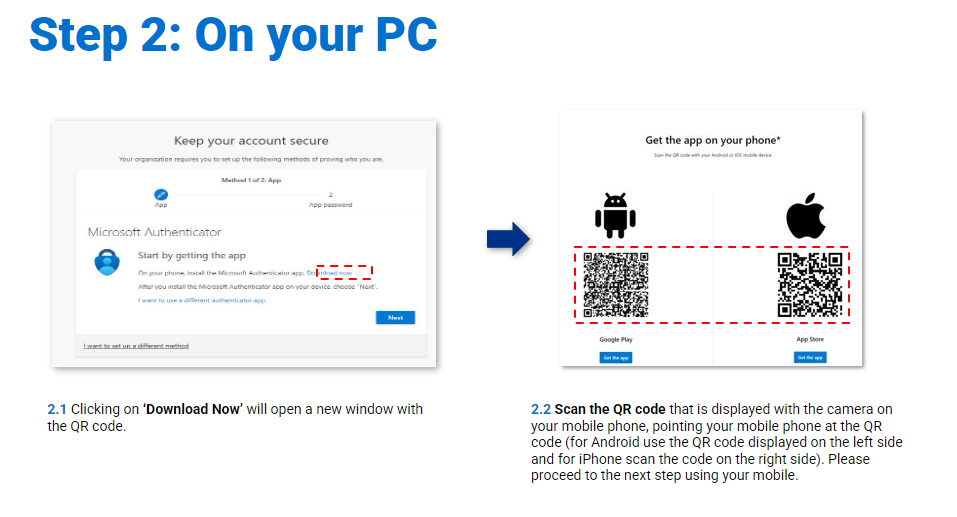
- Step 2: Clicking on ‘Download Now’ will open a new window with the QR code. Scan the QR code that is displayed with the camera on your mobile phone, pointing your mobile phone at the QR code (for Android use the QR code displayed on the left side and for iPhone scan the code on the right side). Please proceed to the next step using your PC.
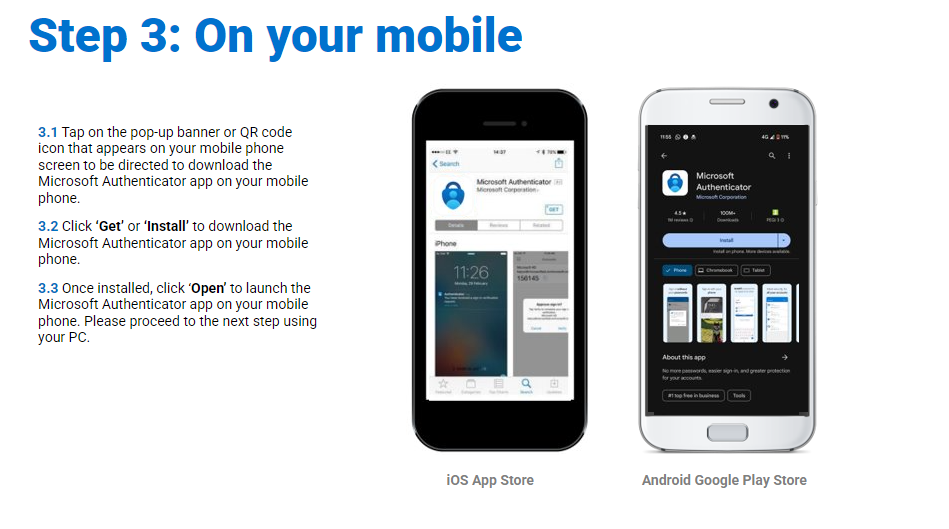
- Step 3: Tap on the pop-up banner or QR code icon that appears on your mobile phone screen to be directed to download the Microsoft Authenticator app on your mobile phone. Click ‘Get’ or ‘Install’ to download the Microsoft Authenticator app on your mobile phone. Once installed, click ‘Open’ to launch the Microsoft Authenticator app on your mobile phone.
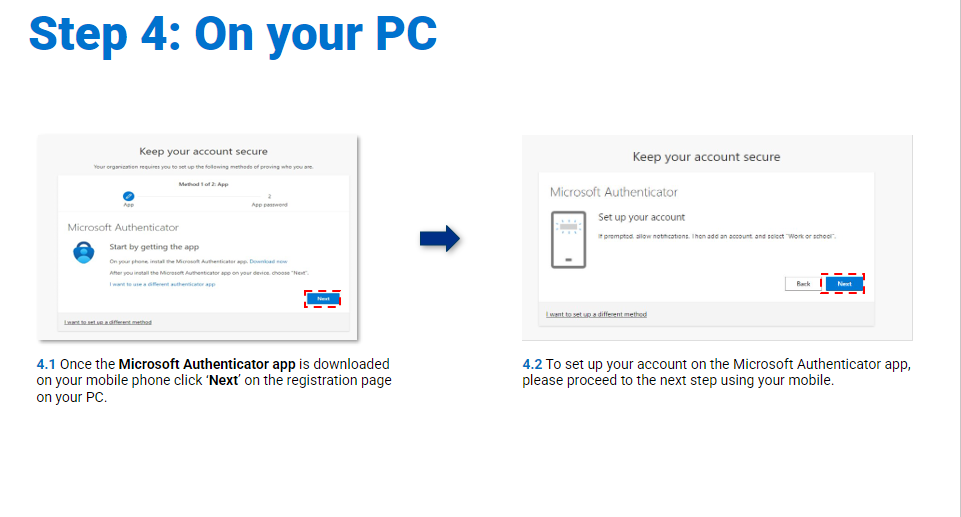
- Step 4: Once the Microsoft Authenticator app is downloaded on your mobile phone click ‘Next’ on the registration page on your system. To set up your account on the Microsoft Authenticator app, please proceed to the next step using your mobile.
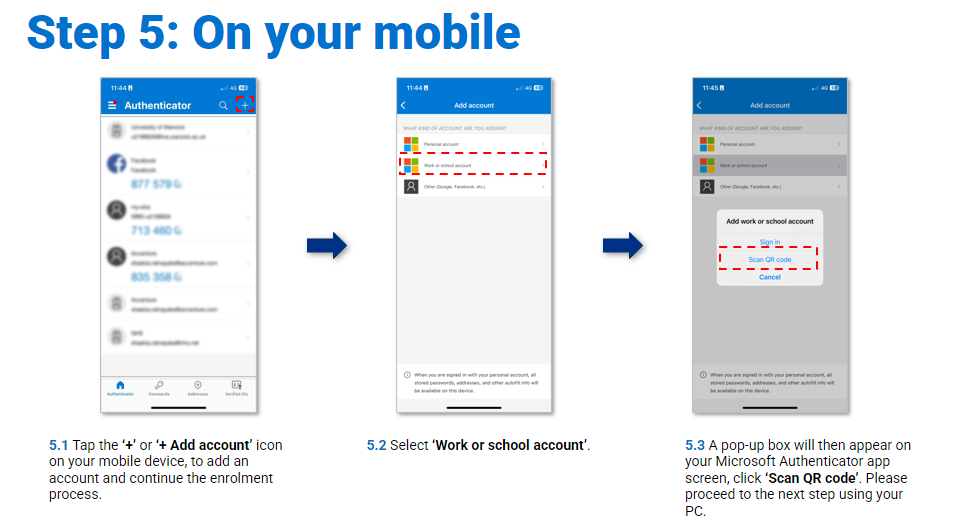
- Step 5: Tap the ‘+’ or ‘+ Add account’ icon on your mobile device, to add an account and continue the enrolment process. Select ‘Work or school account’. A pop-up box will then appear on your Microsoft Authenticator app screen, click ‘Scan QR code’. Please proceed to the next step using your PC.
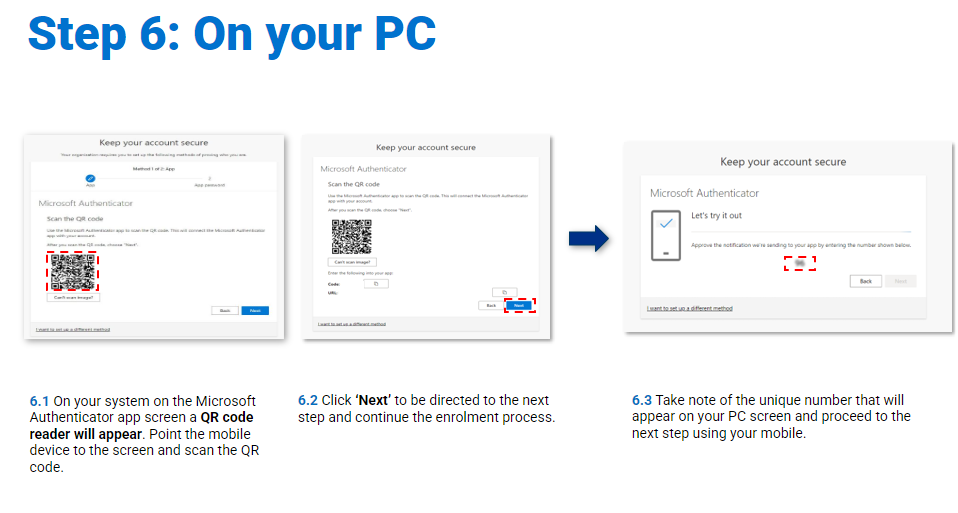
- Step 6: On your system on the Microsoft Authenticator app screen a QR code reader will appear. Point the mobile device to the screen and scan the QR code. Click ‘Next’ to be directed to the next step and continue the enrolment process. Take note of the unique number that will appear on your PC screen and proceed to the next step using your mobile.
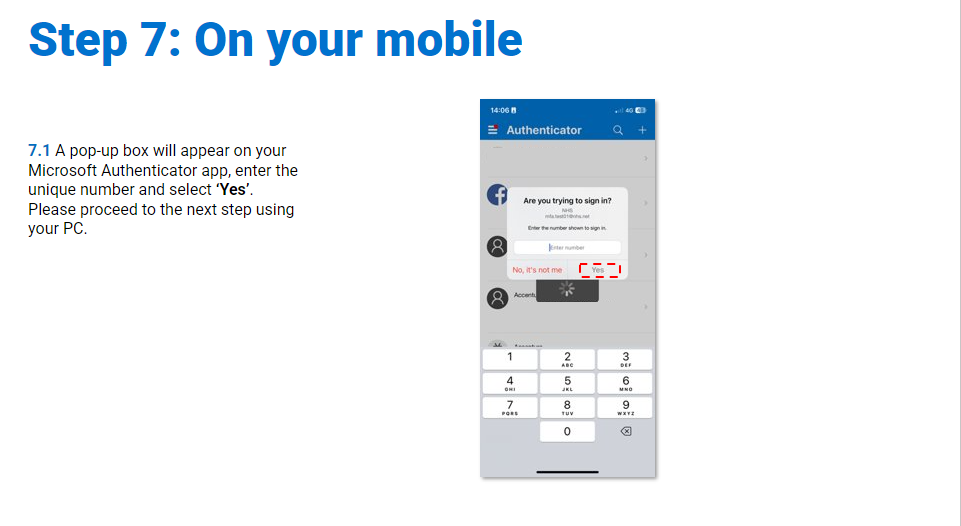
- Step 7: A pop-up box will appear on your Microsoft Authenticator app, enter the unique number and select ‘Yes’. Please proceed to the next step using your PC.
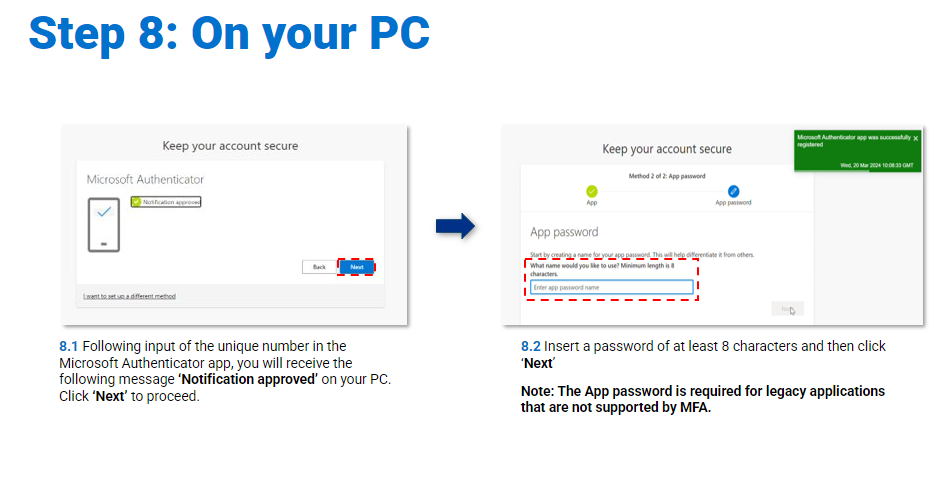
- Step 8: Following input of the unique number in the Microsoft Authenticator app, you will receive the following message ‘Notification approved’ on your PC. Click ‘Next’ to proceed. Insert a password of at least 8 characters and then click ‘Next’.
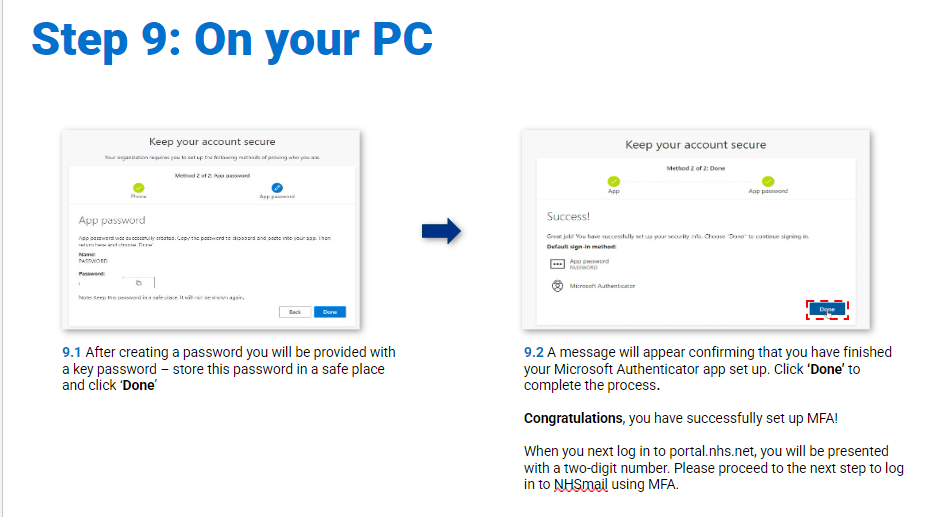
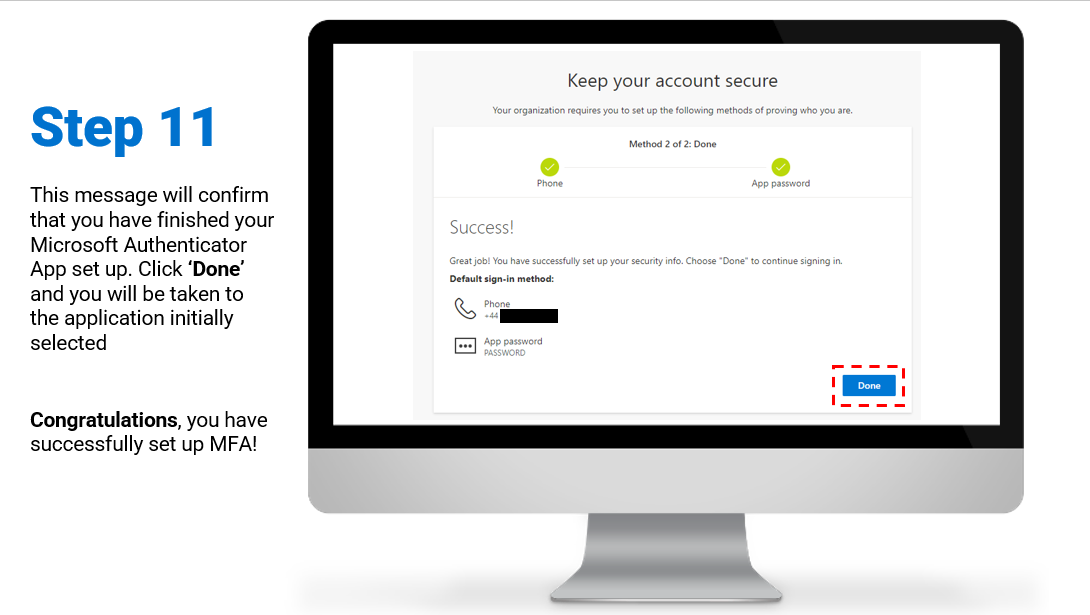
- Step 9: After creating a password you will be provided with a key password – store this password in a safe place and click ‘Done’. A message will appear confirming that you have finished your Microsoft Authenticator app set up. Click ‘Done’ to complete the process. Congratulations, you have successfully set up MFA!
When you next log in to portal.nhs.net, you will be presented with a two-digit number, number matching is a key security notification in Microsoft Authenticator. Please proceed to the next step to log in to NHSmail using MFA.
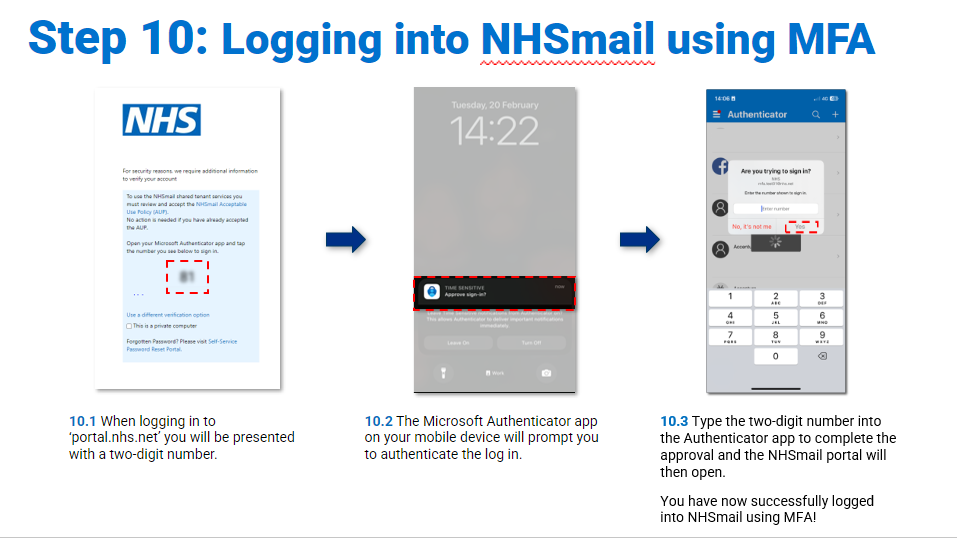
- Step 10: When logging in to ‘portal.nhs.net’ you will be presented with a two-digit number. The Microsoft Authenticator app on your mobile device will prompt you to authenticate the log in. Type the two-digit number into the app to complete the approval and the NHSmail portal will then open.
You have now successfully logged into NHSmail using MFA!
Please note: You won’t be able to install or use Microsoft Authenticator on Apple Watch. Microsoft recommends that you delete Microsoft Authenticator from your Apple Watch, and sign in with Microsoft Authenticator on another device.
1.3 Text Message
To register for MFA with text message, watch the video above or follow the steps below


Download the full Step by Step Guidance for text message
Follow the steps below to enrol in MFA:
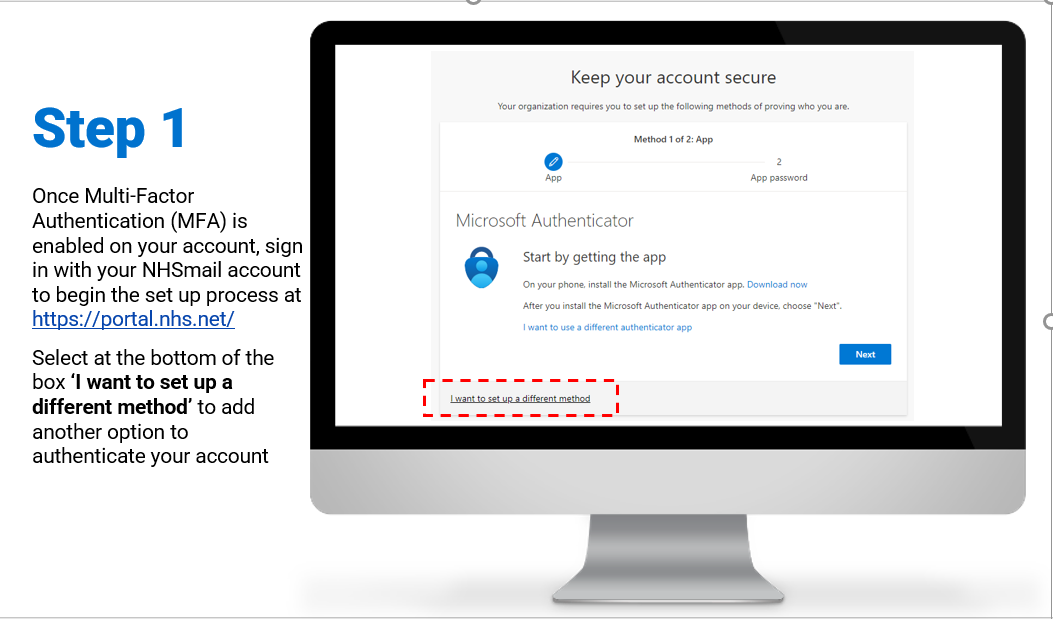
- Step 1: Once Multi-Factor Authentication (MFA) is enabled on your account, sign in with your NHSmail account to begin the set up process at https://portal.nhs.net/
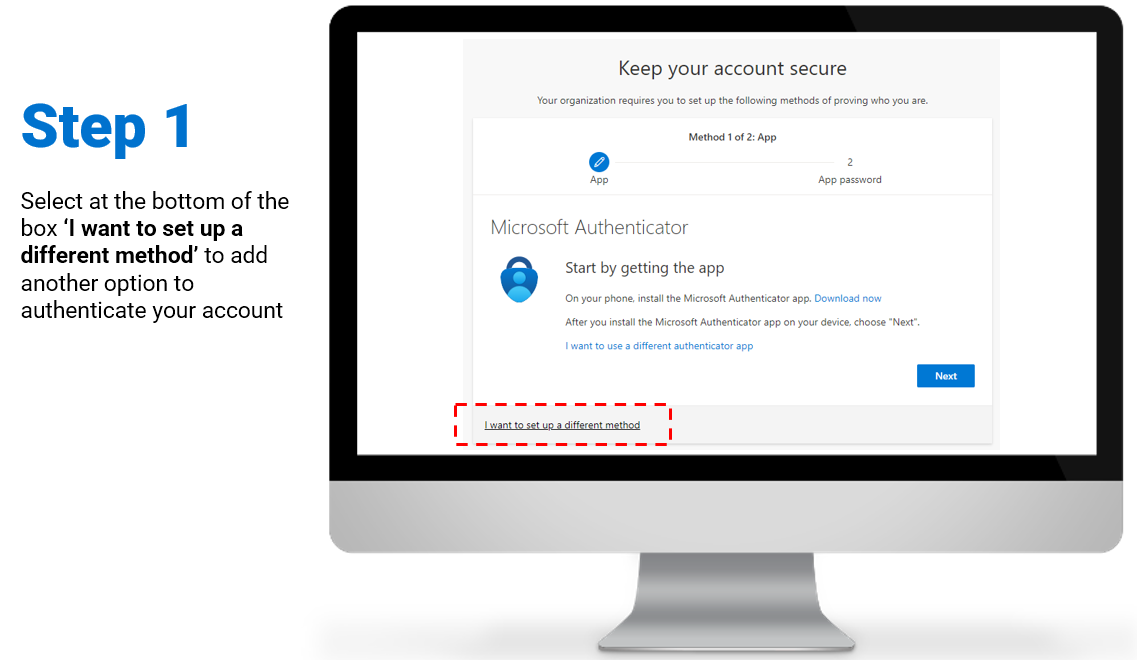
Select at the bottom of the box ‘I want to set up a different method’ to add another option to authenticate your account
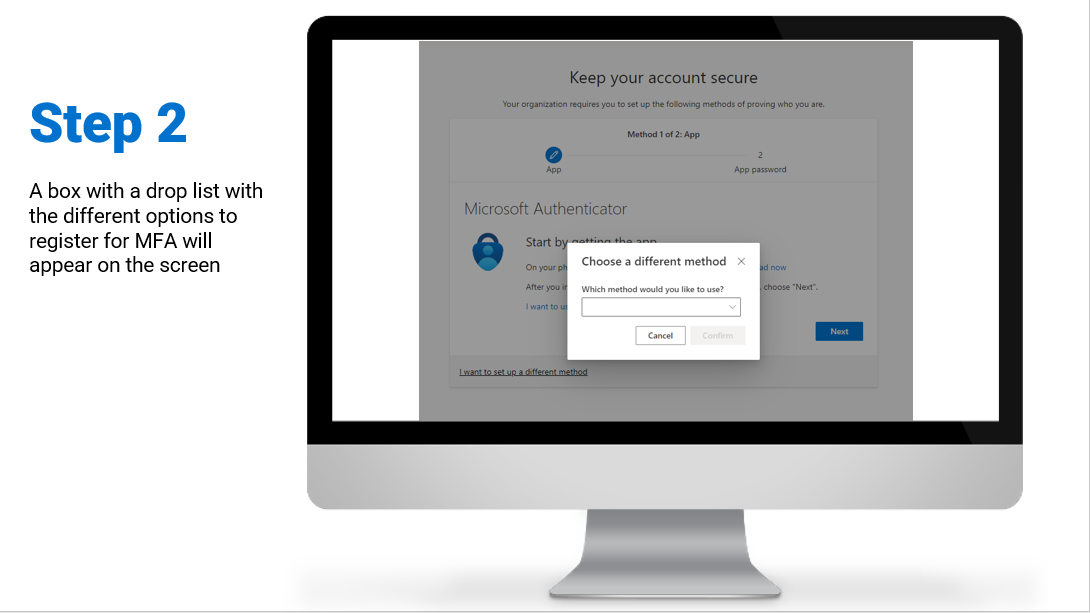
- Step 2: A box with a drop list with the different options to register for MFA will appear on the screen
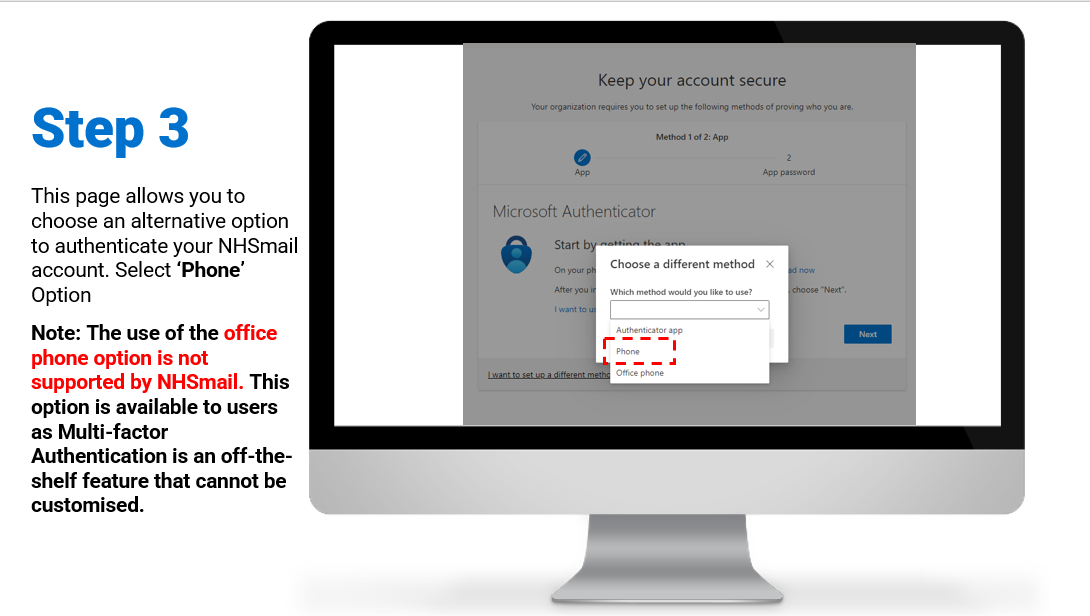
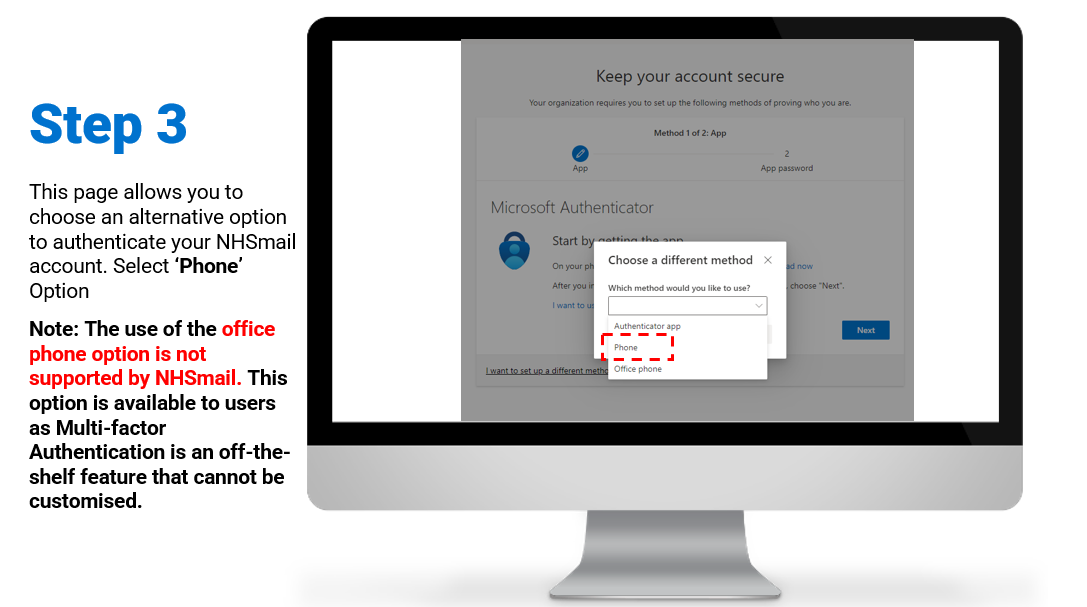
- Step 3: This page allows you to choose an alternative option to authenticate your NHSmail account. Select ‘Phone’ Option. Note: The use of the office phone option is not supported by NHSmail. This option is available to users as Multi-factor Authentication is an off-the-shelf feature that cannot be customised.
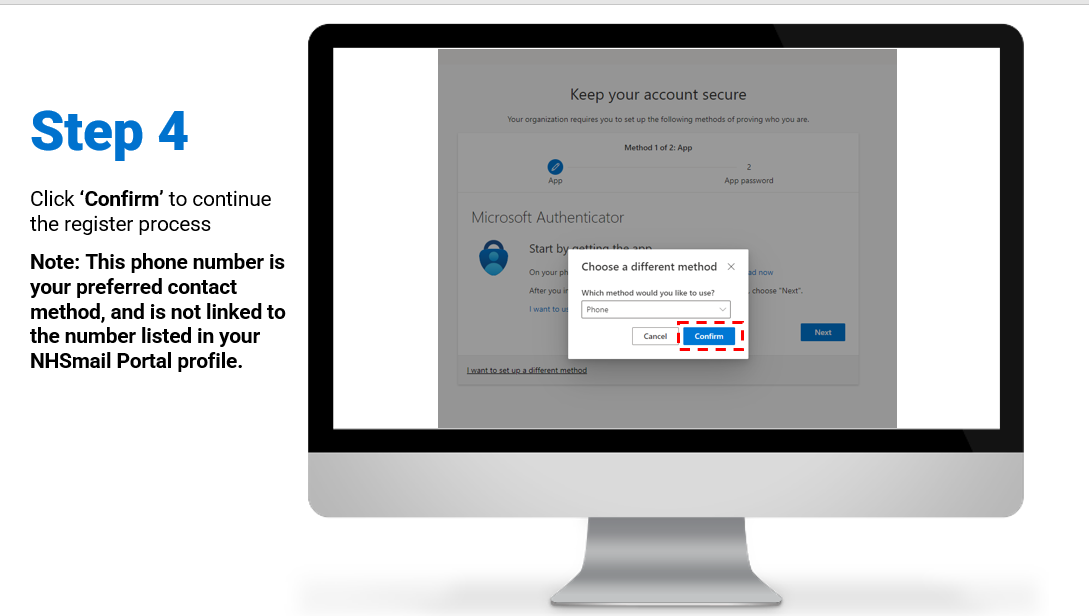
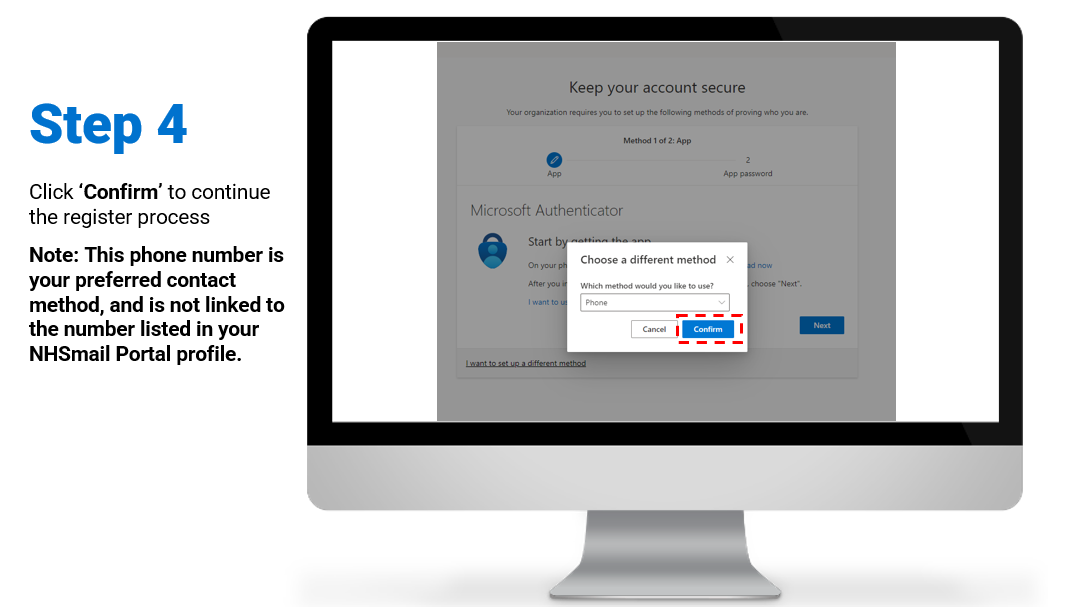
- Step 4: Click ‘Confirm’ to continue the register process. Note: This phone number is your preferred contact method, and is not linked to the number listed in your NHSmail Portal profile
- Step 5: Select your country code from the country options and enter the mobile phone number you would like to use, select ‘Text me a code’ as your authentication method and click ‘Next’. Note: Mobile numbers used to register for an NHSmail account must be UK based.
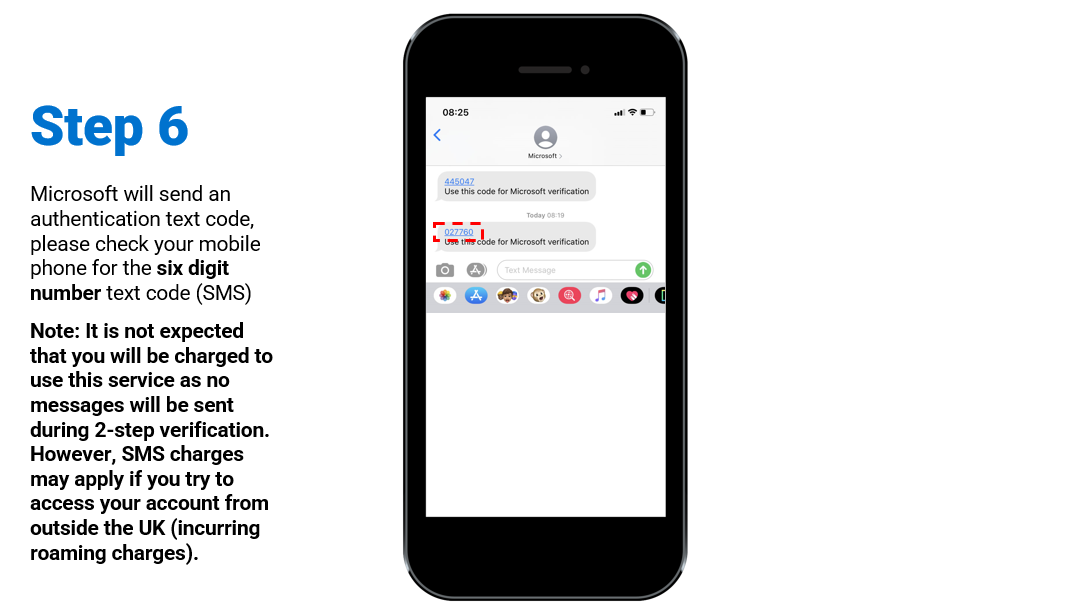
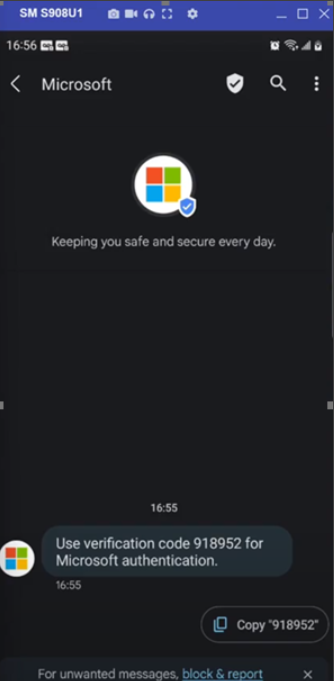
- Step 6: Microsoft will send an authentication text code, please check your mobile phone for the six digit number text code (SMS). Note: It is not expected that you will be charged to use this service as no messages will be sent during 2-step verification. However, SMS charges may apply if you try to access your account from outside the UK (incurring roaming charges).
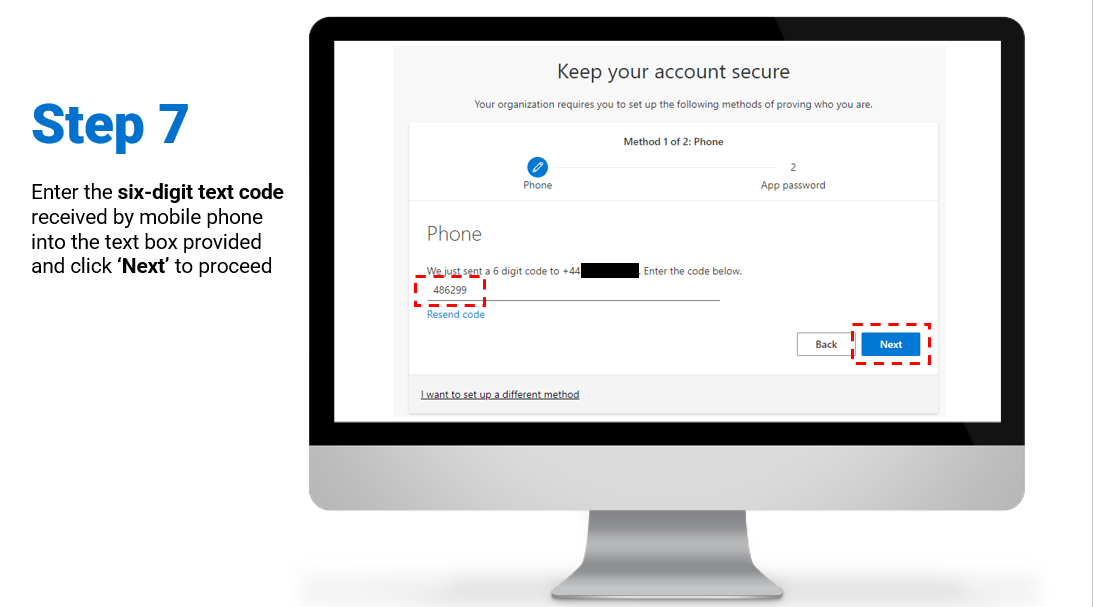
- Step 7: Enter the six-digit text code received by mobile phone into the text box provided and click ‘Next’ to proceed
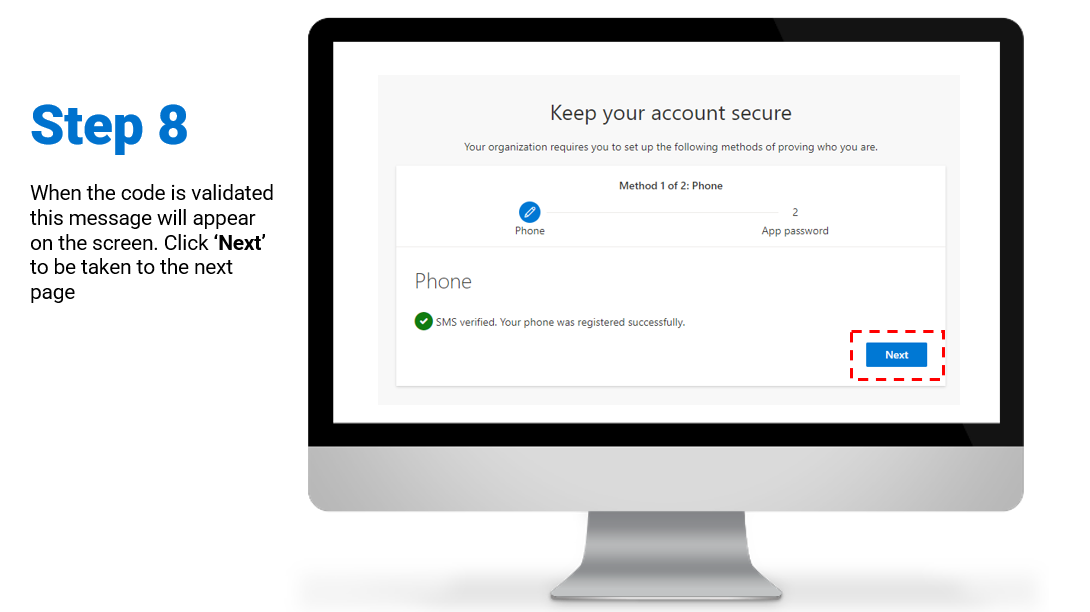
- Step 8: When the code is validated this message will appear on the screen. Click ‘Next’ to be taken to the next page.
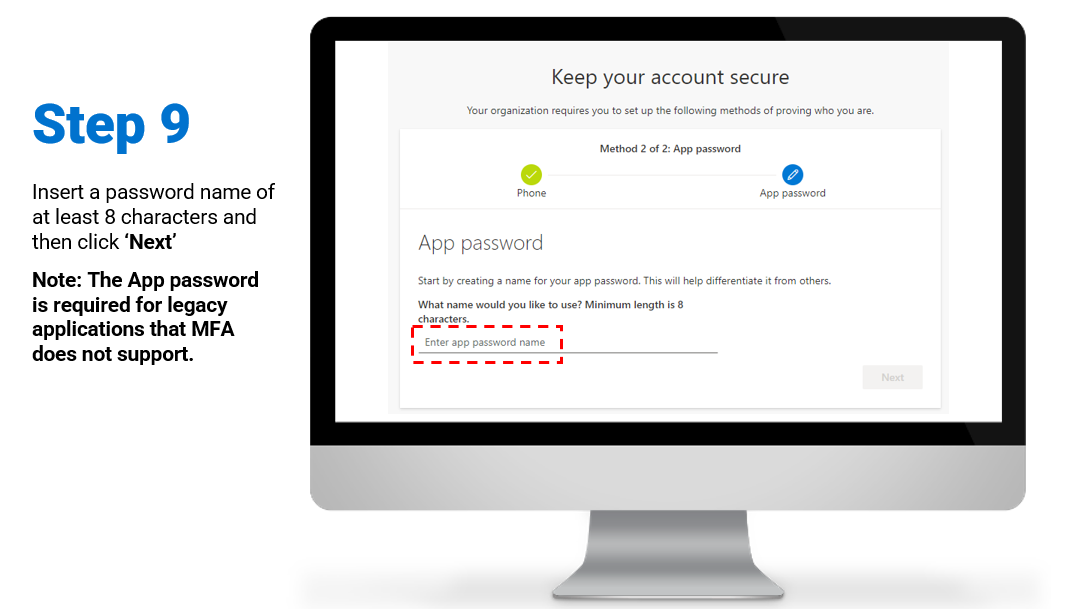
- Step 9: Insert a password of at least 8 characters and then click ‘Next’. Note: The App password is required for legacy applications that MFA does not support.
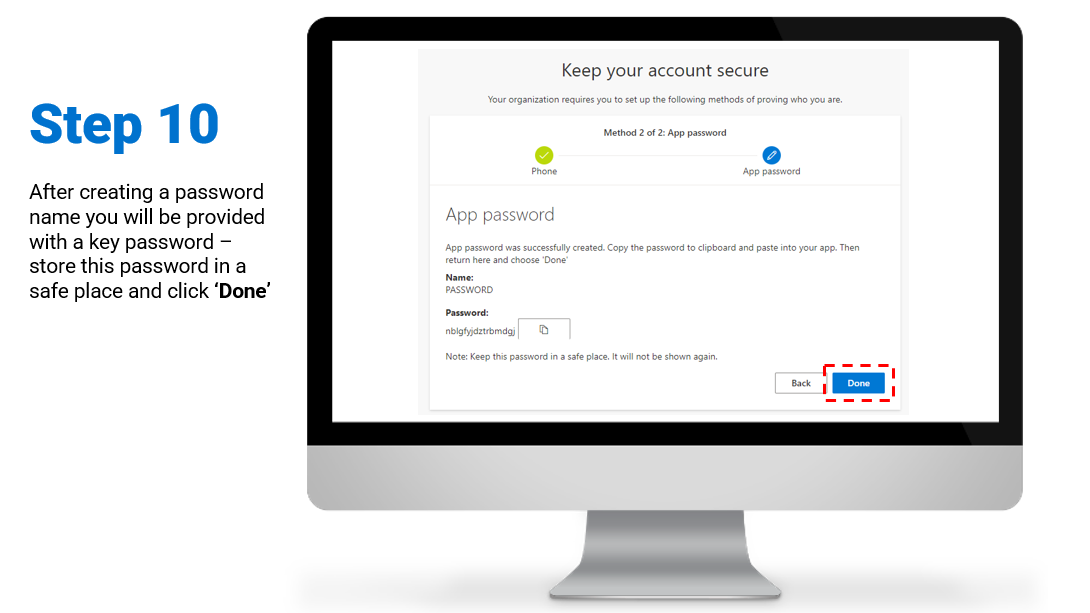
- Step 10: After creating a password you will be provided with a key password – store this password in a safe place and click ‘Done’
- Step 11: A message will confirm that you have finished your Microsoft Authenticator app set up. Click ‘Done’ and you will be taken to the application initially selected. Congratulations, you have successfully set up MFA!
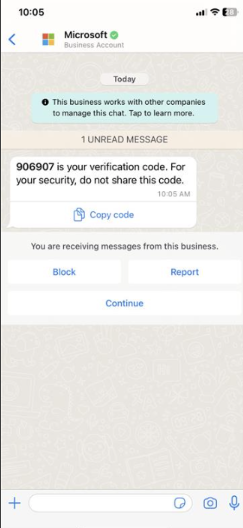
1.3.1 WhatsApp verification
Some users may receive their verification codes in WhatsApp. Like RCS (Rich Communication Services), these messages are similar to SMS, but have more Microsoft branding and a verified checkmark.
The first time a user receives a verification code in WhatsApp, they will be notified by SMS text message of the changed behaviour.
Only users who have WhatsApp installed and configured on their device with the mobile number registered for the SMS text message delivery method will receive verification codes through this channel. An internet connection will also be required.
To check if a user has WhatsApp, Microsoft will silently try to deliver them a message in the app by using the phone number they registered for text message verification.
What user information is stored via the use of WhatsApp?
When Microsoft sends Multi-Factor Authentication (MFA) codes via WhatsApp, the only information stored is the phone number associated with your WhatsApp account, which is used to deliver the verification code. Microsoft does not store any additional WhatsApp-specific data like chat history or contact details. The MFA codes themselves are delivered as standard text messages with Microsoft branding to ensure authenticity.
The information collected and stored when using the WhatsApp service may include additional data beyond what is covered under the NHS.net Connect service and may vary depending on the WhatsApp services used. For details on how WhatsApp collects and stores user data, please refer to the WhatsApp Privacy Policy and if you decide to accept their service then these apply.
If users do not have any internet connectivity or they have not installed / uninstall WhatsApp, they will receive MFA verification codes via the SMS delivery method.
Opting out/disabling WhatsApp as a delivery method
Microsoft does not provide a specific option to disable WhatsApp as an MFA verification code delivery method. Users who wish to prevent receiving Microsoft MFA verification codes via the WhatsApp service already installed and configured on their device can do so by performing one the following steps:
- Uninstall WhatsApp from the device being used to receive the MFA verification code. This will utilize the SMS delivery method.
- Should a user wish to continue using WhatsApp on their device without the service being used to deliver Microsoft MFA verification codes, the user should change their preferred verification method from text message to an alternate method such as Authenticator App.
1.4 Call
To register for MFA with calls, watch the video above or follow the steps below


Download the full Step by Step Guidance for phone call
Follow the steps below to enrol in MFA:
- Step 1: Once Multi-Factor Authentication (MFA) is enabled on your account, sign in with your NHSmail account to begin the set up process at https://portal.nhs.net/
Select at the bottom of the box ‘I want to set up a different method’ to add another option to authenticate your account.
- Step 2: A box with a drop list with the different options to register for MFA will appear on the screen.
- Step 3: This page allows you to choose an alternative option to authenticate your NHSmail account. Select ‘Phone’ Option. Note: The use of the office phone option is not supported by NHSmail. This option is available to users as Multi-factor Authentication is an off-the-shelf feature that cannot be customised.
- Step 4: Click ‘Confirm’ to continue the register process. Note: This phone number is your preferred contact method, and is not linked to the number listed in your NHSmail Portal profile.
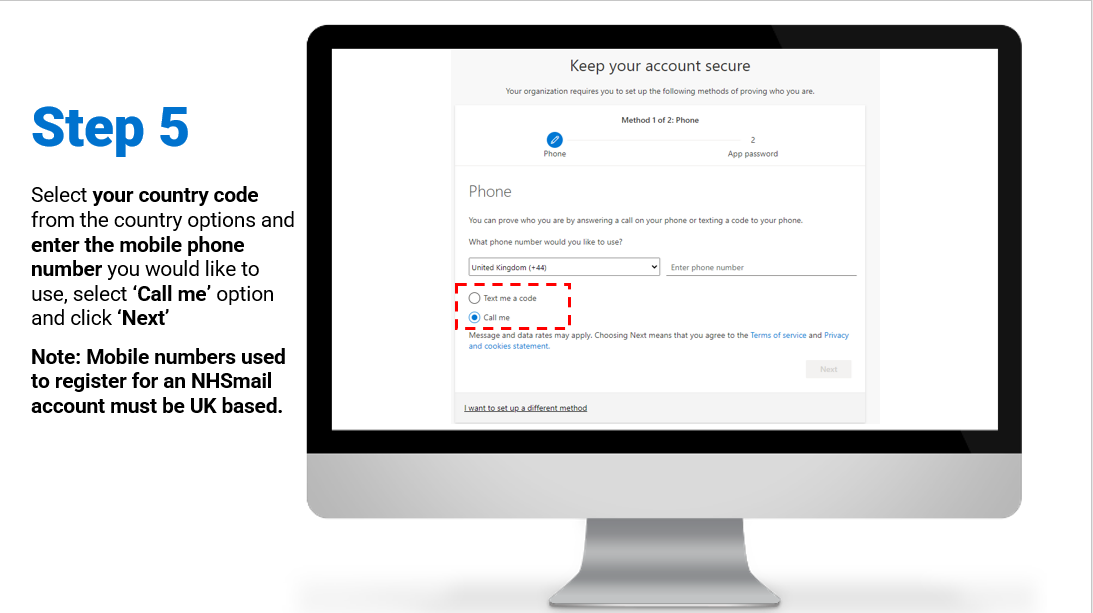
- Step 5: Select your country code from the country options and enter the mobile phone number you would like to use, select ‘Call me’ option and click ‘Next’. Note: Mobile numbers used to register for an NHSmail account must be UK based.
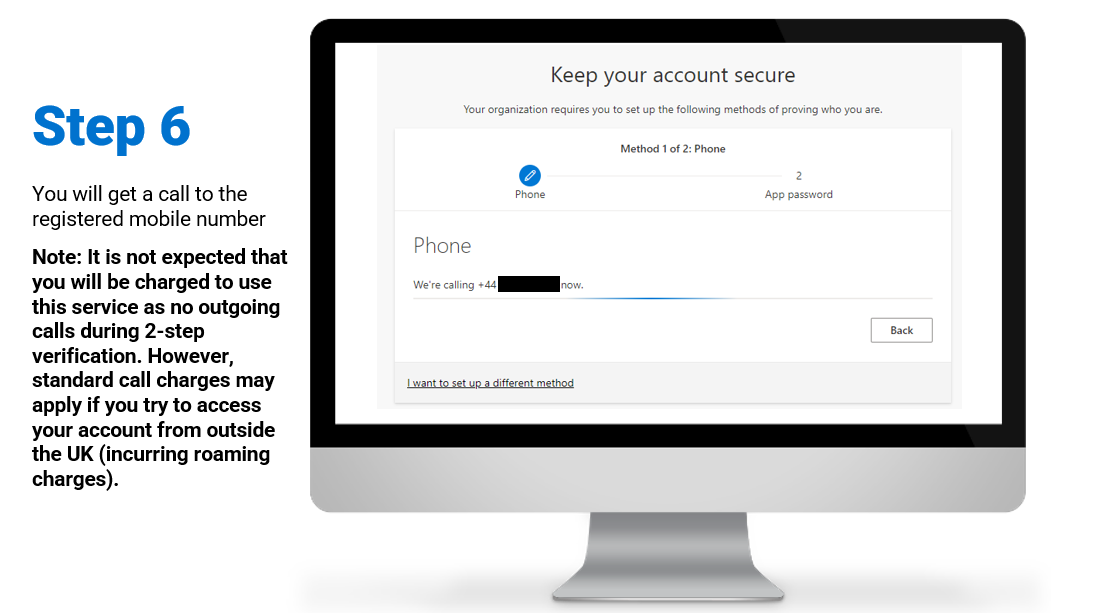
- Step 6: You will get a call to the registered mobile number. Note: It is not expected that you will be charged to use this service as no outgoing calls during 2-step verification. However, standard call charges may apply if you try to access your account from outside the UK (incurring roaming charges).
- Step 7: Answer the call and press the # key on the device to verify your identity. Note: the automated message may ask you to press the “pound” key or the “hash” key, but you should always press the # symbol on your telephone keypad.
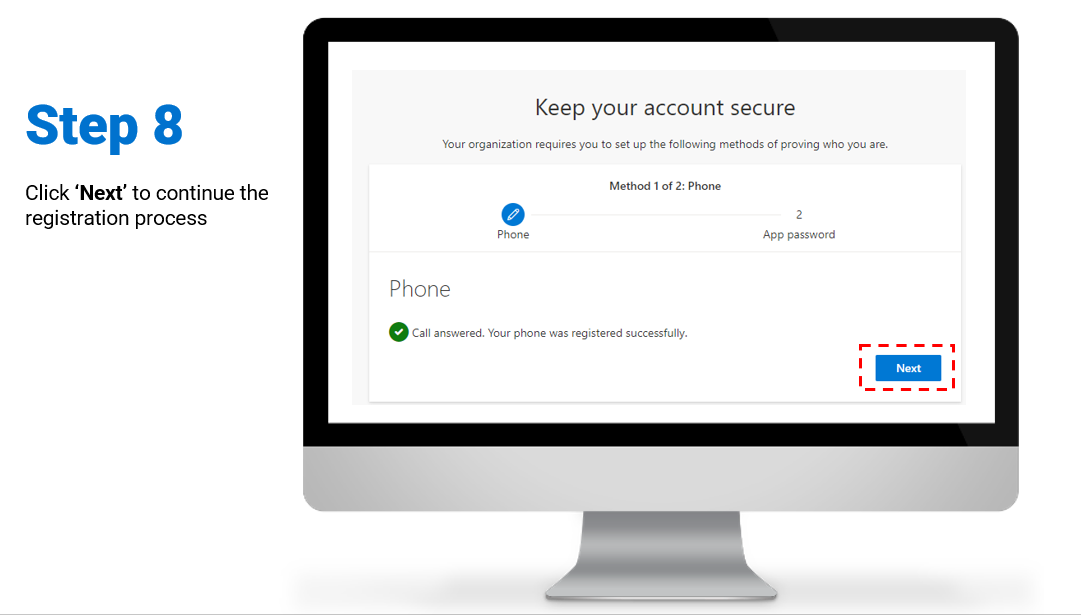
- Step 8: Click ‘Next’ to continue the registration process.
- Step 9: Insert a password of at least 8 characters and then click ‘Next’. Note: The App password is required for legacy applications that MFA does not support.
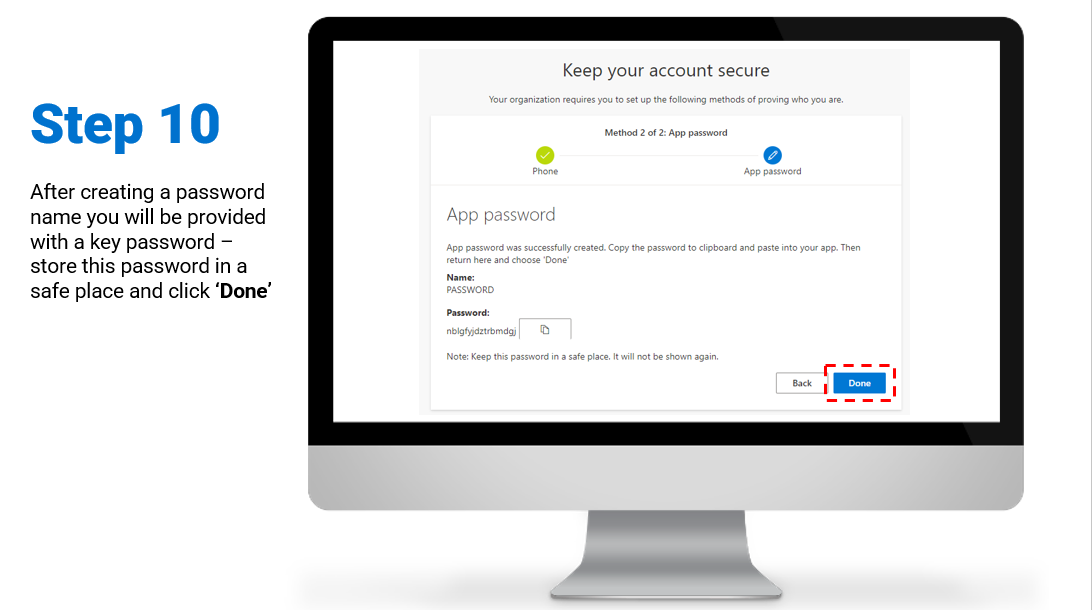
- Step 10: After creating a password you will be provided with a key password – store this password in a safe place and click ‘Done’.
- Step 11: A message will confirm that you have finished your Microsoft Authenticator app set up. Click ‘Done’ and you will be taken to the application initially selected. Congratulations, you have successfully set up MFA!
1.5 Alternative Phone
Download the full Step by Step Guidance for Alternative Phone
Follow the steps below to enrol in MFA:
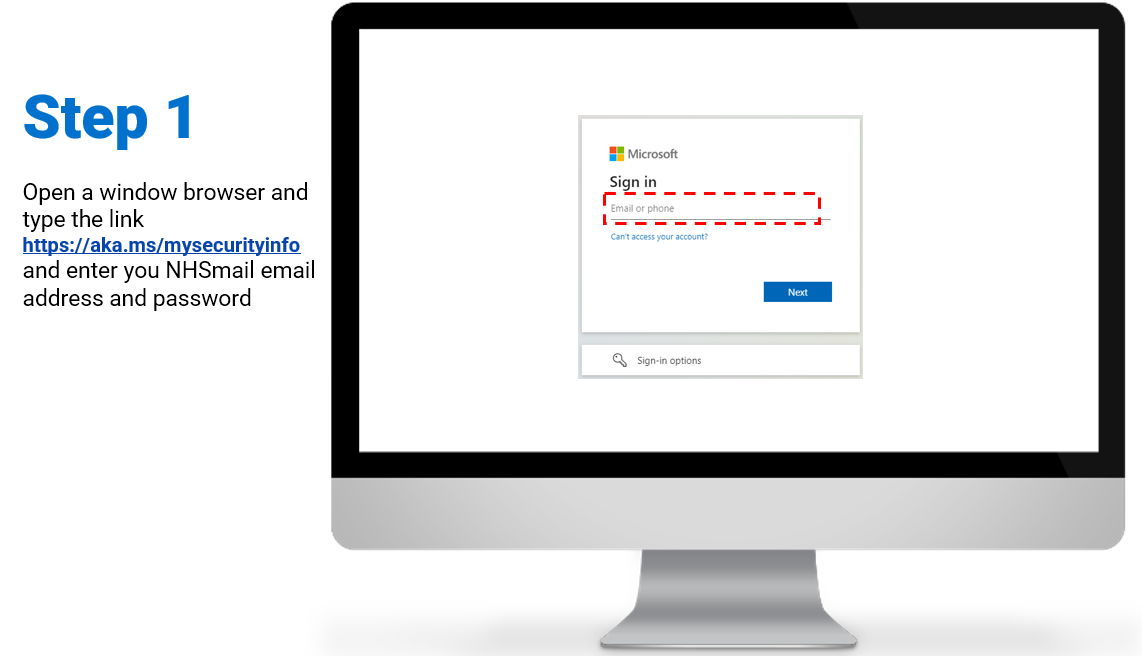
- Step 1: Open a window browser and type the link https://aka.ms/mysecurityinfo and enter you NHSmail email address and password
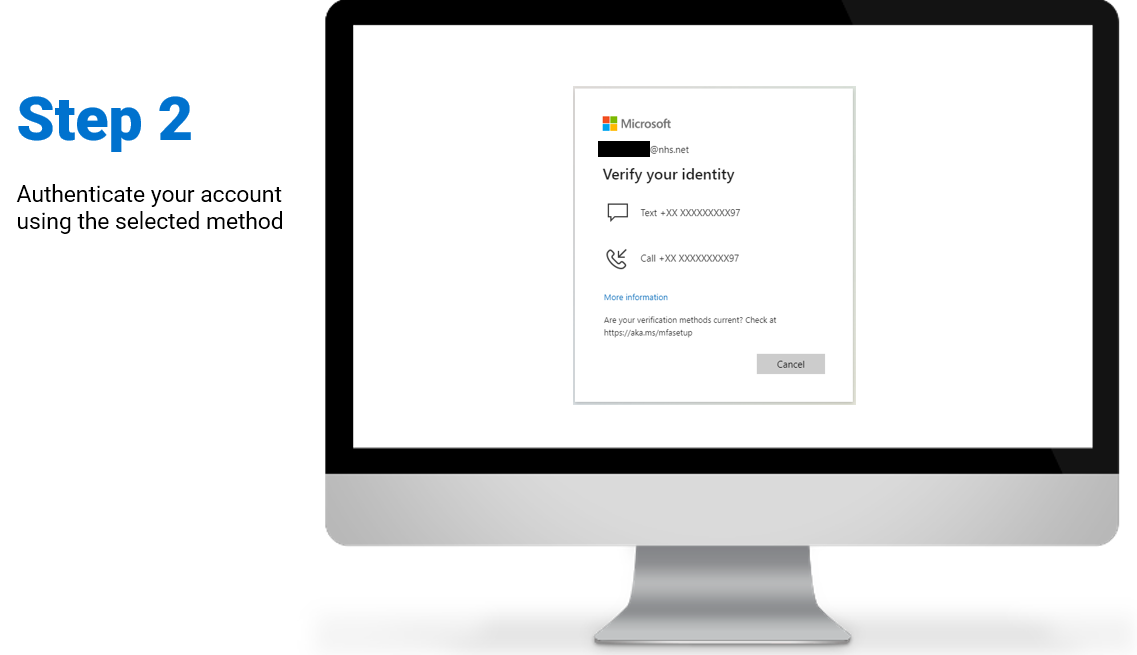
- Step 2: Authenticate your account using the selected method
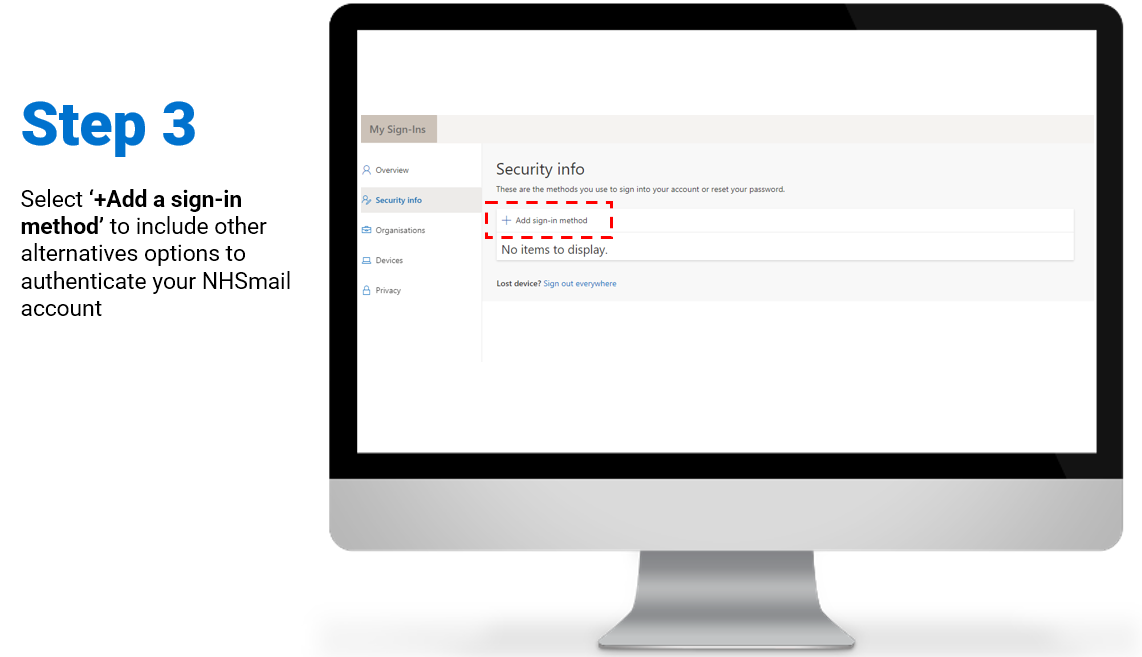
- Step 3: Select ‘+Add a sign-in method’ to include other alternatives options to authenticate your NHSmail account
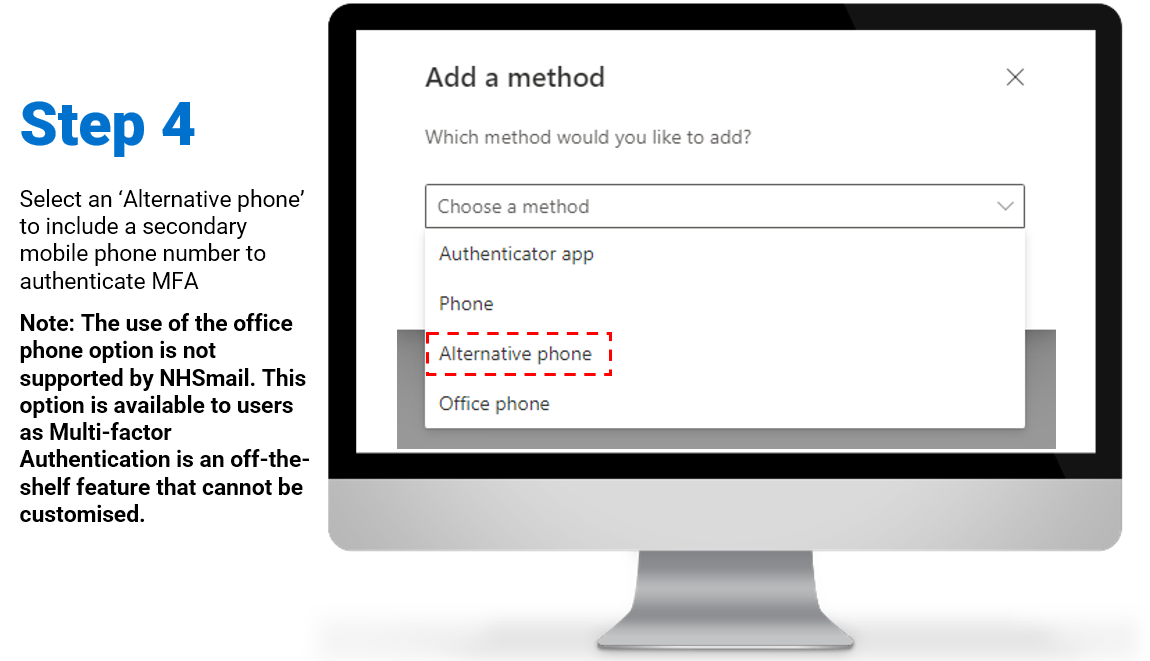
- Step 4: Select an ‘Alternative phone’ to include a secondary mobile phone number to authenticate MFA. Note: The use of the office phone option is not supported by NHSmail and should not be selected. This shows as an available option to users as it is an off-the-shelf feature that cannot be customised.
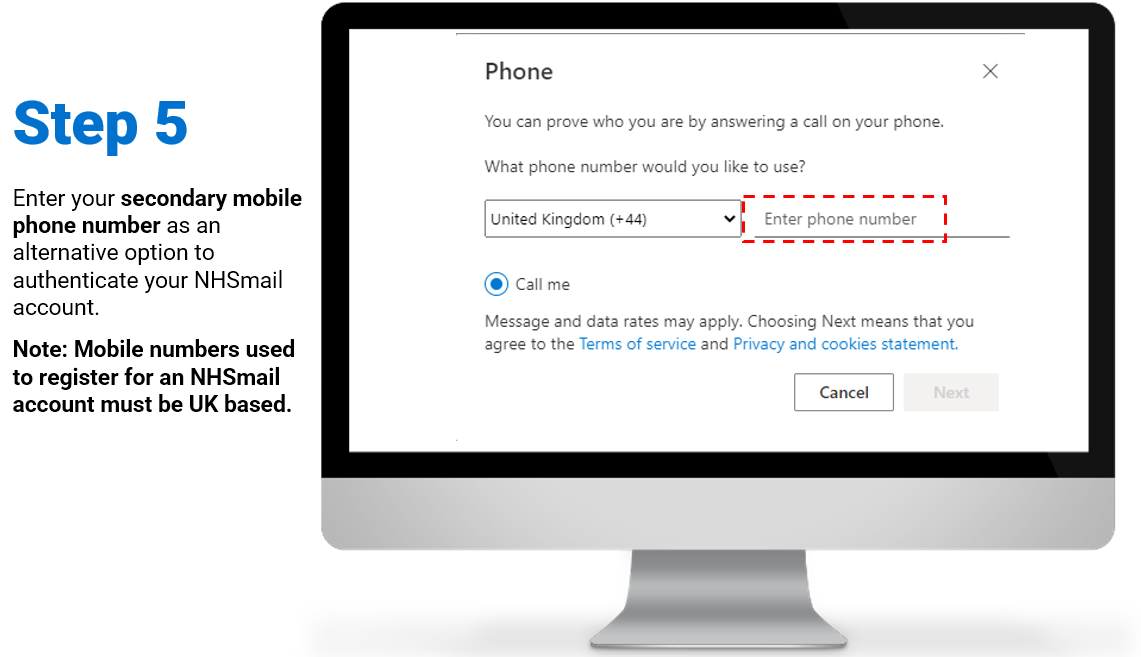
- Step 5: Enter your secondary mobile phone number as an alternative option to authenticate your NHSmail account. Note: Mobile numbers used to register for an NHSmail account must be UK based.
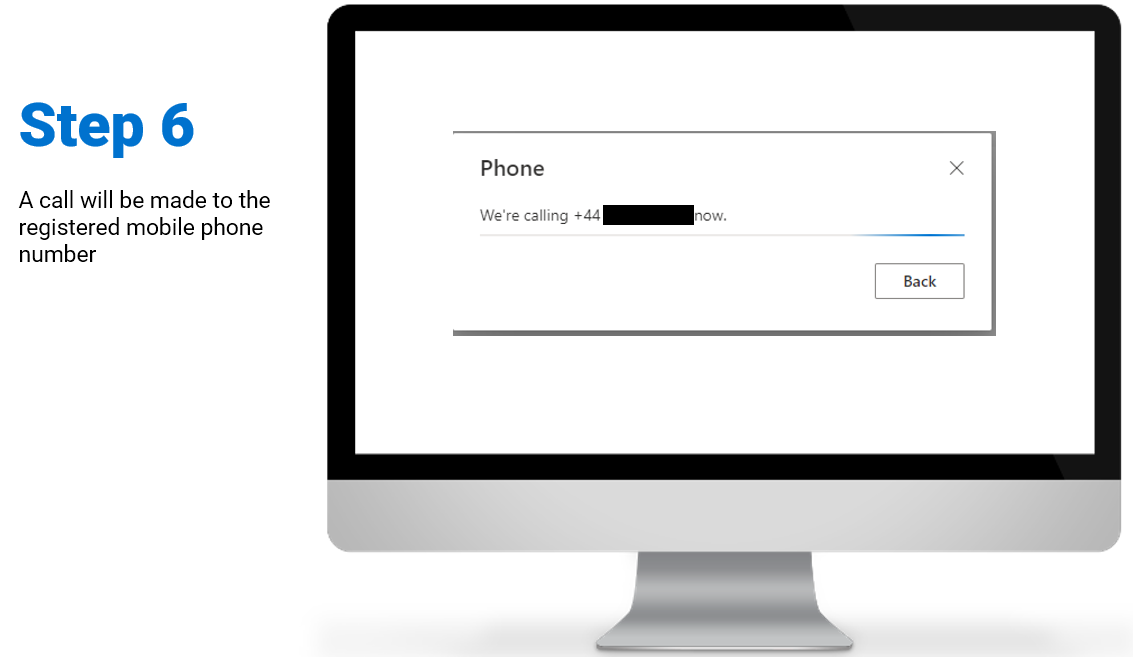
- Step 6: A call will be made to the registered mobile phone number
- Step 7: Answer the call and press the # key on the device to verify your identity. Note: the automated message may ask you to press the “pound” key or the “hash” key, but you should always press the # symbol on your telephone keypad
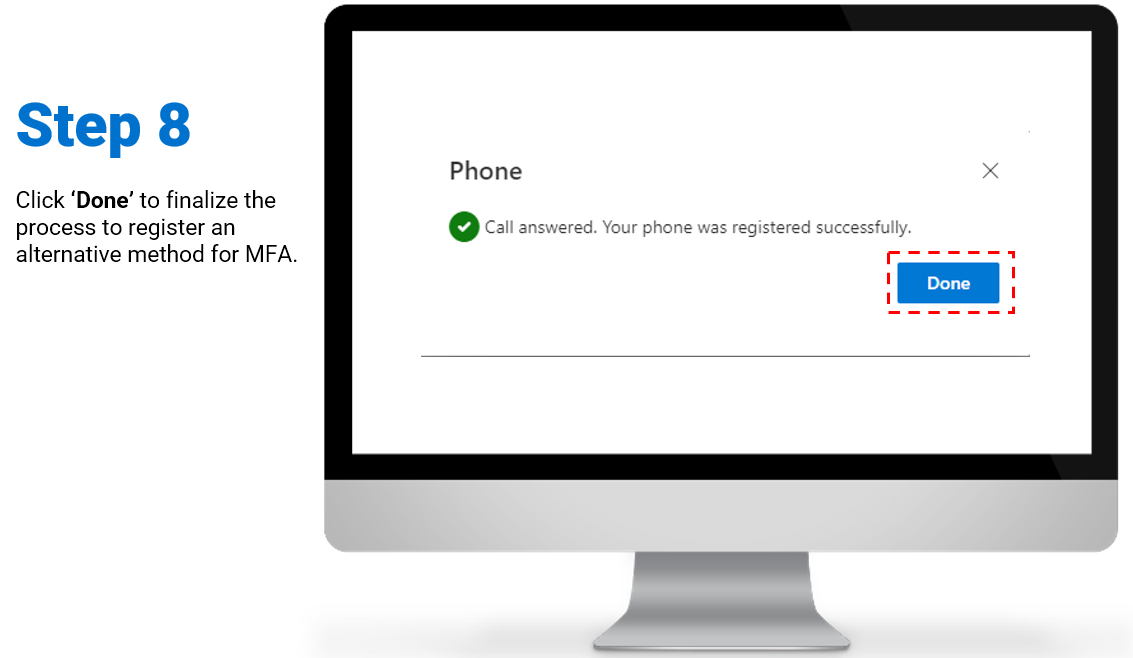
- Step 8: Click ‘Done’ to finalize the process to register an alternative method for MFA.
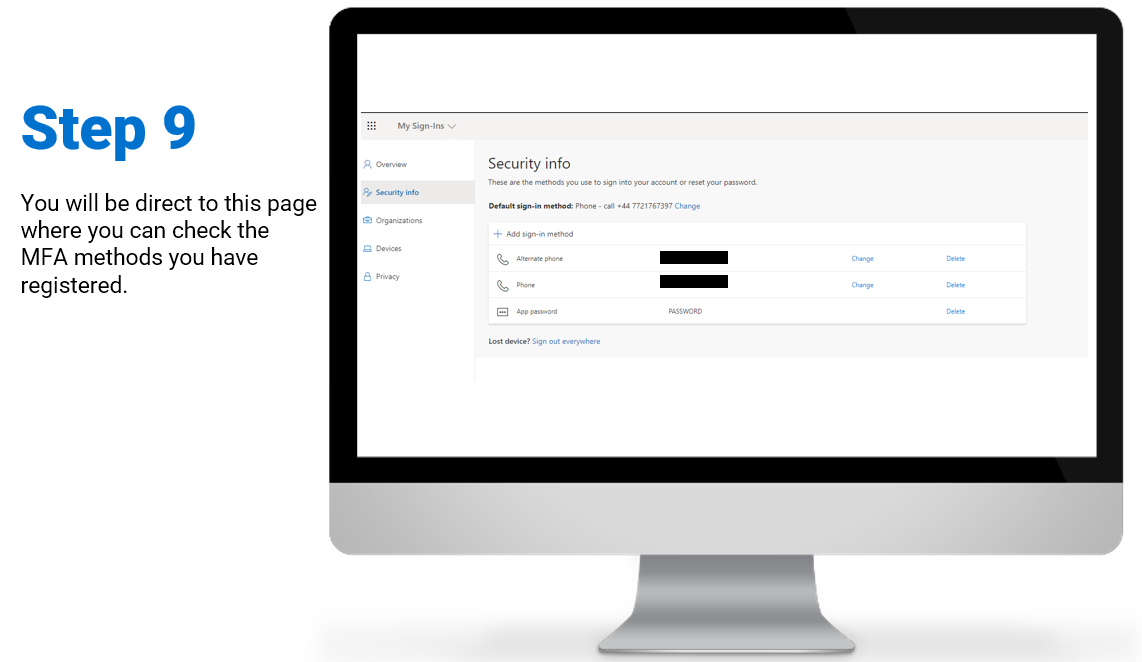
- Step 9: You will be direct to this page where you can check the MFA methods you have registered.
1.6 Change your preferred method of authentication for MFA

Download the full Step by Step Guidance for Changing your preferred method of authentication
Follow the steps below to enrol in MFA:
- Step 1: Open a window browser and type the link https://aka.ms/mysecurityinfo and enter you NHSmail email address and password
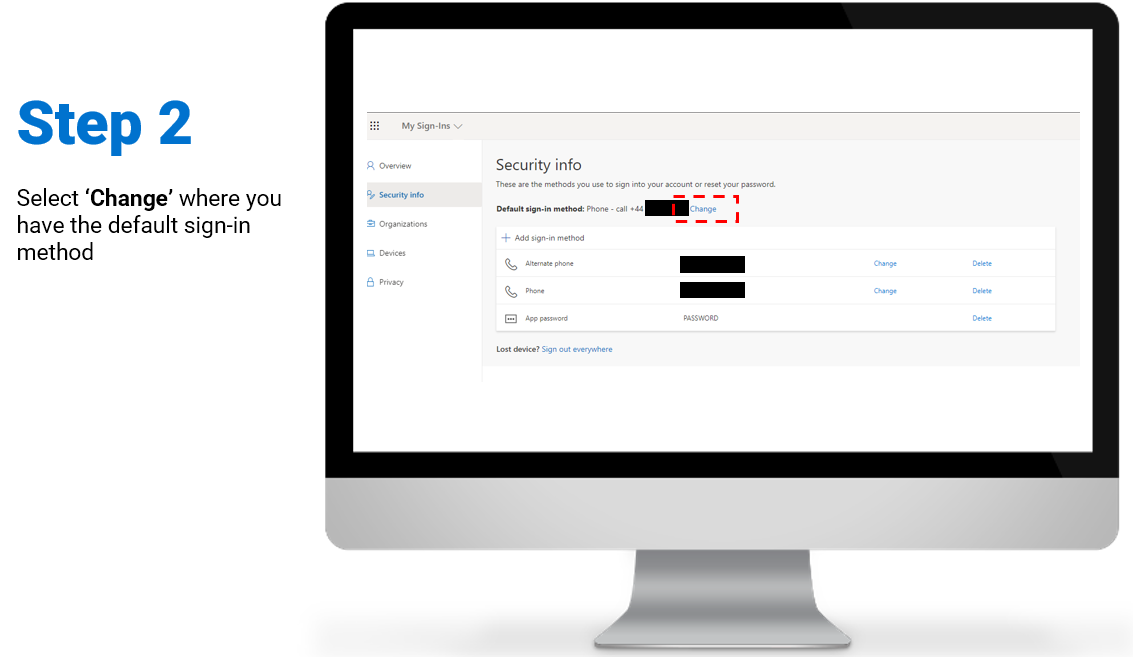
- Step 2: Select ‘Change’ where you have the default sign-in method.
- Step 3: Select the new preferred method to authenticate MFA.
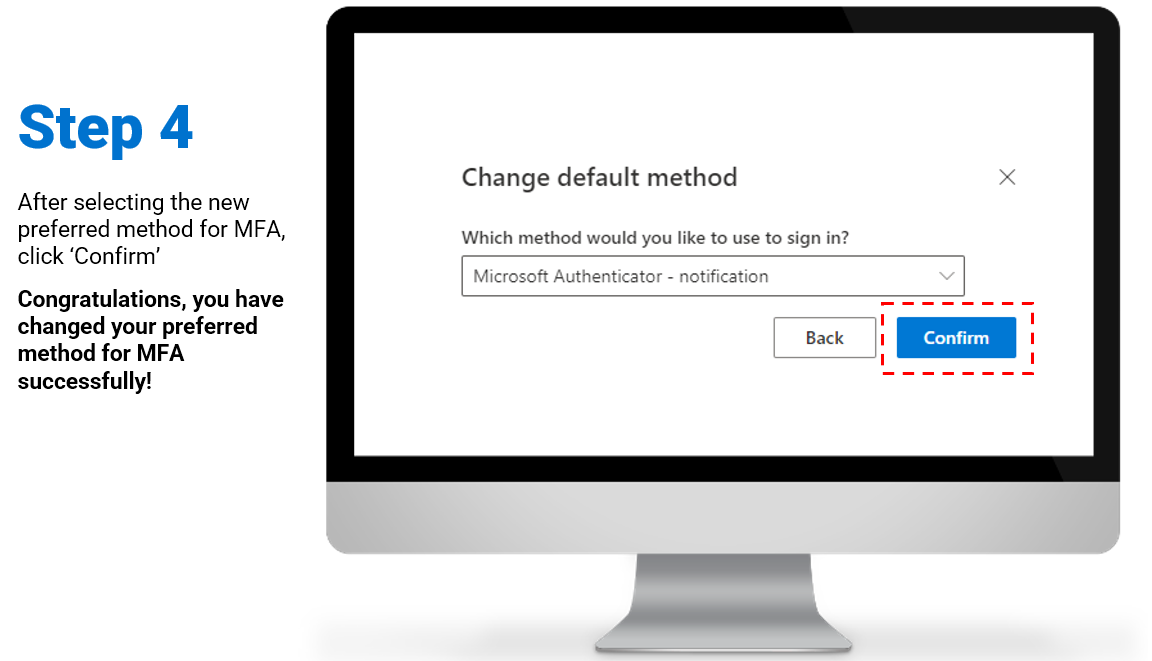
- Step 4: After selecting the new preferred method for MFA, click ‘Confirm’.
Congratulations, you have changed your preferred method for MFA successfully!
| Last Reviewed Date | 21/02/2025 |