
External Sharing Settings
Once an external user is added into the Azure Active Directory, users can share using O365 applications as outlined below. Please note some O365 applications do not support external sharing with guest accounts.
|
O365 Application |
B2B Guest Access Available* |
Comments |
| Microsoft SharePoint
Microsoft Power BI Microsoft Project Online |
Yes |
Contact your Local Administrator to enable sharing with external users from these applications, permissions can then be set by data owners. For Project Online external users must have a licence to access any functionality. Power BI Pro and Premium users can share their dashboard / reports with an external user |
| Microsoft OneDrive for Business
Microsoft Planner Microsoft Visio |
Yes |
OneDrive for Business and Planner external sharing is enabled. Visio diagrams in OneDrive can be shared as per the OneDrive external sharing policy. |
| Microsoft Sway
Microsoft Forms |
Yes |
Data from these applications can be shared with external users without requiring a guest account in Azure Active Directory. |
| Microsoft PowerApps
Microsoft Flow Microsoft Yammer |
No |
Data from these applications cannot be shared with external users, as per Microsoft settings. |
Microsoft Teams Sharing
Guest users can access Teams resources and files held within Teams/channels that they have been added to.
Guest users can also share files in Teams channels, attach files in Teams chats and download files shared via 1-2-1 chats with members of Teams that they have been given access to.
Sharing via Teams
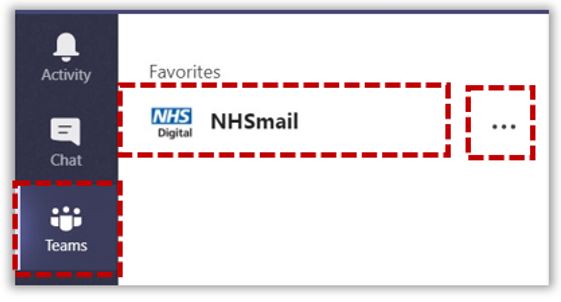 1. Open Teams and navigate to the team site that you would like to add an external user to.
 2. Select the 3 dots (‘More options’) and select Add member. Add the external user as a member.
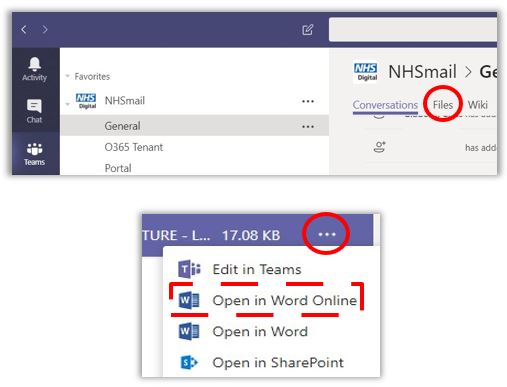
3. Select Files and open a document within Office Online (Word, PowerPoint, Excel).
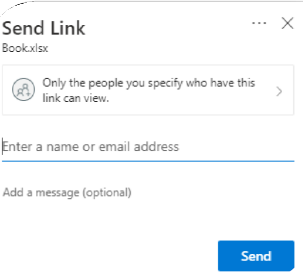
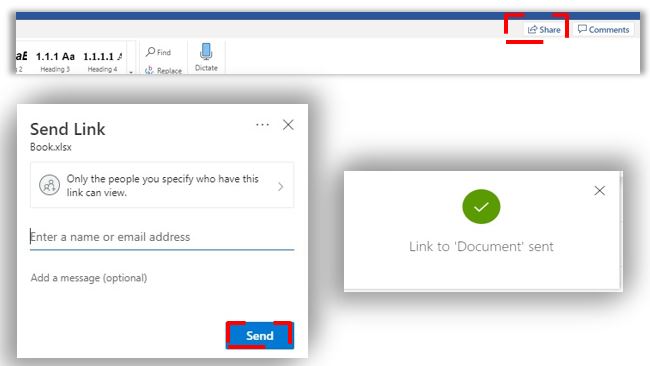 4. Select Share, enter the external user’s email address and select Send.
 5. The external user will receive an email from ‘Microsoft no-reply’ with a link to the document.
 6. The external user will need to redeem the guest invitation and then enter their username and password to access the document / Folder.
 7. A verification code will be sent to the same email address. The guest user will be required to enter this code then select Verify.
Once completed, the guest can be added to the Teams site (following steps 1-2) and access shared files
Share a document via OneDrive
1. Navigate to portal.office.com and log in using your nhs.net username and password.
 2. Select the OneDrive tile.
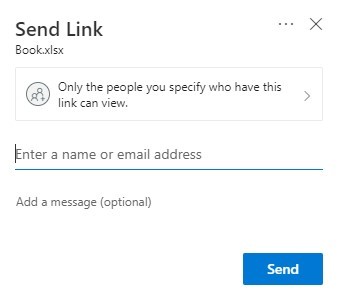
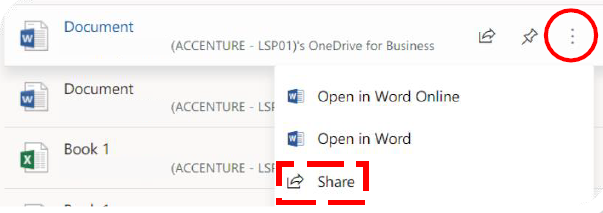 3. Here there will be a list of your documents. Select the document or folder you would like to share and select the three dots (‘Show actions’) and select Share.
 4. Enter the external user’s email address and select Send.
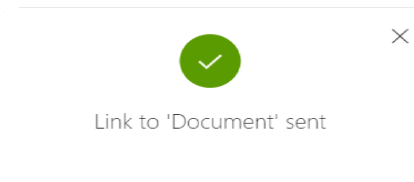 5. Check for the message below to ensure your data has been sent.
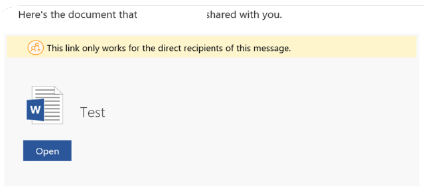 6. The external user will receive an email from ‘no-reply@sharepointonline.com’ with a link to the document / folder.
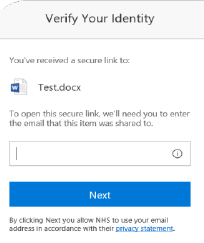 7. The external user will need to redeem the guest invitation and then enter the email address that the link was sent to.
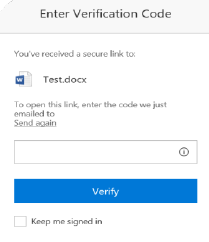 8. A verification code will be sent to the same email address. The guest user will be required to enter this code and select Verify.
9. Once the external user has entered the code they will be able to access the shared data.
Share a document via SharePoint
 1. Navigate to portal.office.com and log in using your nhs.net username and password.
 2. Select the SharePoint
 3. Select required Sharepoint Site
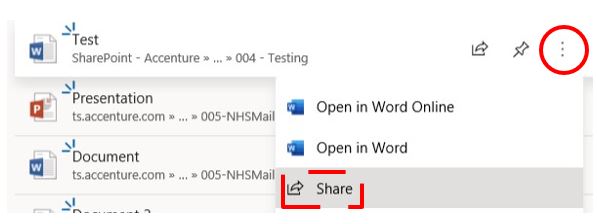 4. You will see a list of your documents. Select the document or folder you would like to share and select the three dots (‘Show actions’) and select Share.
 5. Enter the external user’s email address and select Send.
6. Check for the message below to ensure your data has been sent.
7. The external user will receive an email from ‘no-reply@sharepointonline.com’ with a link to the document / folder.
8. The external user will need to redeem the guest invitation and then enter the email address that the link was sent to.
9. A verification code will be sent to the same email address. The guest user will be required to enter this code and select Verify.
10. Once the external user has entered the code they will be able to access the shared data.
| Last Reviewed Date | 6/7/2021 |