
Local Administrators can configure Live Events permissions and assign to users through the NHSmail Portal. Please see Enabling and Disabling Teams Live Events for a user for more information.
Introduction:
Teams Live Events can be used to broadcast video and meeting content to large online audiences (up to 10,000 attendees). It is an extension of normal meetings, and ideal when running large training sessions, broadcasts, or webinar with attendees from inside and outside your organisation. Attendees will be able to interact via a moderated Q&A system.
Plan & Schedule a Live Event
You can schedule a live event as you would schedule a normal meeting – only select live events in the top left-hand side drop menu as shown below.
- To create a live event in Teams, select Meetings on the left side of the app and then select New meeting.
- At the top of the dialog box, select New meeting > New live event.
- Add the meeting title, date and time information, and other details.
- In the Invite people to your event group box, add the names of the people who will be presenting and producing the event.
- Select Next.
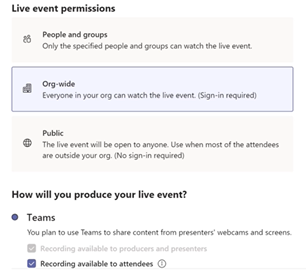
- Under Live event permissions, choose who can attend your live event (see below for more on permission).
- Make selections under How do you plan to produce your event?
- Select Schedule.
- Select the Get attendee link to copy the unique code. This is what you post or send to anyone attending the event.
 Note that once the event is scheduled, any changes should be made in Teams.
Setting attendee permissions
Producing a Live Event
- As a producer and organizer, you will be able to share content, manage the Q&A, make announcements. This is the view you will have while running your event.
- Please note that once you go live, your attendees will be able to hear everything, so it is best do a practice session to ensure that anyone not presenting is muted to minimize noise and distractions.
- Presenters and producers should join the live event at least 15min before to share the relevant content for the session. Once a live event has started it cannot be stopped and resumed.
- The ‘view window’ indicates what you are currently sharing with your attendees.
- The ‘Queue window’ indicates what content is waiting in the queue. To share content with your attendees, press “send live”.
Plan a Live event
Produce a Live Event:
Attend a Live Event:
Moderating a Q&A:
Attendees are able to watch the live event and interact with moderators via the Q&A. They cannot speak. To join the live event, you need to open the event link. You can do this in two different ways:
- Join from a web browser
- Join directly from the Teams app
When an event is public, you can choose to log into Teams or join as an anonymous user. Watch the video below for more details on how to attend a live event.
| Last Reviewed Date | 13/12/2023 |