
1. Overview
This Quick Start User Guide is intended to be used by end users who will be using iOS/iPadOS devices enrolled onto Intune.
Please follow the step-by-step instructions to begin using your Intune-enrolled iOS/iPadOS device. If you have any questions or queries about any of the following enrolment steps or other content in this document please contact your Local Administrator (LA).
This Quick Start End User Guide covers the steps which need to be followed to enrol both Single User and Shared User devices. Please use the contents above to navigate to the specific steps you need to follow.
2. Getting started on iOS/iPadOS (Single User)
 Step 1
Unbox your iOS/ iPad device, plug it in and turn it on. Tap the home button or screen (depending on device)
 Step 2
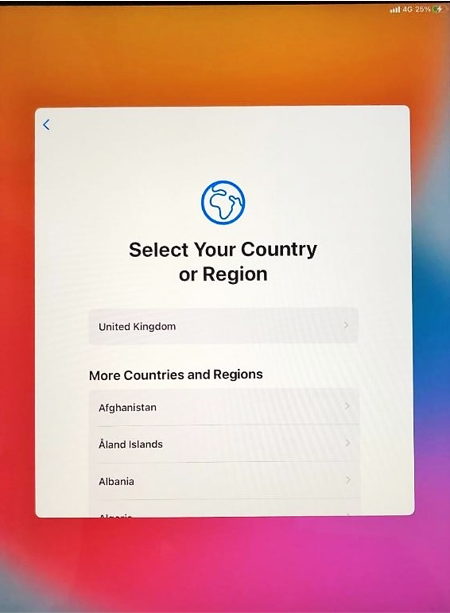
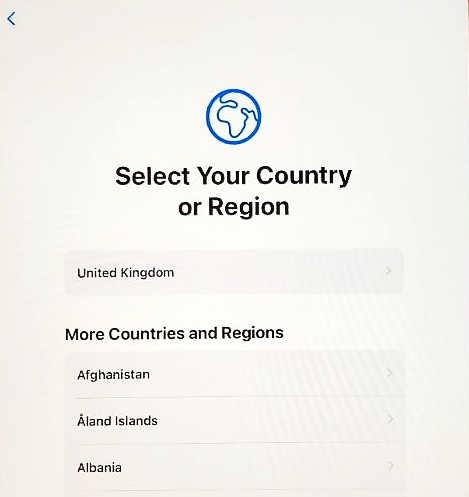
Select your region and then choose your language from the options shown on the screen.
 Step 3
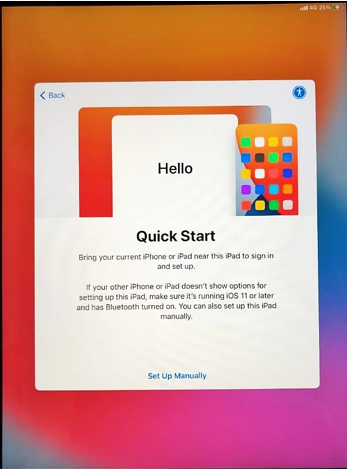
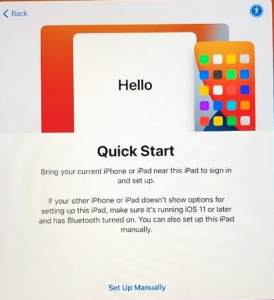
You will then be taken to a Quick Start Page. Select the option Set Up Manually.
Step 4
Next, select the Wi-Fi network you wish to connect to from the list shown.
 Step 5
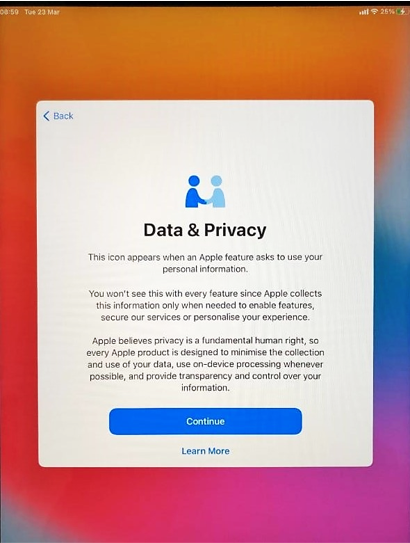
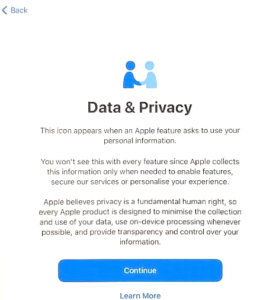
Please read the Data and Privacy notice. Select Continue if you are happy to progress past this notice or select Learn more if you wish to know more about Data and Privacy.
 Step 6
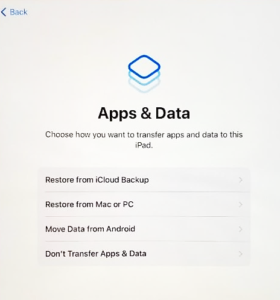
You will be asked how you would like to configure your device. If you are a new user, you should select Don’t Transfer Apps & Data option.
 Step 7
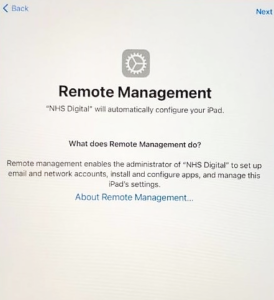
You will be informed that your device will be managed by NHS England. If you wish, you can select About Remote Management to learn more. If you are happy with the information provided on the screen, you can simply select Next to progress with enrolment.
Step 8
Please wait while policies are deployed onto your device. This may take a couple of minutes. You are not required to do anything at this step.
 Step 9
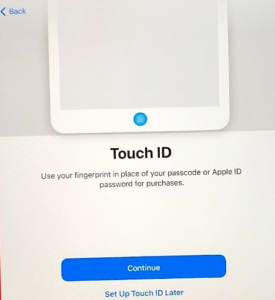
You will be asked if you want to set up biometric authentication on your device. Select Continue if you would like to do this or select Set up Touch ID Later if you’d like to return to this at another time.
 Step 10
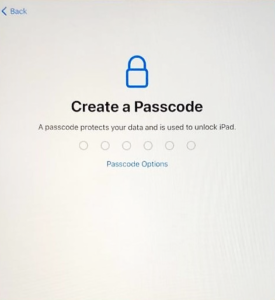
You will be asked to set up a device passcode to help secure your device. Please enter a 6-digit passcode by clicking Continue and following the instructions to set up a device pin.
Step 11
Please read the Apple Terms and Conditions and select Agree if you understand all terms and are happy to adhere to these.
 Step 12
Your device will now attempt to install any recent updates. Select Continue to permit this and progress with the enrolment.
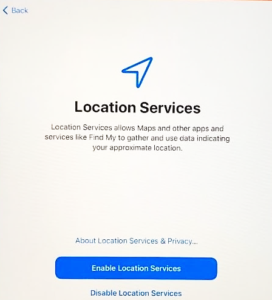
Step 13
You will be asked to configure Location Services. You should select Enable Location Services to allow the device to configure the correct time zone.
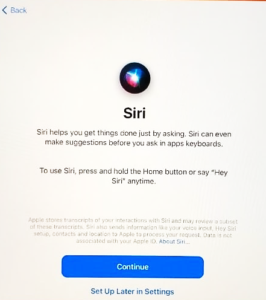 Step 14
Your device will provide you with the option of setting up Siri. This is entirely optional.
Select Continue if you would like to set up Siri on your device or select Set Up Later in Settings if you would like to move on from this screen and progress with the enrolment.
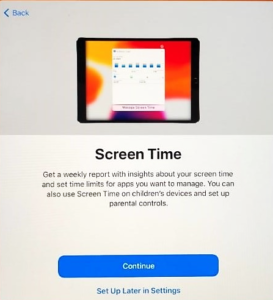 Step 15
Your device will provide you with the option to enable Screen Time. This is entirely optional.
Select Continue if you would like to set up Screen Time on your device or select Set Up Later in Settings if you would like to move on from this screen and progress with the enrolment.
 Step 16
Your device will provide you with the option to enable iPad Analytics. This is entirely optional.
Select Share with Apple if you are happy for information about usage data to be shared with Apple. Select About Device Analytics & Privacy if you would like more information about iPad Analytics. Select Don’t Share if you would prefer not to share information about usage data with Apple.
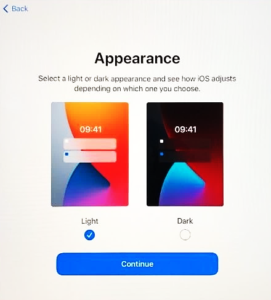 Step 17
You will be asked to select the appearance of your device’s screen. Choose either Light or Dark and select Continue to progress with the enrolment.
Step 18
Once Apple Set up has completed, you will be prompted to select the Get Started button. Please select Get Started to progress with the enrolment.
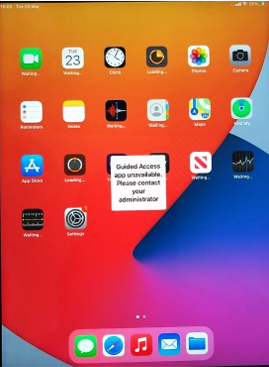 Step 19
Your device will now turn on again, but it will be in Guided Access mode while the Company Portal app installs in the background. Please be patient at this step, as it may take a couple minutes for the Company Portal app to install. You are not required to do anything at this step.
 Step 20
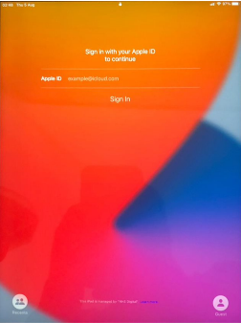
You will now be prompted to sign into the Company Portal App. Select Sign In to begin this process.
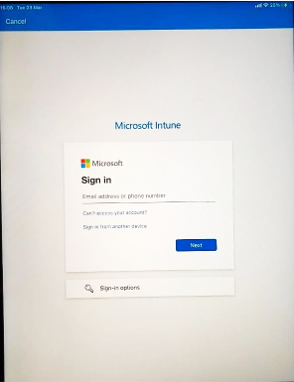 Step 21
To sign in, you will need to enter your nhs.net email address. Enter your nhs.net email address and select Next to progress with the enrolment.
 Step 22
You will now need to enter your nhs.net email password. Please enter this password and then select Sign In.
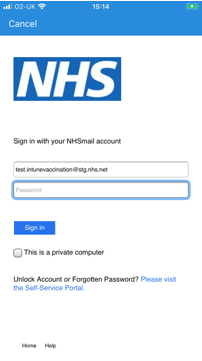
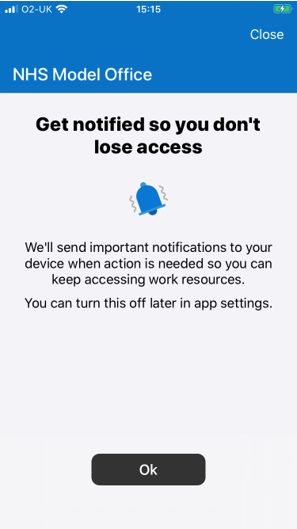 Step 23
Once you have signed-in, you will receive a message about turning on device notifications. Select Ok to progress with the enrolment. You can turn this setting off later via the app Settings.
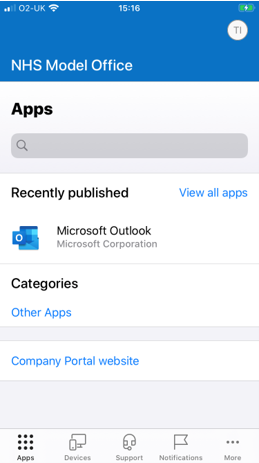
Please note: Your screen will not display ‘NHS Model Office’. The rest of the screen you see at this step should be the same as is shown on the screenshot.
 Step 24
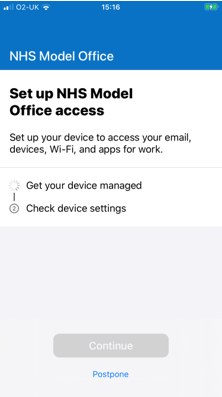
Next, to enable the setup of NHS Production Access, select Begin.
Please note: Your screen will not display ‘NHS Model Office’. The rest of the screen you see at this step should be the same as is shown in the screenshot.
 Step 25
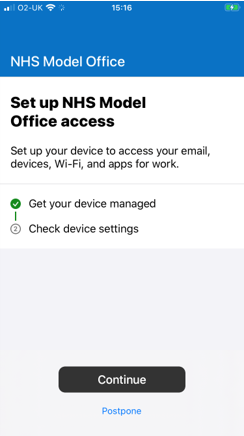
To continue the set-up of NHS Production Access, select Continue.
Please note: Your screen will not display ‘NHS Model Office’. The rest of the screen you see at this step should be the same as is shown on the screenshot.
 Step 26
There should now be a green tick on the checklist, next to ‘Get your device managed’. Select Continue to progress with the enrolment.
Please note: Your screen will not display ‘NHS Model Office’. The rest of the screen you see at this step should be the same as is shown on the below screenshot.
 Step 27
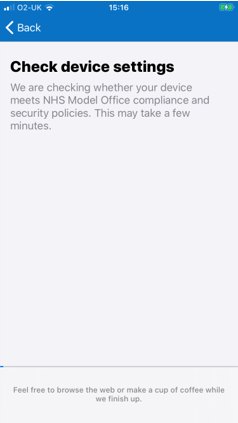
A check will now take place to see if your device meets NHS Production compliance and security models. This may take a few minutes. You are not required to do anything at this step.
Please note: Your screen will not display ‘NHS Model Office’. The rest of the screen you see at this step should be the same as is shown on the below screenshot.
 Step 28
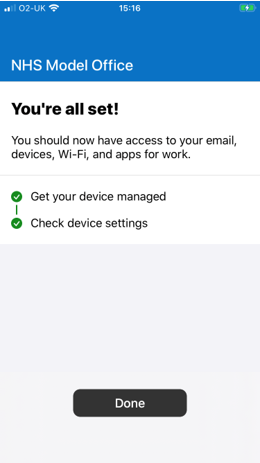
Once this check has been completed successfully, you will see the ‘You’re all set!’ message. Select Done to continue with the enrolment.
Please note: Your screen will not display ‘NHS Model Office’. The rest of the screen you see at this step should be the same as is shown on the below screenshot.
 Step 29
Your device should now be enrolled into Intune. Guided Access mode should have been disabled and you should be able to use your device as you normally would.
3. Getting started on iPadOS (Shared Devices)
Please remember to log out when you take a break or finish using the device to allow others to use this shared device.
Step 1
Unbox your device, plug it in and turn it on. Tap the home button or screen (depending on device)
 Step 2
Next, select your region and then select your language from the options presented.
 Step 3
You will be taken to a Quick Start Page. Select Set Up Manually.
Step 4
Select the Wi-Fi network you wish to connect to from the list shown.
 Step 5
Please read the Data and Privacy notice. Select Continue if you are happy to progress past this notice or select Learn More if you wish to know more.
Step 6
Your device will now restart. Please wait a few moments for this to complete. You are not required to do anything at this step.
 Step 7
Please select the Guest button located in the bottom right-hand corner of your device’s screen.
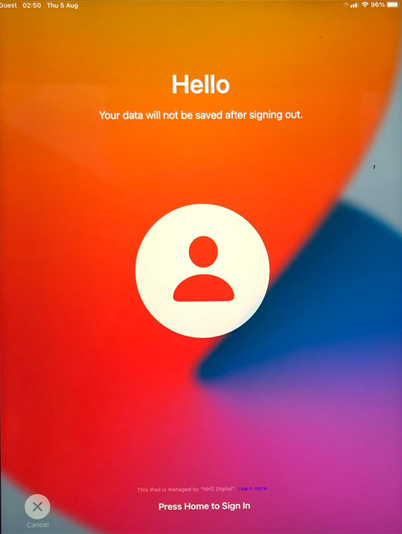 Step 8
Your device will now prompt you to press the ‘Home’ button to enter the device. Press the Home button on your device.
 Step 9
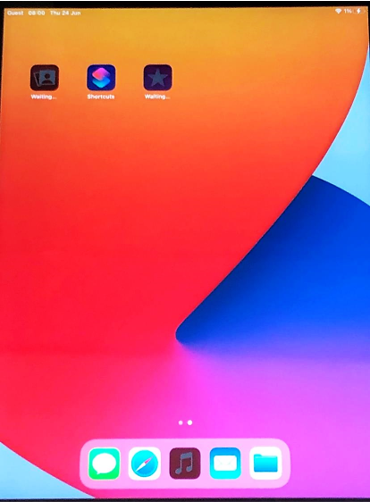
Your device will now begin installing all required applications. This process may take a few minutes. Once the applications have installed, you will be able to use your device normally.
 Step 10
To end the session, you will first need to lock your device and then reopen it. You will then be prompted to sign out. Select Sign Out which should be shown in the bottom right-hand corner of your device’s screen.
Step 11
You will be asked to confirm that you want to end the session. If you want to end the session, select Sign Out. If you do not want to end the session, you can select Cancel and return to your session.
 Step 12
If you chose to end the session on Step 11, your device will have ended your session and will now show the screen below. A new session can now be started.
| Last Reviewed Date | 29/02/2024 |