1. Article summary
This article provides a summary of the prerequisites and step by step instructions for the onboarding of Copilot Studio licenses for users within their organisation. By reviewing this article, you will gain an understanding of:
- Pre-requisites for technical readiness
- How to onboard your organisation onto Copilot Studio
For more information about Copilot Studio, please visit the full How To Guide for Copilot Extensibility Management support site article.
2. Technical Readiness for Copilot Studio
Organisations must begin by reviewing and completing the technical readiness checklist for Copilot agents (extensibility).
Technical Readiness Pre-Requisite Checklist
| 01 | Only organisations on the enhanced service are in scope to be provisioned with Copilot Studio licensing and environments. All participating users must be Enhanced Service users. |
| 02 | Adequate in-house technical resources (e.g. Local Administrators (LAs), technical managers) will be required to support with any necessary local technical configuration changes. |
| 03 | All participating users will be encouraged to be licensed with M365 Apps for Enterprise if using Copilot in installed applications is a requirement. This is for user personas rather than the maker persona. |
| 04 | All participating users must have enrolled for Multi-Factor Authentication (MFA). |
| 05 | All participating users should have securely managed devices, either via NHS.net Connect Intune or a local device management solution. |
| 06 | Each organisation will be auto onboarded into the Global Sensitivity Label Policy to access the sensitivity labels created for managing Copilot usage. |
| 07 | Each organisation will be encouraged to start labelling their SharePoint sites, prioritising those with highly sensitive/confidential information. |
| 08 | Through local organisation communication and messaging, all participating users should be required to use sensitivity labels for their existing and new content and review access & permissions. |
| 09 | Each organisation should review the following resources to input into their own: 1.Data Protection Impact Assessment (DPIA) which includes Risk information, 2. Hazard Log and Clinical Safety Case Report 3.Organisation Acceptable Use Policy (AUP), 4. Responsible AI Guidance via support.nhs.net |
| 10 | Each organisation must ready a security group for the management of Copilot Studio-enabled environment membership. |
3. Onboarding your organisation to work with Copilot Studio for the first time
Below outlines the key steps to onboard your organisation to work with Copilot Studio for the first time.
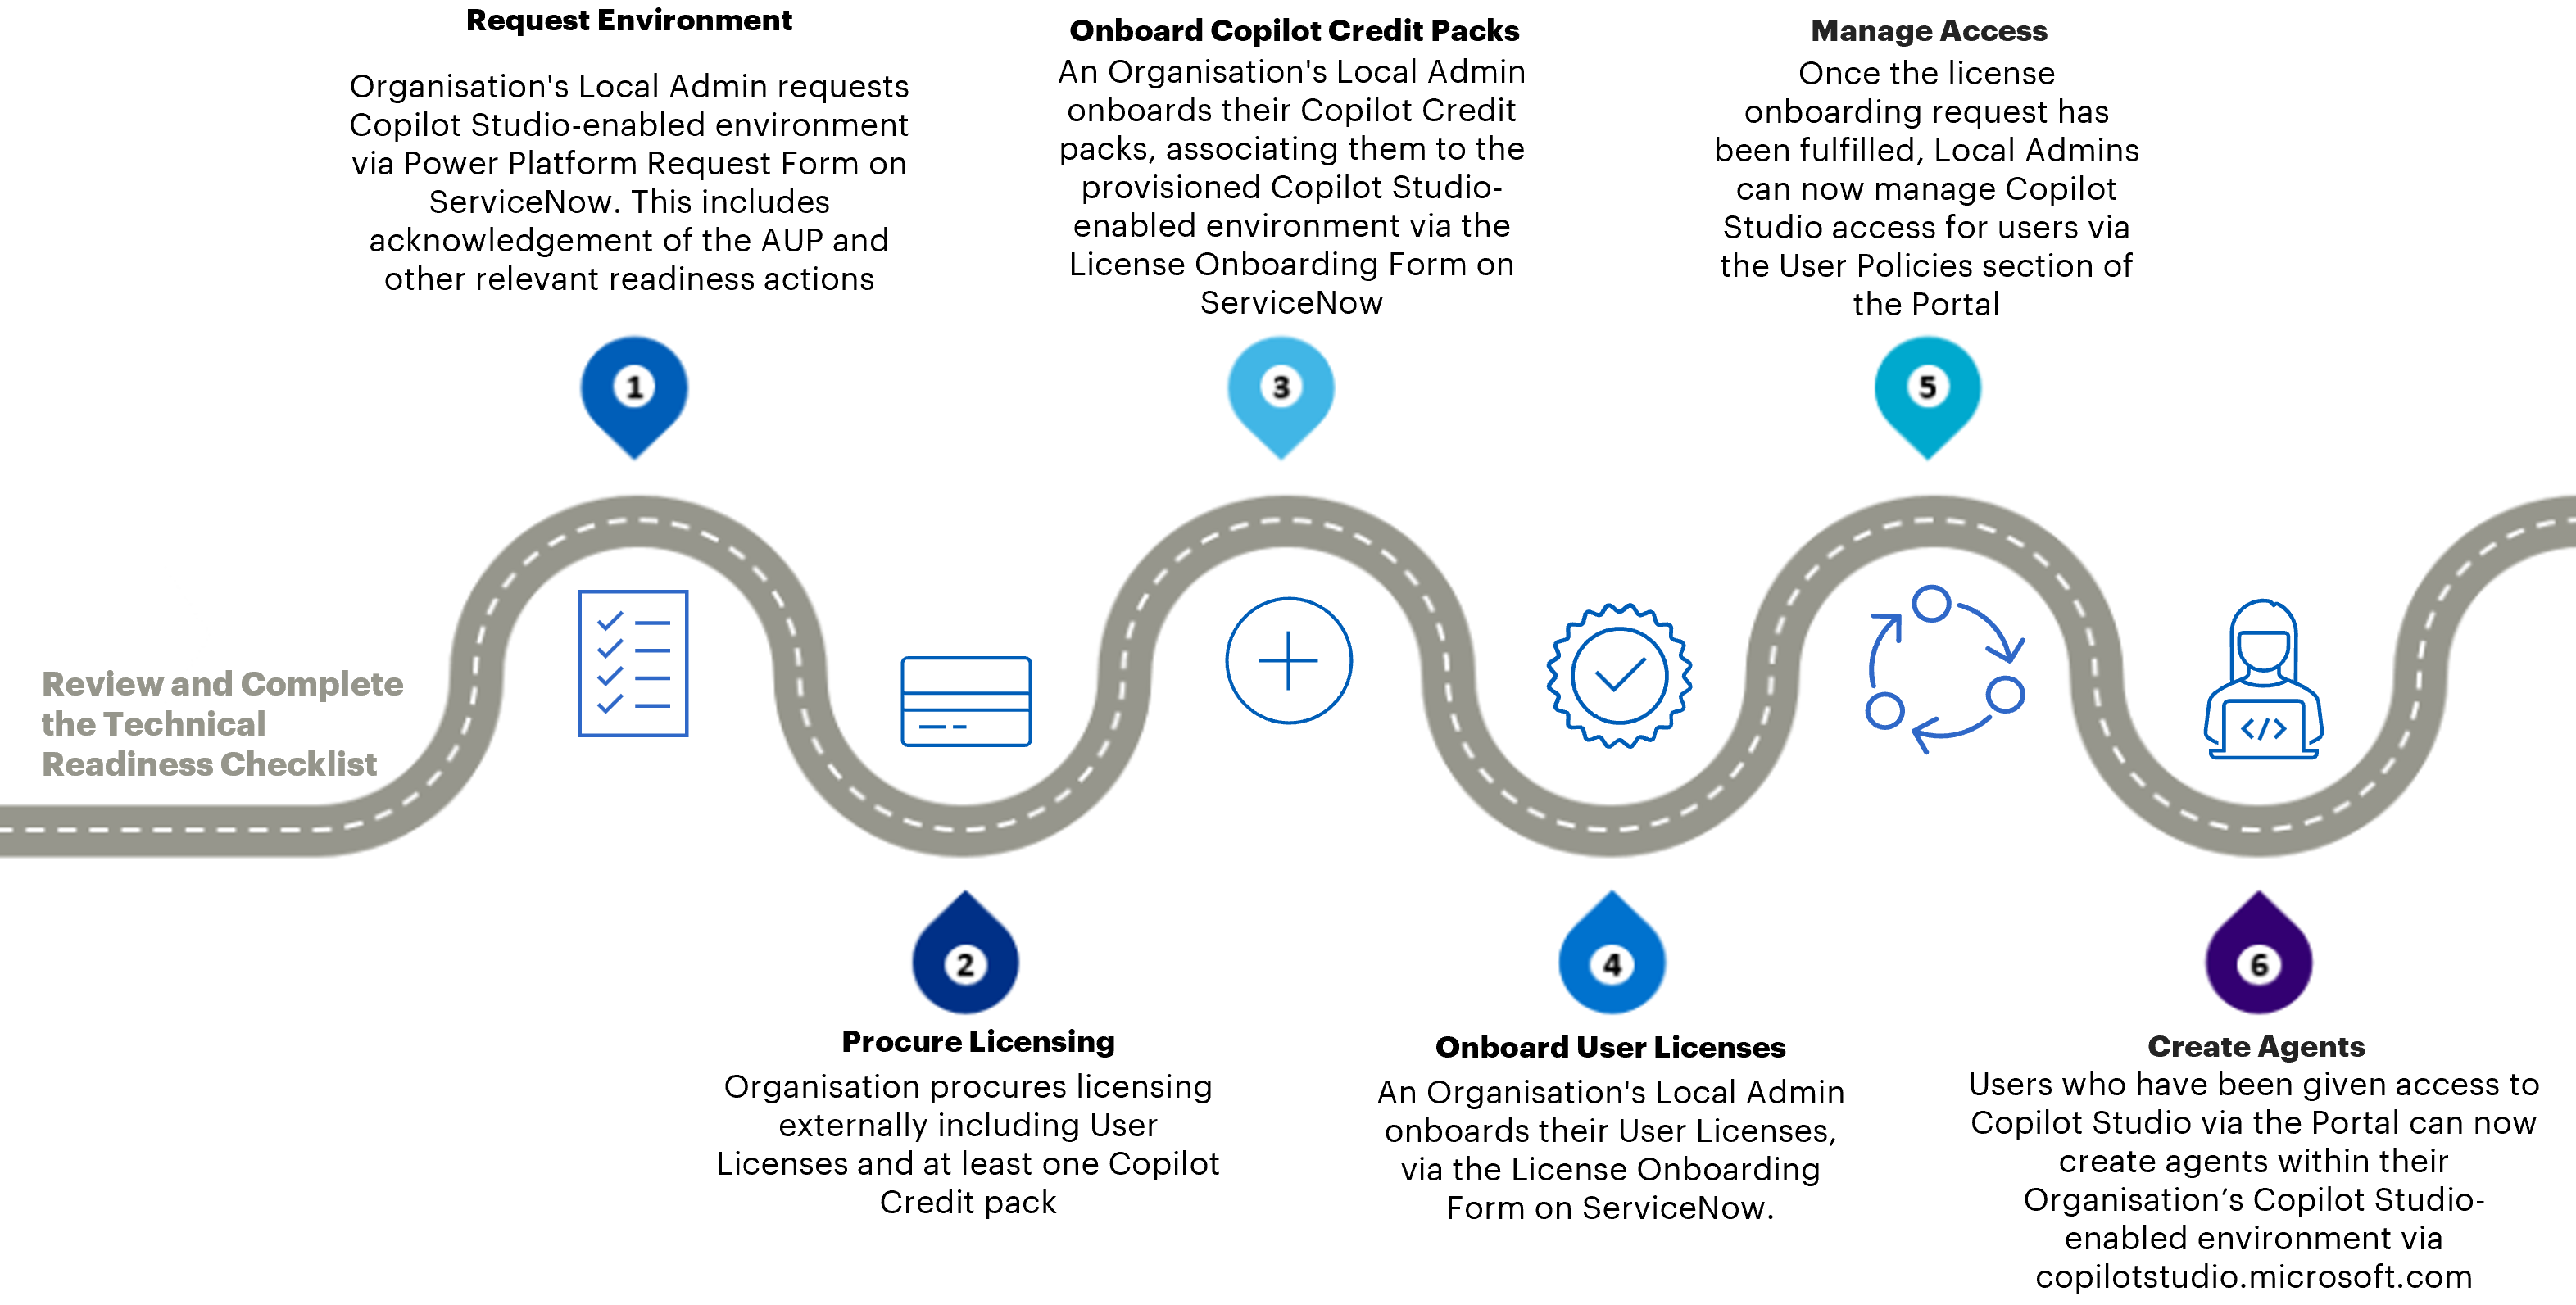
Step 1: Procure Licensing
Your organisation will need to have acquired your own licensing externally through your License Service Provider (LSP). You will need to have:
- Copilot Studio User licences
- Copilot Credit pack- Copilot Credit capacity packs should be purchased for the anticipated number of Copilot Credits your agent is expected to consume each month.
The specific Product Name for these two licenses is listed in the table below. When acquiring licensing, make sure that the Product Name matches those in the table below to avoid acquiring the incorrect licensing as licenses not detailed below are incompatible for onboarding on to the NHS.net Connect tenant.
| License Type | Product Name |
| User License | Microsoft Copilot Studio User License |
| Copilot Credit Pack | Microsoft Copilot Studio License |
Step 2: Request an Environment
A NHS.net Connect Local Administrator from your organisation must request a Copilot Studio–enabled environment by submitting a Power Platform Request Form via ServiceNow (SNOW).
When requesting environments, organisations must select whether they want to use the basic or advanced Copilot Studio DLP policies (see the Copilot Studio DLP Policy Article for details), which allow different connectors to be used. Upon enrolling an organisation into usage of Copilot extensibility functionality, the organisation will be expected to confirm acceptance of the AUP.
Make sure to follow the correct naming convention when requesting your Copilot Studio-enabled Environment. It must take the form of: <Org> – <ODS> – CS – <Environment Name> – <Environment Type>.
The template values are defined as follows:
| Template Value | Description |
| <Org> | Is the name of the organisation that owns the environment |
| <ODS> | Is the ODS Code of the organisation that owns the environment |
| <Name> | is the name given to the environment by the organisations e.g. HR Test |
| CS | CS is a static string to denote that this is a Copilot Studio Environment |
| <Environment Type> | is the definition of environment type e.g. Sandbox, Prod, Developer |
To request a Copilot Studio-enabled environment:
- Access Helpdesk Self-Service, using your NHS.net Connect account (Organisations will not be able to trigger this request via email/ phone).
- Once on the homepage of Helpdesk Self-Service, choose Raise a Request.
- Ensure that you have purchased 2GB of Dataverse capacity(CDS Database Capacity Sub Add-on) and 2GB File Capacity(CDS File Capacity Sub Add-on) to allow your environment to be created, as you will need to attach the evidence to your environment creation request.
- Ensure that you have created a security group for access to the environment. For more information on creating and managing security groups, refer to Managing NHSmail Security Groups – NHSmail Support
- Consider which DLP Policy you want for your environment. You can read more about what connectors are available in Copilot Studio DLP Policy – NHSmail Support
- Navigate to the Power Platform Request form and select ‘Create a Copilot Studio Enabled Environment’ from the request type drop down. Complete the fields within the form and submit the request. It may be useful to refer to Power Platform Environments – NHSmail Support to decide on certain environment configurations, such as whether you want sample apps an data, and whether you need a sandbox, trial or production environment. Keep in mind that as a Copilot Studio enabled environment, some configurations will be different to standard Power Platform environments.
- A Copilot Studio Environment request is created upon submission of ticket.
- Once the Copilot Studio-enabled environment request is completed, email confirmation of ticket completion/closure will be sent to the original requestor.
Once Copilot Studio-enabled environment request is completed, email confirmation of ticket completion/closure sent to the original requestor.
Step 3: Onboard User Licenses
Once you have onboarded your Copilot Credit Packs and associated them with a Copilot Studio-enabled environment, a Local Administrator can now revisit the Licence Onboarding Form on SNOW to onboard their Copilot Studio User Licenses.
To onboard per user licensing:
- Access Helpdesk Self-Service using your NHS.net Connect account (Organisations will not be able to trigger this request via email/ phone).
- Once on the homepage of Helpdesk Self-Service, choose Raise a Request.
- Navigate to the Licence Onboarding form, and click ‘Add’ in the ‘Select Licence’ field to add Copilot Studio User License.
- Fill in the remaining fields within the form and submit the request
- Once your licences are onboarded, you will receive email confirmation of ticket completion/closure
- LAs will now be able to manage access to Copilot Studio for users via the Portal
Step 4: Onboard Copilot Credit Packs (Optional)
Once the environment has been provisioned and if Copilot Credit pack licensing has been procured, a Local Administrator should complete the Licence Onboarding Form on SNOW.
This form will allow you to onboard Copilot Credit packs to your organisation.
To onboard Copilot Credit packs:
- Access Helpdesk Self-Service using your NHS.net Connect account (Organisations will not be able to trigger this request via email/ phone).
- Once on the homepage of Helpdesk Self-Service, choose Raise a Request.
- Navigate to the Licence Onboarding form, and click ‘Add’ in the ‘Select Licence’ field to add Copilot Credit Packs.
- Fill in the environment allocation field. Copilot Credit Packs need to be allocated to a specific Copilot Studio-enabled environment to be properly onboarded
- Fill in the remaining fields within the form and submit the request
- Once your licences are onboarded, you will receive email confirmation of ticket completion/closure
Step 5: Manage Access
After the licensing onboarding request is fulfilled, Local Administrators can manage user access to Copilot Studio through the User Policies section of the Portal and through managing the security group for their Copilot Studio enabled environment.
Step 6: Create Agents
Users who have been granted access can begin creating Copilot Agents within the organisation’s Copilot Studio–enabled environment by visiting copilotstudio.microsoft.com. Refer to How to Guide for Agent Building and Microsoft Learn guidance on building Agents.
4. Find out more
- How to Guide for Copilot Extensibility Management
- How to Guide for Agent Building
- Copilot Extensibility FAQs
- Copilot Studio DLP Policy
- Copilot Extensibility Guardrails
For support around the Copilot Extensibility service, please raise an O365 support ticket, specifying Copilot Agents as your application/component, or reach out to the NHS.net Connect Help Desk, citing Copilot Studio in your request.
| Last Reviewed Date | 01/06/2026 |