To successfully use the Virtual Wards Questionnaire App and automatically configure your Virtual Ward in MS Teams, you will first need to add the nhsdigital.coe@nhs.net automated account to your Team.
Below is a preview of the App with instructions on completing each step.
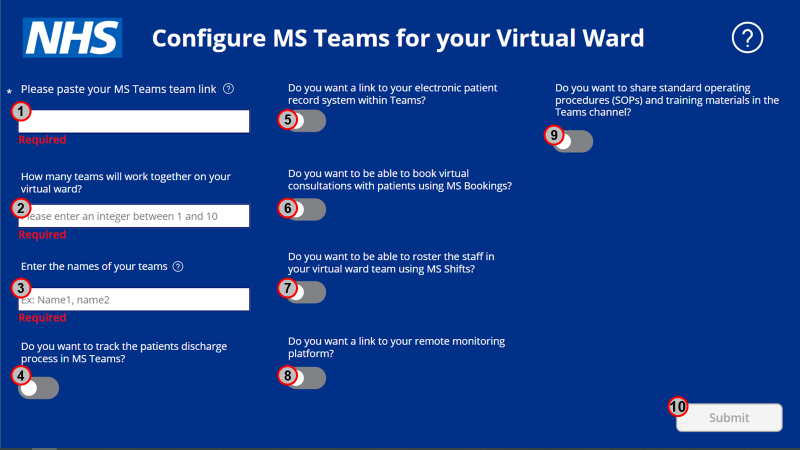
Please follow the instructions below to use the Virtual Wards App to set up your Virtual Ward in MS Teams.
- Paste the link to your Team here.
- This field informs how many additional channels are created. While it may be useful to have one channel for each team, you can also specify the number of channels that makes the most sense for your Virtual Ward. Please note that this is not fixed, and you can add more channels to your team at a later date as needed.
- This field informs the titles of the additional channels you specified in field #2. Please note that the names should be comma-separated (please do not include a comma within a team name as this will create two separate teams), and the number of comma-separated names should match the number you entered for field #2.
- Click this toggle to add a patient discharge tracker to your new Virtual Ward.
- Click this toggle to be able to access your electronic patient record system from your new Virtual Ward team. Please note that your EPR system needs to be Web-based (i.e., accessible from a Web-browser). When you click the toggle, you will see two new fields to 1) add a title for your EPR system, and 2) paste the URL for your EPR system. Please note that if you access MS Teams from your Web-browser, your EPR system may not display correctly – for optimal viewing, please access MS Teams through the Desktop App.
- Click this toggle to enable Virtual Visits for your Virtual Ward. Virtual Visits is a tool that integrates MS Teams with MS Bookings to easily book, manage and carry out virtual patient consultations. Find out more about Virtual Visits here: Virtual Visits and Microsoft Bookings.
- Click this toggle to enable MS Shifts for your Virtual Ward. Use MS Shifts to manage scheduling and rostering for your team. Find out more about Rostering with MS Shifts here: Using MS Shifts to roster health and care staff.
- Click this toggle to be able to access your remote monitoring platform from your new Virtual Ward team. Please note that your remote monitoring platform needs to be Web-based (i.e., accessible from a Web-browser). When you click the toggle, you will see one new field to paste the URL for your remote monitoring platform. Please note that if you access MS Teams from your Web-browser, your remote monitoring platform may not display correctly – for optimal viewing, please access MS Teams through the Desktop App.
- Click this toggle to automatically create two new folders in the dedicated SharePoint site for the Virtual Ward. Using these folders, you can share documents that your team can view and collaborate on.
- Once you have completed all of the required fields, this button will turn blue and will be ready to click. If you have filled in all of the details for your team but the button is still grey, please check that the number of teams and the number of team names match, and that your Team ID is valid.
If you have any problems completing the questionnaire or using the App, please contact nhsdigital.coe@nhs.net.
| Last Reviewed Date | 25/04/2022 |