Licensing Enablement
1. Enterprise Subscription Agreement (ESA) Setup
Before proceeding with the Microsoft Fabric configuration, organisations must ensure the following prerequisites:
Agreement Signed: An active Enterprise Subscription Agreement (ESA) must be in place between Microsoft and the NHS organisation.
Enterprise Administrator: The designated will sign in to the Azure portal using their local tenant account associated with the ESA. Important Note: The first time you sign in as the Enterprise Administrator, you may be prompted to select a billing scope for your account.
To find out more information on billing administration, visit EA Billing administration on the Azure portal – Microsoft Cost Management | Microsoft Learn
1.1 Activate your enrolment
To activate your enrolment:
Enterprise Administrator Sign-In: The initial enterprise administrator signs in to the Azure portal.
- If you are the enterprise administrator, you can directly activate the enrolment without needing an invitation email.
1.2 To activate an enrolment
a. Sign in to the Azure portal.
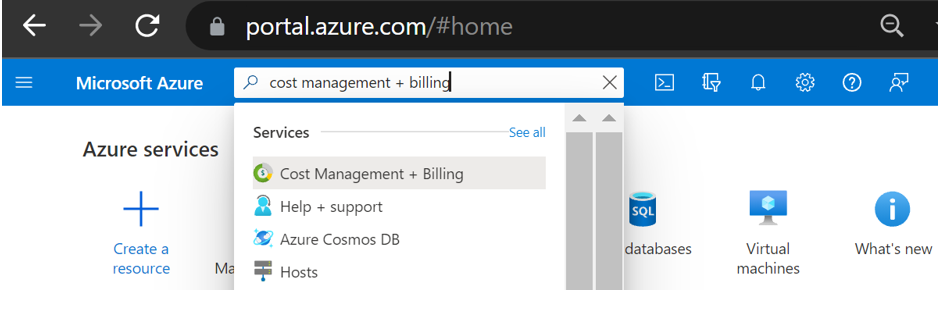 b. Search for Cost Management + Billing and select it.
 c. Select the enrolment that you want to activate.
d. Once the enrolment is selected, status of enrolment is changed to active.
e. You can view the status of enrolment under Essentials on Summary view.
Billing Scope Selection: Upon sign-in, select the appropriate billing scope for your enrolment.
1.3 Switch billing scope in the Azure portal (optional)
a. Sign in to the Azure portal.
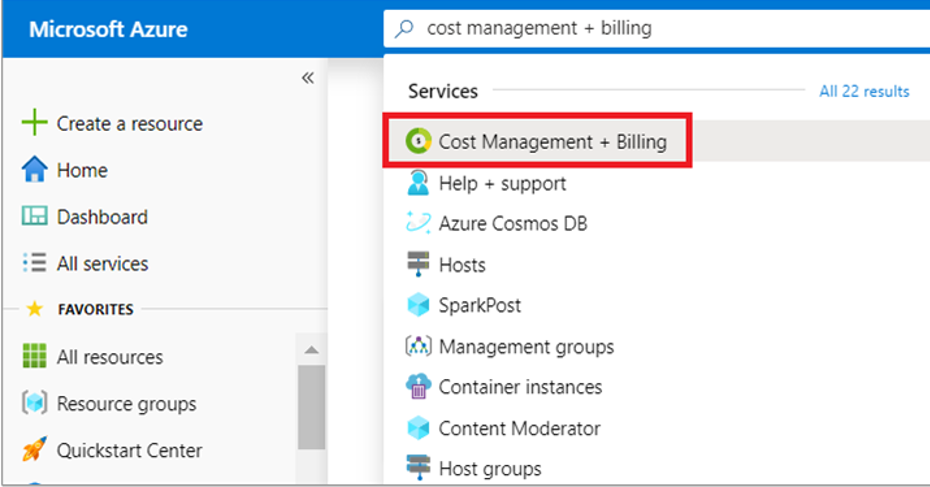 b. Search for Cost Management + Billing.
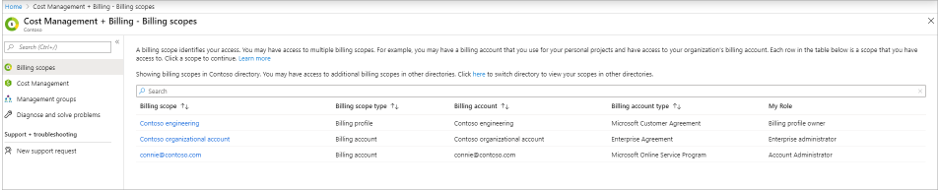
 c. In the overview page, select Switch scope.
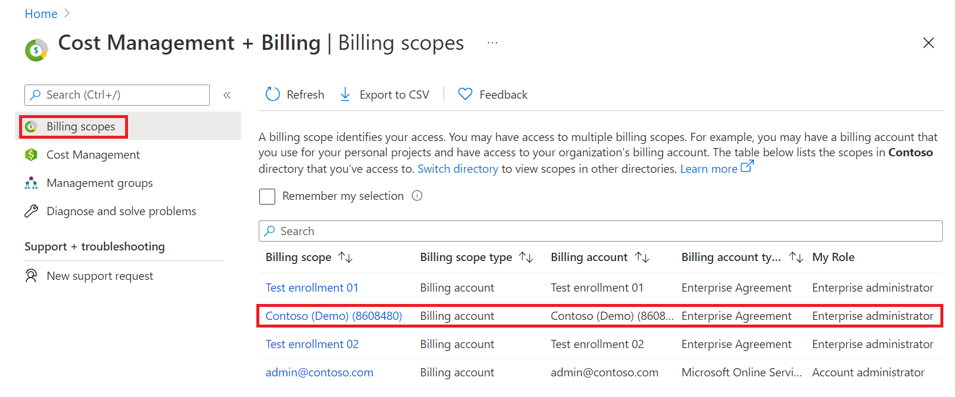
 d. To view details, select a scope.
Warning
Be advised that you can benchmark your usage before setting up a reservation (Annual Billing). Initial subscription configuration will be set up as Pay as You Go (PAYG), as a of the local tenant you will have the flexibility up front to change the capacity need while using a PAYG service. Thereafter, to avoid being charged on PAYG and secure discounted pricing on an annual committed basis, set up a reservation on the capacity size you have chosen.
Navigate to Azure Billing to create a reservation for a year. You will now be charged under the agreement from the reserved instance.
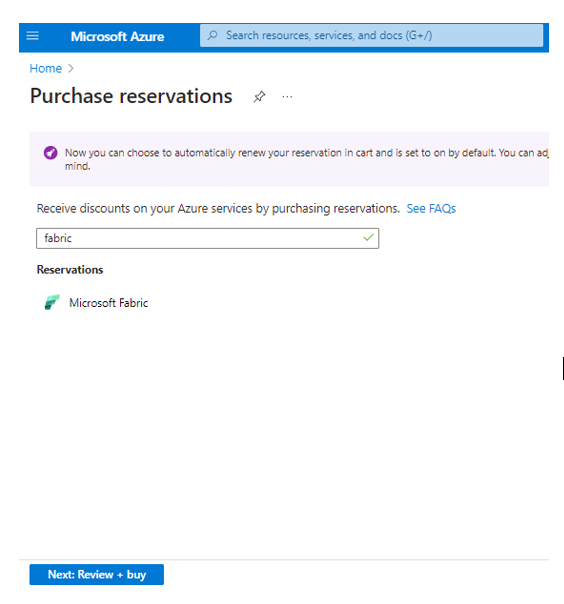 You can go to the Azure portal reservations to purchase a reservation for Fabric.
Please speak to your LSP to understand more about Fabric capacity licensing and billing on your own ESA.
2. Creating and Managing Subscriptions Roles Required:
Enterprise Administrator or Account Owner can create new subscriptions in the local tenant.
Steps to Add a Subscription:
a. Sign In to the Azure Portal: Use an account with required permissions above to access the Azure portal.
b. Navigate to Cost Management + Billing: In the Azure portal, go to Cost Management + Billing.
c. Select Billing Scopes: In the left-hand menu, select Billing Scopes, and choose the billing account scope associated with your enrolment.
d. Select Accounts: In the left menu, click Accounts and select the enrolment account where you want to create a new subscription.
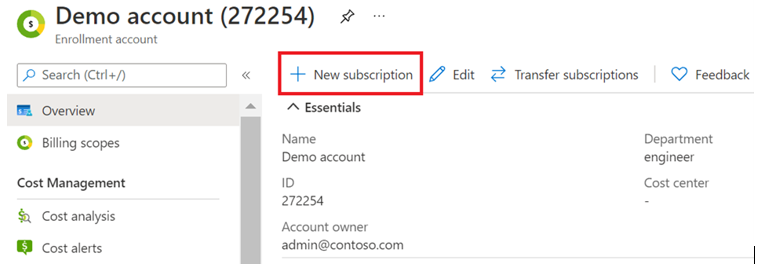 e. Create a New Subscription: On the enrolment account page, click+ New Subscription.
f. Enter Subscription Details: Enter a Subscription Name and click Create.
3. Adding Fabric Premium Capacity
For organisations to start using Microsoft Fabric, the following steps must be followed:
a.Create Subscription Using central tenant @nhs.net Account: Ensure that the Azure subscription is created using a central tenant @nhs.net account with an assigned fabric licence (e.g. free or pro Fabric). Synchronised accounts using cross tenant sync or guested user can be used.
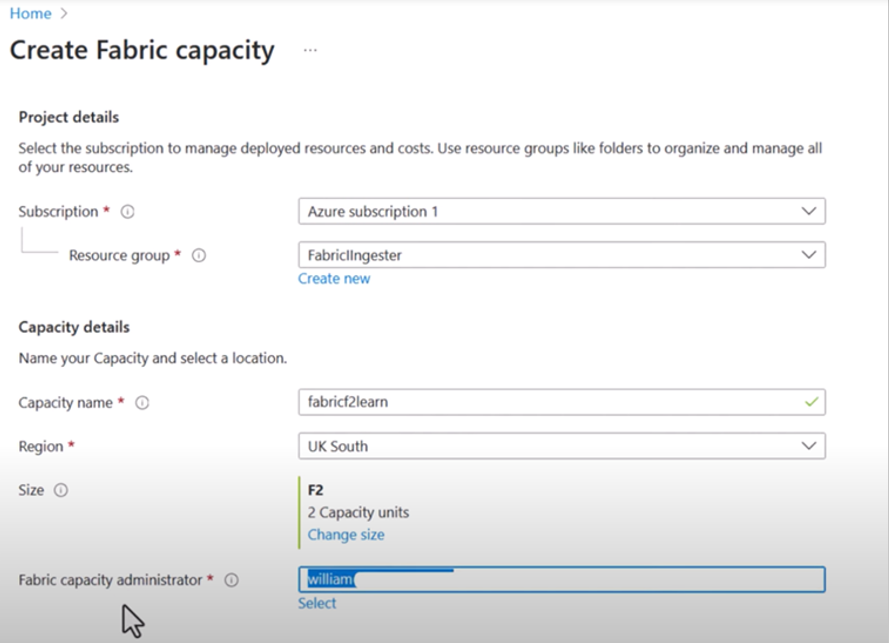
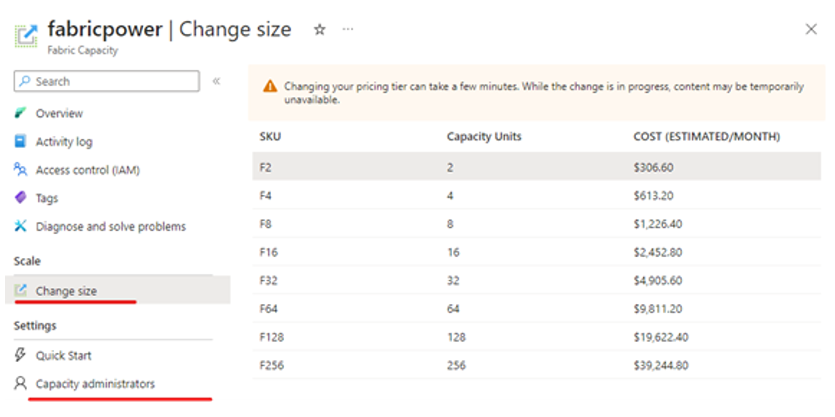
b. Deploy Fabric SKU: Organisations must deploy the appropriate Fabric SKU based on their requirements. It is recommended to choose the F64 SKU for optimal capacity support and the ability for free Fabric users to view reports.
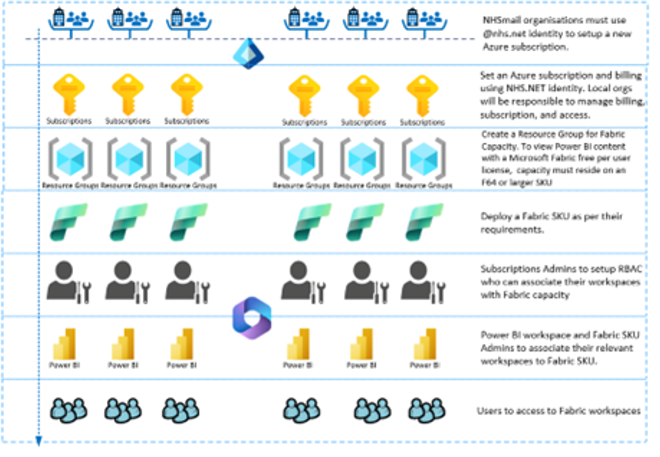
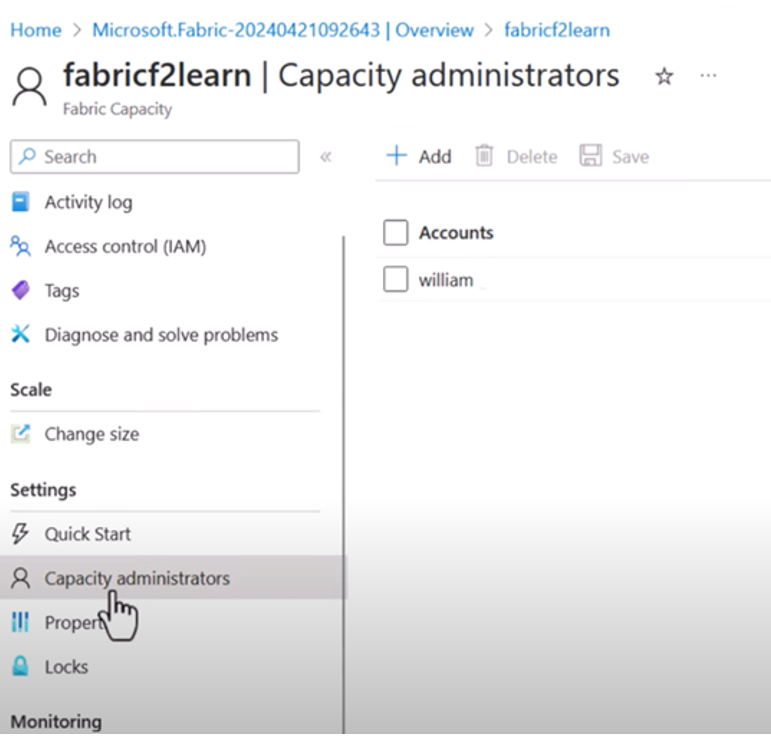
c. Add Additional Capacity Owners: After the Fabric SKU is deployed, the (the user who created the subscription gets this role by default) can add additional capacity owners via the Azure portal.
4. Managing Fabric Admin and Capacity
a. Access Fabric Admin Portal: Go to Fabric Admin portal and log in with your administrator account.
b. Fabric Admin Portal Settings:
– You need a Fabric License to access the “Admin portal”
– Admin roles required:
-
-
- Global Administrator
- Power Platform Administrator
- Fabric Administrator
-
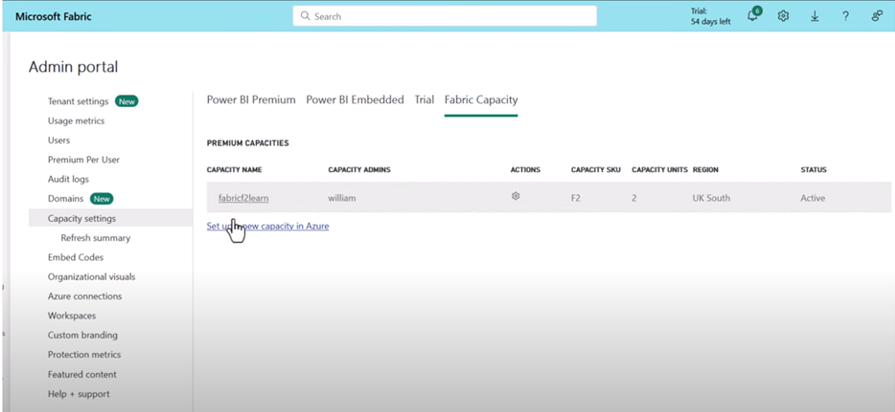
c. View Provisioned Capacity: In the Fabric Admin portal, you can view the provisioned capacity.
d. Add Capacity Administrators: From the Fabric portal, you can add new capacity administrators by selecting + New Capacity Administrator.
5. Linking Workspaces to Premium Fabric Capacity
To link workspaces to the premium fabric capacity:
a. Log In to Fabric Admin Portal. : Use an account with Fabric Admin access.
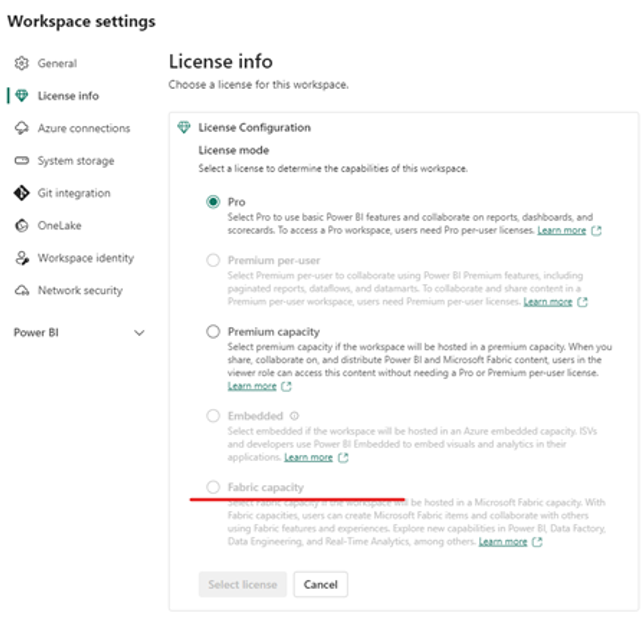
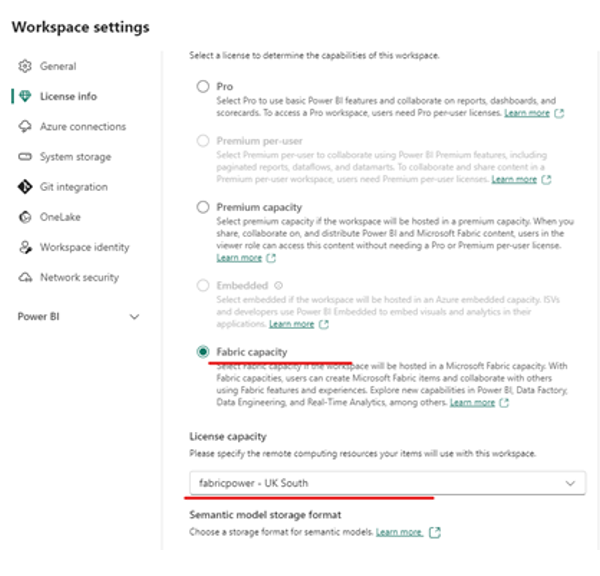 b. Select Fabric Capacity for Workspaces: In the Fabric Admin portal, navigate to the workspace settings.
The workspace is now linked to Premium fabric capacity.
c. Confirm Workspace Linkage: Once the workspace is linked, it can utilise the available Premium Fabric resources for processing and storage.
6. Enable Microsoft Fabric for Your Organisation
Follow the steps below to enable Microsoft Fabric for your tenant:
a. Navigate to Tenant Settings: In the Fabric Admin Portal, go to Tenant Settings.
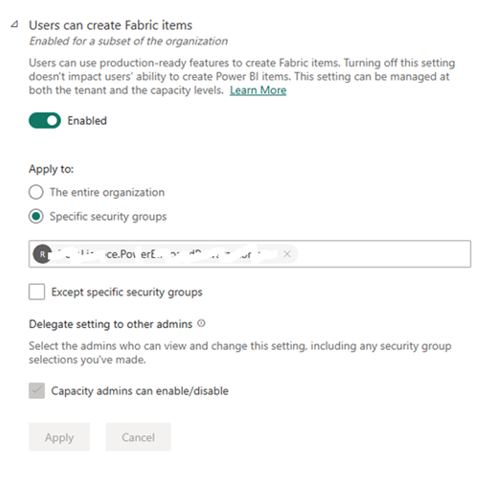
b. Enable Fabric Item Creation: In the settings, locate Users can create Fabric items and toggle the switch to Enable.
c. Optional Security Group Settings: You can select specific security groups if you want to restrict access to certain users.
d. Apply the Changes: Click Apply to finalise the configuration. To learn more, please visit Enable Microsoft Fabric for Your Organization – Microsoft Learn.
7. Policy and Monitoring
Azure Policy can be leveraged to restrain users from creating resources outside of Power BI and Fabric. This can be paired with Azure Monitor to track unauthorised resource creation attempts. By utilising this, you can prevent excess charges to the subscription outside of the Power BI and Fabric scope.
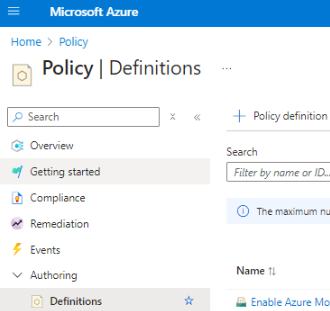
Azure Policy
A custom azure policy should be defined to restrict the allowed resource types to only PowerBI and Fabric
You can create one by searching for the resource Policy, within Authoring select the Definitions blade, then selected + Policy Definition
Assign this policy to your subscription (Search and select the policy → Assign Policy → Review + Create) where you want these restrictions applied.
Azure Monitor
Azure Monitor Activity Logs can capture all resource creation attempts, including failed ones due to the policy restriction from above.
- Go to Monitor → Alerts → + Create → Alert rule.
- Select your Subscription as the Scope
- Select ‘deny’ Policy action. (Policy evaluation) as the signal.
- Within Actions, Create an action group to notify you (email, SMS, webhook, etc.) when an unauthorised attempt is logged.
- Select Review + Create
| Last Reviewed Date | 08/07/2025 |