
HoloLens 2 enrolment in Intune
The section below covers the steps Local Administrators should follow to enrol HoloLens 2 devices in Intune via Autopilot
Register the device through Microsoft Endpoint Manager (MEM)
Once you have obtained the HoloLens 2 device hash, you will need to register the device through MEM. Autopilot devices that are not yet enrolled are listed by using the device serial number as the device name.

1. In Microsoft Endpoint Manager admin centre, select Devices > Windows > Windows enrolment. Next, select Devices > Import under Windows Autopilot Deployment Program
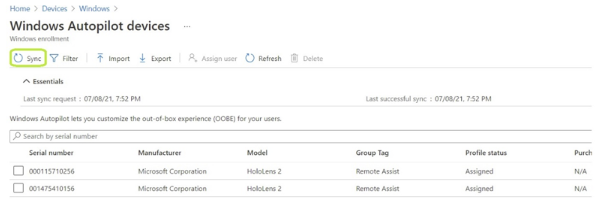
2. Under Add Windows Autopilot devices, select the DeviceHash .csv file, select Open, then Import
3. After the import finishes, select Devices > Windows > Windows enrolment > Devices > Sync. The process might take a few minutes to complete, depending on how many devices are being synchronised. To see the registered device, select refresh
Device Enrolment Process-User Experience
Please allow 15 minutes for synchronisation after importing the device into MEM, then initiate Autopilot on the device.
Autopilot experience requires internet access. Please use one of following options to provide internet access:
- Connect your device to a Wi-Fi network in the Out-Of-Box Experience (OOBE) and let it detect Autopilot experience automatically. This is the only time the user needs to interact with OOBE until Autopilot experience completes on its own
- Connect your device with Ethernet using USB-C to Ethernet adapters for wired internet connectivity and let HoloLens 2 complete Autopilot experience automatically
- Connect your device with USB-C to Wi-Fi adapters for wireless internet connectivity and let HoloLens 2 complete Autopilot experience automatically.
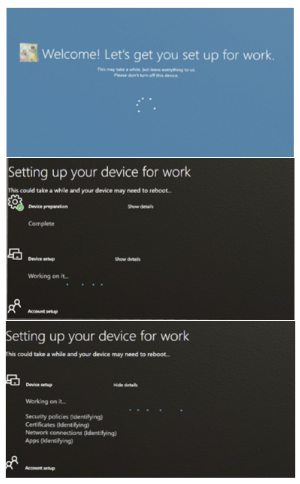 The device should automatically start the OOBE. Do not interact with OOBE. Let HoloLens 2 detect the network connectivity and allow it to complete OOBE automatically. The device may restart during this process. The OOBE screens should resemble the following:
Device log in
Once you have enrolled your HoloLens 2 device in Intune following the Autopilot steps above, please log into the device using the following steps:
- A Windows Sign In option will display. Select Add Account and you will be prompted to sign in.
- Enter your nhs.net account, and you will be prompted to the NHS authentication page. Enter the password.
- The eye calibration process starts again. Follow the steps. The Iris sign-in process then starts. Select Next. Once completed, select Done.
- You will be prompted with MFA code authentication (this is a standard NHS setting related to Azure AD accounts).
- As part of Windows Hello, you will be prompted to setup a PIN. Once completed, you can log in using the chosen PIN.
- The device is prompted to enable speech recognition. Select Accept. The guidance on how to use the Start Menu is then prompted. Setup is now complete.
Device Ownership
It is not possible to have multiple admins, and technically there is not a device admin. The first account that registers on the HoloLens during the Autopilot process becomes the device owner. There is not much difference from this user to others except that this user could delete other accounts if needed.
Intune device management
Resetting HoloLens 2 Devices
If a HoloLens 2 device was enrolled with an Azure AD account or Autopilot, it cannot be unenrolled from Intune. To remove HoloLens from Azure AD or re-join it to a different to Azure AD tenant, the HoloLens device must be reset or reflash. Any HoloLens devices joined to another tenant need to be unenrolled ahead of being enrolled again in the NHSmail central tenant. If this applies to any devices in your organisation, please follow the steps below.
Reset the device manually from HoloLens 2
 Turn on the device and navigate to Start Menu > Settings > Update & Security > Reset & Recovery > Reset device.
Delete Intune Device Object
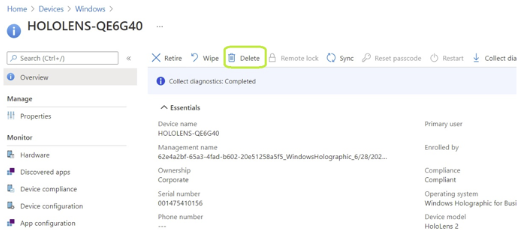 From Admin Center Tenant Administration navigate to > Devices> Windows devices > Select ‘device name’ > Click on delete.
Removing device from Autopilot enrolment (hardware hash)
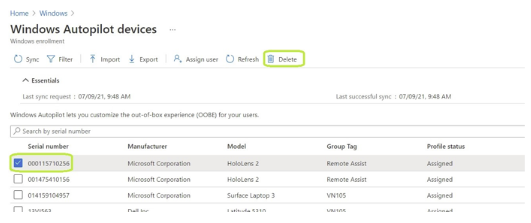 From Admin Centre Tenant Administration navigate to > Devices> Windows devices > Windows enrolment > Devices > Select ‘device’ > Click delete.
Please visit the HoloLens 2 Device Enrolment document for more details.
| Last Reviewed Date | 14/03/2024 |